I’ve been spreading the Good Word of RxJS for over a year now. Angular has baked it into actions from Http, notifications for form and field changes, and made it part of the immutable update strategy (piping @Input observables to async, etc.)
But using it in anger, I found I needed a more involved example to put it through its paces.
This week to celebrate ng-conf 2017, I’m making a Web Audio-based game, Drum Legend, public on GitHub. The game uses a separate (also public) API I’m working on, ng-webaudio-synthesizer. I didn’t write these apps to make them highly polished and ready to sell, I made them to help explain how to work on multi-NPM-module Angular applications, web audio, obserables and the Redux pattern with NGRX Store.
Overall Architecture
The Drum Legend, an Angular application, uses Chrome’s WebMidi API to subscribe to an USB drum trigger pad to implement a Guitar Hero kind of game. The generated MIDI event data is fed to an RxJS observable stream, passing various commands as instances of TypeScript classes.
From there, two things happen. First, I configure the synthesizer API to generate an audio sample to play a snare drum for the left-hand stroke, and a tom for a right-hand stroke. I do this by subscribing to the event data stream and watching for a specific message for each type of drum, then send the synthesizer the request to play the sounds when the messages arrive.
Another subscription is fed into a state machine, written in the awesome NGRX Store lirary, that manages the state of the game.
The MIDI-to-WebAudio Pipeline
What I’m building here is a pipeline of sorts – input feeds an observable, and is consumed by a number of observers for things like audio output and gameplay.
Since it’s all reactive, and event driven, I wasn’t surprised to see how well it performed. I could actually do a basic buzz roll on the pad and the application kept up with me, not locking up and not ending up with memory leaks. That’s pretty impressive.
I have purposely decoupled the input from the output; all of our messages generated and sent through our synthStream$ Observable object, are typed objects, and not native MIDI data. This way, we can test the synthesizer and play notes from pure JavaScript API calls, buttons in Angular components, and the like.
What’s in this series?
Throughout this series of blog articles, I’ll outline a number of techniques I used to put the game together, including:
- An overview of how WebAudio works and decoupling note requests from audio output (this article)
- How to connect to MIDI with Chrome
- How to externalize a library into a separate NPM module, providing the proper TypeScript types and use it from an Angular CLI-based project
- How to create a game, using NGRX Store and NGRX Effects to manage state and Angular components to provide the user interface
The WebAudio API using RxJS Observables
The rest of this article shows how to craft an Angular service to provide a musical synthesizer using Chrome's WebAudio API, Angular and RxJS.
What is WebAudio?
WebAudio is a W3C Public Draft standard, with implementations available on Chrome, Firefox, Edge, and Android, and Apple Safari-based WebKit browsers (though accessing the API via WebKit involved using the webkit prefix).
WebAudio provides audio playback via raw audio samples, as well as sound generation via oscillators (waveforms piped to your speaker). As an API it is a bit overly object-driven and nesty. But it is the de-facto way of making noise in a browser.
The AudioContext node
Everything is driven from an AudioContext node. The way you get an audio context varies. For Chrome, IE and other standards-compliant browsers:
const audioContext = new AudioContext();
For browsers based on webkitAudioContext (Safari for example), see the AudioContext Monkey Patch library or use webkitAudioContext like this:
const audioContext = new webkitAudioContext();
Once you have an audio context, you can use it to configure your audio processing pipeline. The first step (depending on which direction you start, input or output), is to wire up a destination, or a place to output your noises.
The Destination node
A destination node (of type AudioDestinationNode) represents the final output of the Web Audio API – your speaker, headphones or other audio output device.
const destination = audioContext.destination;
By default, anything sent to the destination is played at full volume. That is probably not a good idea – with multiple tones or samples, you may actually distort the output channel and certainly it would be better to lower the volume at first attempt.
Controlling Volume with a Gain node
We can set up a Gain object, of type GainNode, which acts as a volume limiter, and set its gain.value property to control the level of output:
const gain = audioContext.createGain();
gain.gain.value = 1.0;
This gain node does nothing by itself. It’s not hooked to anything yet. So, lets connect it to the destination:
gain.connect(destination);
So now we have a gain node, which is wired to the destination. (Start singing the leg-bone-is-connected-to-the-thigh-bone song here…
Making Noise with an Oscillator
Finally, we can make a noise by creating an oscillator from our context. An oscillator generates a tone with a specific waveform and frequency.
const oscillator = audioContext.createOscillator();
oscillator.type = 'sawtooth';
oscillator.frequency.value = 440;
We need to connect this oscillator to something, so lets connect it to the gain node – forming a complete audio pipeline.
oscillator.connect(gain);
And to make our oscillator ring, we can start it:
oscillator.start();
This is obviously something we should put behind a service. We haven't even talked about how to make it stop, or how to fade it in or out. So naturally, we'll put this work behind an Angular service and abstract it.
Wrapping WebAudio Tone Generation with RxJS and Angular Services
Let's front-end our audio API with a set of services. You can find my (work in progress) GitHub project at ng-webaudio-synthesizer, which is deployed as a npm module named ng-webaudio-synthesizer if you want to play with it yourself.
We will use the 's RxJS API, which is included in the Angular platform to provide an observable object representing actions to take in our audio synthesizer.
If we imagine our synthesizer as the 'back end' or tone generator for a musical keyboard, we'd have to provide polyphonic (more than one note at a time) sound for up to 88 keys. And we'd need to let the player play multiple keys at roughly (according to our perception at least) the same moment. We'd need to be able to do things like start a key’s oscillator when a key is pressed, stop it when the key is released, and pay attention to commands like volume control changes and changes to oscillator settings.
Overall architecture
We can view our audio synthesis engine as a pipeline of note data, starting from various sources such as Midi or an arbitrary JavaScript note playing API, and ending with the tone generation using the WebAudio API:
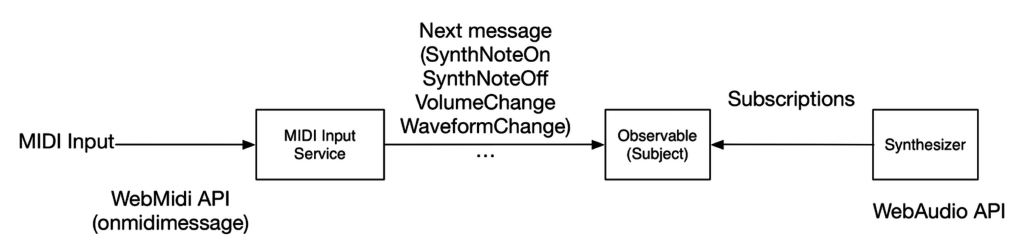
Requests to play notes are submitted as typed messages to a message-bearing object, in our case a Subject (type of Observable), which then delivers the notes and other instructions to a service that plays them.
Let’s define the data we’ll send through this system – messages to start and stop musical notes, adjust volume and waveform data, and play samples.
Most message-based systems take various types of messages, typically developed as either typeless or typed data objects. We'll type ours as TypeScript objects. The base type is the SynthMessage. Here is the hierarchy:
export interface SynthMessage { }
export class SynthNoteMessage implements SynthMessage {
  readonly noteNumber: number;
  constructor(noteNumber: number) {
    this.noteNumber = noteNumber;
  }
}
export class SynthNoteOn extends SynthNoteMessage {
  constructor(public velocity: number) { }
}
export class SynthNoteOff extends SynthNoteMessage { }
export class TriggerSample implements SynthMessage {
  public instrument: string;
  public velocity: number;
  constructor(instrument: string, velocity: number) {
   this.instrument = instrument;
   this.velocity = velocity;
  }
}
export class VolumeChange {
  public level: number;
  constructor(level: number) {
    // hack due to arduino stupidity kenny
    this.level = Math.min(level / 127.0);
  }
}
export class WaveformChange {
  public waveForm: string;
  constructor(public rawValue: number) {
    switch (rawValue) {
      case 0:
        this.waveForm = 'sawtooth';
        break;
      case 1:
        this.waveForm = 'sine';
        break;
      case 2:
        this.waveForm = 'triangle';
        break;
      case 3:
        this.waveForm = 'square';
        break;
      default:
        this.waveForm = 'sawtooth';
    }
  }
}
Each message in our system has a particular purpose:
SynthNoteOn– Begin playing a note with its dedicated oscillatorSynthNoteOff– Stop playing a noteTriggerSample– Play a pre-configured MP3 sample file for a drum machine (which is part of the synthesis engine)VolumeChange– a request to modify the volume level of audio in the primary gain nodeWaveformChange– A request to change the waveform of all oscillators (which are attached toNoteobjects
Generating Audio
Now we have a way to send note start/end messages to our Observable. Next, we need to devise a system for playing those notes. First, let's look at the object we'll construct for each of the 88 notes on the music keyboard, Note:
export class Note {
  ...
  constructor(public noteValues: string[],
              private frequency: number) {
    ...
  }
  noteOn() { .. }
  noteOff() { .. }
}
We'll come back and fill more of this class out later… But for now, eyballing the code shows each instance of the class will be responsible for playing its own tones.
In WebAudio, oscillators are meant to be cheap to use, and we're creating a new one for each note pressed. That will be the job of each of these Note objects.
Wiring up the Notes
To create our note objects, we need a service. Enter the SynthesizerService:
@Injectable()
export class SynthesizerService {
  // hold onto our notes once created
  private notes: Note[];
  setup(audioContext: Context, synthStream$: Subject<SynthMessage>,
        audioBus: AudioNode) {
    // start by setting static values for all notes
    Note.configure(audioContext, synthStream$, audioBus);
    // now, configure each note object
    this.notes = [
      new Note(['C0'], 16.3516),
      new Note(['C#0', 'Db0'], 17.3239),
      new Note(['D0'], 18.3540),
      new Note(['D#0', 'Eb0'], 19.4454),
      ...
      new Note(['D8'], 4698.64),
      new Note(['D#8', 'Eb8'], 4978.03),
      new Note(['E8'], 5274.041),
      new Note(['F8'], 5587.652)
    ];
  }
}
So far we have:
- Message hierarchy:
SynthMessage->SynthNoteMessage->SynthNoteOn,SynthNoteOff MidiNoteService– creates ourNoteobjects and sets static information on theNoteclass definition that we can use to access common parametersNote– A wrapper for the audio oscillator that can play a tone
But we need to wire up subscriptions to our synthesis note stream in our Note objects to pay attention to the data coming in.
Let's elaborate a bit on the way we send messages via our Observables…
Observables – (Almost) Never-Ending Promises
Remember, an Observable is a stream of updates, initiated by a sender, and provided as an object with three callbacks – one for message receipt, one for error handling, and a final one that is called once the Observable is completed.
Many Angular APIs emit Observables – including Http, form and field changes, and libraries like NgRX Store, a Redux library for Angular.
To subscribe to a stream you'd write something like this:
const subscription =
   myObservable.subscribe(onMessage, onError, onComplete);
function onMessage(message: MessageType) {
  // do something with the message
}
function onError(error: Error) {
  console.log(error);
}
function onComplete() {
  // do cleanup if needed
}
// In two seconds, stop listening
setTimeout(() => {
  subscription.unsubscribe();
}, 2000);
Observables take the place of promises when the API requires zero or more answers to be delivered. If you used to use the update parameter of AngularJs's $q promise API, this will feel vaguely familiar. But, even more than being a stream-replacement for promises, we can compose and aggregate/filter data coming from observables, in a functional way.
And we're going to do exactly that: for each note, we're going to subscribe it to the stream of messages for its given keyboard note number, and only subscribe to the message type that we want to operate on.
A word about Subjects
A Subject is an Observable that can be programmatically used to both Observe (watch/subscribe) and provide data that can be observed (the Subject).
The base class, Subject, introduces a next(object) function. If we want to send an observation down to subscribers of the new Subject observable, we just call next:
function generateNumbers(): Subject<number> {
    // send a value every 1/10th of a second, quit after 20 seconds
    const mySubject: Subject<number> = new Subject();
    let counter = 0;
    const interval = setInterval(() => {
    counter = counter + 1;
    mySubject.next(counter);
    }, 100);
    setTimeout(() => {
        clearInterval(interval);
    }, 20000);
    return mySubject;
}
Anything subscribing to mySubject will be barraged asynchronously every 10th of a second with a new number – in this case, for up to 20 seconds. That is if they subscribe in time. Which leads me to…
Additional Subject Implementations: ReplaySubject and BehaviorSubject
There are two interesting Subject variations – the ReplaySubject and the BehaviorSubject. In the case of BehaviorSubject, it keeps track of the last known value, which it cheerily sends to the subscriber upon connection. You would need to feed an initial value to the BehaviorSubject in the constructor.
The ReplaySubject is useful when you want to keep a buffer of the last n delivered values. Upon connection, all of the last n (configured by the constructor) values are returned. In this way, you can keep somewhat of a history of the activity, and access it by connecting a subscriber to the observable.
So, to make an Observable that keeps the last 10 entries:
const myReplaySubject = new ReplaySubject<number>(10);
And now any subscription will get up to the last ten values delivered immediately on connecting with the observable.
Subscribing to Messages and Making Noise
Let's see how we can subscribe to our subject and act upon various messages. In the Note constructor we had a comment where we'd place our subscriptions. Let's dig into the constructor and its subscriptions:
constructor(public noteValues: string[], private frequency: number) {
  ...
    Note.synthStream$.filter((message: SynthMessage) =>
         message instanceof SynthNoteOn &&
         (<SynthNoteOn>message).noteNumber === this.midiNoteNumber)
      .subscribe((message: SynthNoteOn) => { this.noteOn(); });
    Note.synthStream$.filter((message: SynthMessage) =>
         message instanceof SynthNoteOff &&
         (<SynthNoteOff>message).noteNumber === this.midiNoteNumber)
      .subscribe((message: SynthNoteOff) => { this.noteOff(); });
   ...
Let's unpack these interactions. First, we ask our Note static member, synthStream$ to filter only the message types we are interested in, and then we subscribe to only those messages we care about.
In the subscription, we use the first closure (message delivered) to accept our message and mutate our Note object in some way. Subscriptions are cheap, so rather than build one subscription and use a case statement to decide, we just use several of them and act on the SynthNoteOn and SynthNoteOff messages. We also include subscriptions to manage various control messages as well, such as changing the synth waveform and volume level.
Now, making noise or stopping audio is as easy as calling those methods. For starting an oscillation, we grab a new oscillator and gain node, and start the oscillator immediately, ramping it to max volume based on an attack time in seconds, (zero by default in our synth). Next, we tell it to ramp down to the regular sustain volume:
noteOn() {
    const now = Note.context.currentTime;
    this.createOscillatorAndGainNode();
    this.oscillator.start(0);  // 0 = now
    // ramp up during attack time (how long to take
    // to get the note to full volume).
    this.gainNode.gain.linearRampToValueAtTime(
        this.volume, now + this.attack);
    // ramp down to sustain volume in future
    this.gainNode.gain.setTargetAtTime(
        this.volume / 2, now + this.attack + this.sustain, 0.5);
}
To stop the oscillator, we ramp it down based on the release time set by our settings for the oscillator in the noteOff method:
noteOff() {
    const now = Note.context.currentTime;
    this.gainNode.gain.setTargetAtTime(
        0, now + this.attack + this.sustain + this.decay, 0.5);
}
For completeness, here is our createOscillatorAndGainNode() method… Note the semi-crazy nested objects in the WebAudio API.
private createOscillatorAndGainNode(): void {
    this.gainNode = Note.context.createGain();
    this.oscillator = Note.context.createOscillator();
    this.oscillator.type = this.waveform;
    this.oscillator.frequency.value = this.frequency;
    this.oscillator.connect(this.gainNode);
    this.gainNode.connect(Note.audioBus);
    this.gainNode.gain.value = 0;
}
Now we’re ready to generate notes. First, from a simple TypeScript API, next from a MIDI interface. We’ll do this from
Generating our Notes – from a TypeScript API
The simplest way to generate a tone is to interact with our Subject Observable, synthStream$:
sendNote(note: number | string, duration: number = 300) {
    const self = this;
    this.synthStream$.next(new SynthNoteOn(note));
    setTimeout(() => {
      self.synthStream$.next(new SynthNoteOff(note));
    }, duration);
}
The sample above triggers a note, and then stops playing the note duration milliseconds later.
Generating our Notes – from the MIDI Interface
I won't get into the complexity of the WebMidi API in this blog post (as it is not really the subject of this article). For our purposes, realize that we're taking input from a physically connected MIDI keyboard, and that MIDI keyboard generates events from this API. Ultimately, we need to convert those events into subject messages. The details of the implementation are in the MidiInputService.
Here is the key code, in a method called when a MIDI message is delivered:
private processMusicNoteMessage(midiChannelMessage: any) {
    switch (midiChannelMessage.data[0]) {
    case 144:
        this.synthStream$.next(
            new SynthNoteOn(midiChannelMessage.data[1]));
        break;
    case 128:
        this.synthStream$.next(
            new SynthNoteOff(midiChannelMessage.data[1]));
        break;
    ...
    }
}
So, sending a message to the Subject observable is simply done using next(), and we've typed our messages so that we can easily filter on the right ones on the other end.
Wrap-up: Observables are a Useful Stream Abstraction
The point I'm trying to make in this set of articles is that Observables are simply an abstraction for any streaming API. There are various ways to use this abstraction. Angular itself uses Observables for monitoring input and handling network requests, and in a number of other ways.
In this post I've used it as a form of message bus for generating audio tones. Observables can also be used to create a state machine, which is the point of my next article. There is a fantastic library, NGRX Store which provides a Redux state management system for Angular. We'll use that in the next article to provide a simple drumming game with its game play logic and state.
I’ve extracted this tone generation and synth to a library that others can use, and will take suggestions via issues and pull requests (time permitting on my end). See the ng-webaudio-synthesizer project for details, and to use it you can install via npm install --save ng-webaudio-synthesizer. Better documentation to come.
Comments welcome, and happy coding!