Introduction
In this post, I continue the development of my basic “exercise app” that I started (and enhanced) in these posts:
- Intro to Backbone with jQuery Mobile
- Sorting Collections with Backbone.js and jQuery Mobile
- From a List to a Details View using jQuery Mobile and Backbone.js
Let’s add the ability to create and edit exercise records.
Adding a new activity
Just like in the previous post, the first thing we need is a jQueryMobile page to hold the form content. Add the following to index.html:
New Activity
In the code above, we see the typical jQueryMobile page. The main things of interest here are with respect to the anchor tag in the header div:
- Specify data-rel=”back” to navigate to the previous page once the save is complete. This way whether we enter the form page from “Add” or “Edit”, navigation will be handled.
- The class=”ui-btn-right” moves the button to the right side of the header bar.
- The data-theme=”b” causes the save button to use the blue theme.
The next step is to define the template that the view will use to render the content for this page. Lets start with a simple template with an input for each attribute of an activity. To vary the UI slightly, we can use a drop down for the activity type. The basic template will look like this:
Notice that we are using the HTML 5 input types for some of the fields. Browser support for these will vary, but worst case they will deprecate to a text input type. For example, on iOS, the date will present a native date picker, whereas on Android (or Chrome, etc.) the field will behave as a standard text input.
Now we need to navigate to the form page. This requires modifying the “Add” button on the list page.
Activities
AddIn order to transition to the form page, the href attribute on the anchor tag (i.e. button) needs to be changed to the id of the form page, as shown in line 4 above. The final step in presenting the form page to support adding exercise activities is modifying the add button click handler.
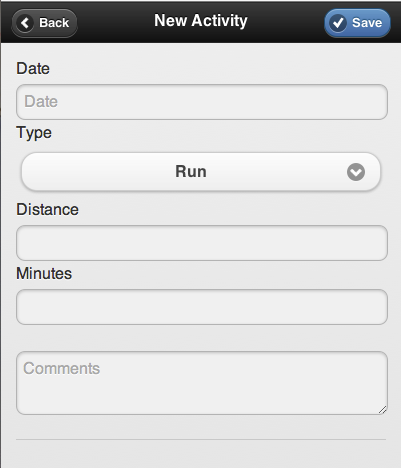
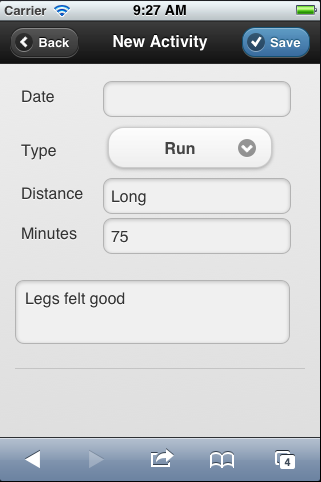
$('#add-button').live('click', function(){ var activity = new exercise.Activity(), activityForm = $('#activity-form-form'), activityFormView; activityFormView = new exercise.ActivityFormView({model: activity, viewContainer: activityForm}); activityFormView.render(); });Here we create an empty model, grab the form node, create a new exercise.ActivityFormView with these objects, and render the form. Testing at this point reveals a problem. The screen shot below doesn’t look right 😉
Investigating the browsers console reveals an error: Uncaught ReferenceError: distance is not defined. This is due to the underscore template trying to access an undefined attribute of the model. The issue is described here with some work arounds. I found the easiest workaround is to provide defaults for the model, as shown below.
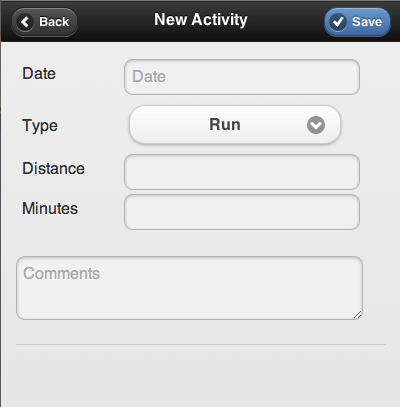
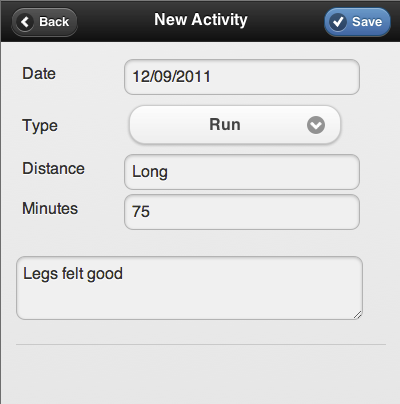
exercise.Activity = Backbone.Model.extend({ defaults: { date: '', type: '', distance: '', comments: '', minutes: '' } });Now the form renders properly. With the help of some CSS, we can tighten things up a little and end up with the version on the right (the CSS is part of the source code, see the links at the end of this post).

Editing an existing activity
With the template and the view already implemented, adding edit functionality is pretty straightforward. The first step is to update the href attribute of the edit button on the activity-details page.
Activity Details
As we did with the add button, this should reference the activity-form page. Now we need to add the click event handler for the edit button.
$('#edit-activity-button').live('click', function() { var activityId = $('#activity-details').jqmData('activityId'), activityModel = exercise.activities.get(activityId), activityForm = $('#activity-form-form'), activityFormView; activityFormView = new exercise.ActivityFormView({model: activityModel, viewContainer: activityForm}); activityFormView.render(); });If you recall, the activityId is passed to the details page view the list item click event handler. We reuse that fact here to retrieve the activity from the collection.
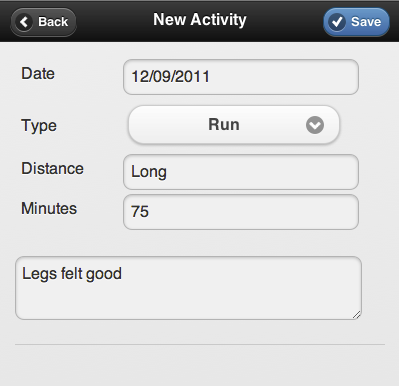
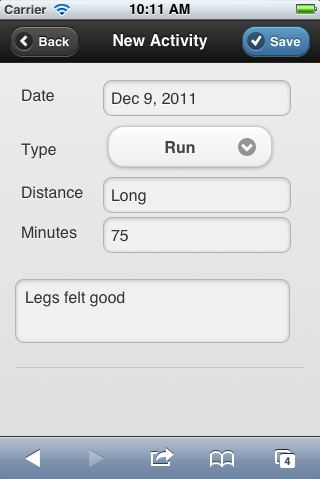
Time to test. Selecting an activity renders the detail page. Clicking the edit button renders the form, pre-filled with the activity details. Everything looks great.
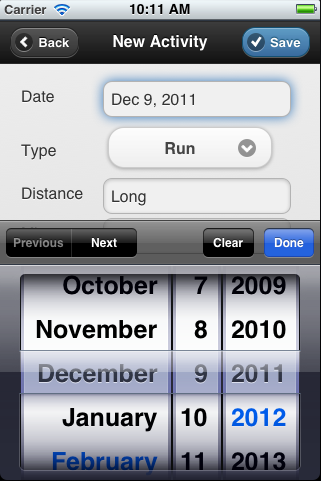
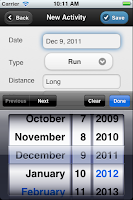
But wait…..that screenshot was from the browser on which I am testing. We should always test on devices as well. Earlier I mentioned that we are using some of the HTML 5 input types (i.e. date). The nice thing is that iOS 5 will render a nice date picker for date types. The challenge is that the date needs to be in a specific format for that to work. The image below shows what the form page looks like on an iOS device.
Fixing the Date
No date value is showing up on our iOS device. This is a known issue. So, for iOS we need the date format as yyyy-mm-dd, while for other platforms, I prefer the date to be shown as mm/dd/yyyy. I do realize that date formats should be localized, but for the purpose of this example I would like to keep it straightforward and specify mm/dd/yyyy as the display date format. There are many options that could be pursued here, but to demonstrate some more capabilities of Backbone.js, we will modify our model to help meet our date requirements.
First, the date attribute in our JSON feed is a string. Lets convert this to a date when the data is retrieved from the server, then when we need the date, we can just manipulate it as needed. This can be accomplished several ways.
- Implement a parse method on the collection that converts the String to a Date as the data is being fetched from the server.
- Implement a method on the model that converts the date String to a Date and sets it on the model. This would then require the calling code to know to call this method depending upon the circumstance.
- Override the set method on the model, look for the date attribute, then convert it to a date as needed.
The last option is the most seamless approach. Add the following method to the Activity model.
set: function(attributes, options) { var aDate; if (attributes.date){ //TODO future version - make sure date is valid format during input aDate = new Date(attributes.date); if ( Object.prototype.toString.call(aDate) === "[object Date]" && !isNaN(aDate.getTime()) ){ attributes.date = aDate; } } Backbone.Model.prototype.set.call(this, attributes, options); }Also, update the defaults so that the date attribute is now a Date instead of a String.
defaults: { date: new Date(), type: '', distance: '', comments: '', minutes: '' },While this clearly isn’t the most robust date handling, it is fine for now. In a future version, this should be improved.
Next, add attributes to our model that will format the date in the ways we need it (i.e. mm/dd/yyyy and yyyy-mm-dd).
dateInputType: function(){ return exercise.formatDate(this.get('date'), "yyyy-mm-dd"); //https://github.com/jquery/jquery-mobile/issues/2755 }, displayDate: function(){ return exercise.formatDate(this.get('date'), "mm/dd/yyyy"); }The formatDate function is a simple date formatter to meet our specific needs and can be found in the source code that accompanied this post (see link at the bottom of the post).
Now, how do we use these new methods in our view. The first thing to realize is that we pass the template JSON. The default implementation of the toJSON method of a Backbone.js model will not include these functions. Therefore, we need to override the toJSON method.
toJSON: function(){ var json = Backbone.Model.prototype.toJSON.call(this); return _.extend(json, {dateInputType : this.dateInputType(), displayDate: this.displayDate()}); }Here, we are using the Underscore.js extend to add our attributes to the standard Backbone JSON. Now, we need to modify our view templates to use the appropriate JSON attributes.
Notice that lines 16-21 include some conditional logic. This is a very basic device detection check to determine which date format to use. There are plug-ins,etc. that provide more robust alternatives, but to keep things clear, this will serve our needs. The screen shots below show the desktop browser and the iOS versions of the form with the appropriate date handling.
Saving
The final step is to implement the save functionality.
$('#save-activity-button').live('click', function(){ var activityId = $('#activity-details').jqmData('activityId'), activity, dateComponents, formJSON = $('#activity-form-form').formParams(); //if we are on iOS and we have a date...convert it from yyyy-mm-dd back to mm/dd/yyyy //TODO future version - for non-iOS, we would need to validate the date is in the expected format (mm/dd/yyyy) if (formJSON.date && ((navigator.userAgent.indexOf('iPhone') >= 0 || navigator.userAgent.indexOf('iPad') >= 0)) ){ dateComponents = formJSON.date.split("-"); formJSON.date = dateComponents[1] + "/" + dateComponents[2] + "/" + dateComponents[0]; } if (activityId){ //editing activity = exercise.activities.get(activityId); activity.set(formJSON); //not calling save since we have no REST backend...save in memory }else{ //new (since we have no REST backend, create a new model and add to collection to prevent Backbone making REST calls) activity = new exercise.Activity(formJSON); activity.set({'id': new Date().getTime()}); //create some identifier exercise.activities.add(activity); } });I used the JavascriptMVC formParams jQuery plugin (found here) to convert my HTML form into a JSON object. Then, the date is converted into the appropriate format. One thing to note here is that since we have no real back end server for Backbone to interface with, we don’t call save on the model or create on the collection. These methods would cause the appropriate REST calls to the server.
Since the click event on the list view passes the activityId to the details page, we can use this to determine if we are adding or editing. One thing to consider here is that the user may click an existing activity, then go back to the list, then click add. In this case, the activityId from the previously selected activity is still attached to the activity-details view. This will cause our save implementation to think we are editing. To prevent this, we should remove the activityId from the activity-details page when adding a new activity. This can be accomplished by adding the highlighted line below to the add handler.
$('#add-button').live('click', function(){ var activity = new exercise.Activity(), activityForm = $('#activity-form-form'), activityFormView; //clear any existing id attribute from the form page $('#activity-details').jqmRemoveData('activityId'); activityFormView = new exercise.ActivityFormView({model: activity, viewContainer: activityForm}); activityFormView.render(); });The final step is to make sure our views are updated accordingly when we add or modify activities. Since the details view retrieves the activity before the page loads, no change is required here. But our list view only renders during the initial page load. This is where we can take advantage of Backbone event binding. A few small additions to the ActivityListView and things will be handled.
initialize: function() { this.collection.bind('add', this.render, this); this.collection.bind('change', this.changeItem, this); this.collection.bind('reset', this.render, this); this.template = _.template($('#activity-list-item-template').html()); }, ... changeItem: function(item){ this.collection.sort(); }The change event will bubble up from the model and fires as a result of the set being called. In the changeItem method, we sort the collection to handle any changes in the date attribute. The sort method call will cause the reset event to fire, which then results in the render method invocation, causing the list to be re-rendered. This keeps everything in the correct order. The add event will be fired when we add a new activity to the collection. Since we implemented the comparator method on the collection, models added to the collection will be added in the appropriate order.
We can now add and edit activities. Start exercising 🙂
The source code for this post can be found here