
Introduction
Cocoapods (http://cocoapods.org/) is a dependency management framework for XCode. It allows you to declaratively define project dependencies and have them included in the build of your project. It’s like Apache Maven or Ruby Gems for XCode. There are many tutorials on getting started with Cocoapods, so in this blog post I will present a simple case where we have a project that depends upon two internally developed projects or private libraries.
We will start by creating two projects, each with a simple UI screen and some 3rd party dependency. Each of these projects will contain a file known as a Podspec that defines what gets included when another project depends upon it. Next, we will create a third project that depends upon these internally developed libraries and see how everything gets tied together.
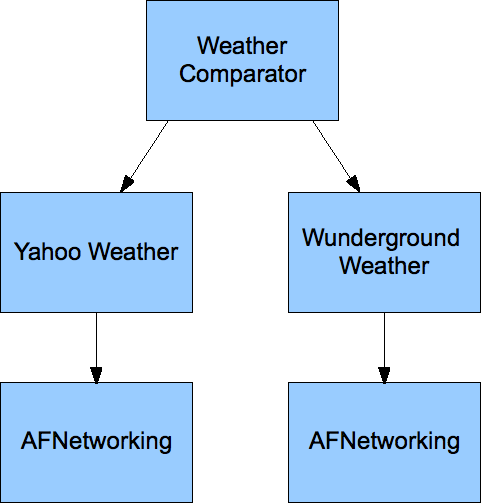
In my contrived example, I’ll create two projects, each with a dependency on AFNetworking (a nice network abstraction layer). AFNetworking is already available via the public cocoapods spec library. Cocoapods will be used to add this dependency. Each project will also use YQL to query a weather service (Yahoo versus Wunderground) and present the forecast for a given zip code. The master project, which I like to call the Weather Comparator, will pull in the Yahoo and Wunderground projects and use their code to present a comparison of the services.
The Private Libraries
We start by creating the first project, Yahoo Weather. Once we have Cocoapods installed on our system, we create an XCode project for our first framework. I started using the Empty iOS application template. Once the XCode project is created, exit XCode. Create a text file called “Podfile” at the root directory of the project. The contents of the Podfile looks like the following:
platform :ios, '5.1'
xcodeproj 'YahooWeather.xcodeproj'
pod 'AFNetworking'
The first line defines the platform and SDK version, the next line defines the name of the XCode project file, and subsequent lines define the dependencies for this project. Podfiles can be much more complex, but this post will keep things simple. Check out the Cocoapods site for more information. Once the Podfile is complete, drop to a terminal and execute pod install at the root of the project directory. You’ll see some messages about the dependencies being downloaded and configured and when the process is complete, there will be a message indicating NOT to use the YahooWeather.xcodeproj anymore, but use the YahooWeather.xcworkspace file now. This is a workspace that includes your project and the Pods project.
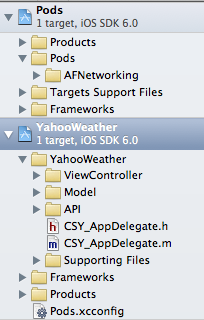
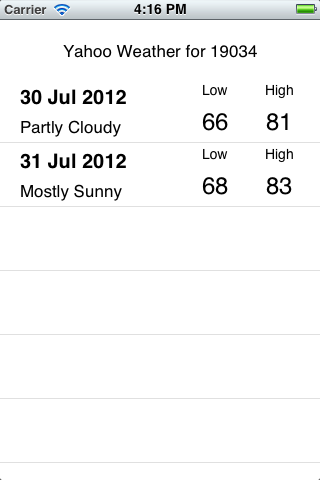
Under the Pods project, there is a Pods directory, which contains the libraries specified in the Podfile (AFNetworking in this case). Besides creating the workspace, Cocoapods configures your project to include a static library called libPods. This is the output of the Pods project build. Essentially it includes the compiled version of the pods for which you asked to be included in the project. We can now use the AFNetworking classes within our code. The source code for the YahooWeather project can be found on my github account: https://github.com/stevenpsmith/YahooWeatherService. The finished app can actually be run and looks like this (I know, gorgeous, right):

Following the same steps, we create a second project called WunderWeather. Much of the code is similar, except now we are using the Wunderground weather API. There are some other small changes, but for simplicity sake I reused much of the same code, just using different names for the classes (notice the class name prefix). Again, remember this is a contrived example, so reusing the code was merely for time efficiency. The source code for WunderWeather can be also be found on my github at https://github.com/stevenpsmith/WunderWeatherService. And for your viewing pleasure, here is what it looks like:
One important thing to note here, is that each of our frameworks uses a slightly different class prefix. This ensures that when both of these projects get used in a third project (the WeatherComparator), there are no name collisions. Wouldn’t namespaces be nice?
When we are done coding each of these projects, we can commit them to our “private” git repository. In this case I am using github public repositories, but these projects can reside anywhere that is accessible from the projects that will depend upon them. That could a private repo, file system, etc. Cocoapods also support SVN and Mercurial, but git is what all the cool kids are using, so that is what this example will use.
Creating the Podspec
The next step is to configure a podspec for each of our frameworks. The podspec defines the source files, resources, etc. that our libraries/frameworks expose for use by other projects. In our case, we need to expose all the classes in the API, Model, and ViewController directories within our projects. We also want to expose our XIB files. Those are resources which need to get compiled and added to our final “.app” file. In a similar way, resources might include images that will get added into the “.app” file during the final build process. To create a podspec, execute pod spec create projectname at the root of the project directory. In our case, it would be pod spec create YahooWeather or pod spec create WunderWeather
The file that gets created has comments and examples of all the properties that can be set. For our projects, the podpsec looks like this (with all the extraneous comments and unused attributes removed):
Pod::Spec.new do |s|
  s.name         = "YahooWeather"
  s.version      = "0.0.1"
  s.summary      = "Provides a Yahoo weather forecast, with basic UI, for a given zip code."
  s.homepage     = "https://github.com/stevenpsmith/YahooWeatherService"
  s.license      = 'MIT'
  s.author       = { "stevenpsmith" => "ssmith@chariotsolutions.com" }
  s.source       = { :git => "https://github.com/stevenpsmith/YahooWeatherService.git", :tag => 'v0.0.3' }
  s.platform     = :ios, '5.1'
  s.source_files = 'YahooWeather/API/*.{h,m}', 'YahooWeather/Model/*.{h,m}', 'YahooWeather/ViewController/*.{h,m}'
  s.resources = "YahooWeather/ViewController/*.{xib}"
  s.requires_arc = true
  s.dependency 'AFNetworking'
end
Notice the source property. This points to our “private” repo. You can also access local repositories (instead of server based repos) by using a URI like this: '/Users/steve/projects/foo', which points to the root directory of your version controlled code. Also note the use of the tag key (which could also be a :commit). If consumers of this library do not specify a tag or commit, this specifies the snapshot of the code that will be provided. Without specifying anything, the latest commit of the master branch will be used. The source_files and resources specify the assets within this project that will be provided to the consuming projects. The dependency property specifies any pods that this pods would depend upon (in our case, AFNetworking). This file needs to be committed to the repository, and if a tag or commit is specified, that must exist within the repo as well. It’s a good practice to validate the podspec by executing pod spec lint
This will save a lot of grief with typos, incorrect source directories, etc. Once your podspec is clean, commit it to the repository and tag if needed. The podspec for WunderWeather looks eerily similar.
Using the private libraries
The next step is to use these libraries in a new project. This is the WeatherComparator project, and it’s source can be found at https://github.com/stevenpsmith/WeatherComparator. We get started like we did before, creating the project within XCode, then exiting and creating a Podfile that references the dependencies. Except this Podfile will look a little different, as shown below:
platform :ios, '5.1'

xcodeproj 'WeatherComparator.xcodeproj'
pod "YahooWeather", :git => 'https://github.com/stevenpsmith/YahooWeatherService.git', :tag => 'v0.0.3'
pod "WunderWeather", :git => 'https://github.com/stevenpsmith/WunderWeatherService.git', :tag => 'v0.0.2'
Here we are adding the :git key to the pod declaration. Again, this could be subversion, mercurial, and even a filesystem reference. Notice there are no dependencies on AFNetworking. Our new project doesn’t directly depend upon those, but since the pods do, it will get pulled into our new workspace as it did in the other projects. Execute pod install in a terminal at the root of the new project directory, open the workspace as we did before, and we are good to go. Here is a screen shot of our weather comparator:

If you take a look at the code in the WeatherComparator project, it is very simple. One interesting thing to look at is the Pods-resources.sh script located in the TargetsSupportFiles/Pods directory within the Pods project. Cocoapods generates this script file based on the contents of the podspec for the libraries. This script actually compiles the XIB files and adds them to the projects final build. As you can see, pods can use storyboards as well. This provides a nice way to create modules that include UIs and then combine them into applications.
Even though we used github public repositories, this post shows how to use Cocoapods to manage your project’s public and private dependencies. To try out the project, install Cocoapods, download the WeatherComparator project, execute pod install at the root, open the workspace, run the project, and see how different Yahoo and Wunderground weather forecasts can be. Pretty surprising actually :).