While working on one of our demo mobile apps for the upcoming SXSW conference, I found the need to store blood pressure and heart rate data in HealthKit. Apple’s documentation is pretty solid and has some good examples on how to use the HealthKit framework. In this short post, I’ll walk through the code snippets required to request access to write data to HealthKit and then actually write the data.
The demo app I am working on interacts with a heart rate monitor via BLE (Bluetooth Low Energy) to capture the users blood pressure and heart rate. The mobile app can start and stop the blood pressure cuff, display measurement progress, and finally show the results captured by the blood pressure monitor. Rather than having the app store any of that data, I decided to use HealthKit to make this information available to the iOS Health App and any other apps on the device that have read access.
Requesting read/write access to HealthKit
Let’s get started with requesting access from the user to write data to HealthKit. In my app I created a class called HealthKitManager, since every app needs at least one manager class.
class HealthKitManager {
    fileprivate let healthKitStore = HKHealthStore()
    func authorizationRequestHealthKit(completion: @escaping (Bool, Error?) -> Void) {
        // 1
        if !HKHealthStore.isHealthDataAvailable() {
            let error = NSError(domain: "com.chariotsolutions.mobile", code: 999,
                                userInfo: [NSLocalizedDescriptionKey : "Healthkit not available on this device"])
            completion(false, error)
            print("HealthKit not available on this device")
            return
        }
        // 2
        let readTypes: Set<HKSampleType> = [HKSampleType.quantityType(forIdentifier: HKQuantityTypeIdentifier.bloodPressureDiastolic)!,
                                          HKSampleType.quantityType(forIdentifier: HKQuantityTypeIdentifier.bloodPressureSystolic)!,
                                          HKSampleType.quantityType(forIdentifier: HKQuantityTypeIdentifier.heartRate)!]
        let writeTypes: Set<HKSampleType> = [HKSampleType.quantityType(forIdentifier: HKQuantityTypeIdentifier.bloodPressureDiastolic)!,
                                            HKSampleType.quantityType(forIdentifier: HKQuantityTypeIdentifier.bloodPressureSystolic)!,
                                            HKSampleType.quantityType(forIdentifier: HKQuantityTypeIdentifier.heartRate)!]
        // 3
        healthKitStore.requestAuthorization(toShare: writeTypes, read: readTypes) { (success: Bool, error: Error?) in
            completion(success, error)
        }
    }
I created an authorizationRequestHealthKit method. This method takes a completion function to allow callers to handle success and failure of the authorization request.
Walking through the code above:
- First, we need to check if HealthKit is available on the device. If not, the calling code should inform the user appropriately.
- Even though I am not reading data in my demo app, I wanted to include the read types sample code. The thing to note here is that blood pressure data is considered correlated data, meaning multiple samples that make up a single data entry. But there is no permission for correlated data. You are asking the user to read and write specific data types, in this case diastolic blood pressure, systolic blood pressure, and heart rate.
- This step is where some of the magic happens. This is where we ask the user for the exact data elements we want to read and store in HealthKit. The
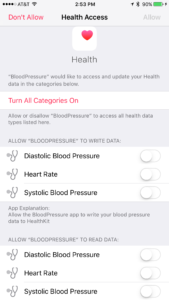
requestAuthorizationmethod doesn’t actually indicate whether the user is allowing access, but whether or not the request for authorization has succeeded. The nice thing here is that based of the read and write types requested, the OS will present a screen with all the relevant information and controls to allow the user to make their access decision. Also, the UI will only be presented if the user has not yet allowed access to the requested data, meaning the UI only gets presented when required 🙂
Important safety tips:
- The
requestAuthorizationcompletion block is called on the background thread, so be aware if your blocks do any UI work. - You must add messages that indicate the reasons for requesting permissions from the user. This can be done in the
info.plistfor your app. Just add the keysNSHealthShareUsageDescriptionandNSHealthUpdateUsageDescriptionwith the pertinent messages as the values.
The authorizationRequestHealthKit method can then be called from wherever you need to request access to the user’s HealthKit data.
Writing the sample data to HealthKit
The next step is to actually write the data. The APIs provided for this are pretty straightforward once you see it. I added the following method to my HealthKitManager class:
func saveBloodPressureMeasurement(systolic: Int, diastolic: Int, heartRate: Int, completion: @escaping (Bool, Error?) -> Void) {
        // 1
        let startDate = Date()
        let endDate = startDate
        // 2
        let systolicType = HKQuantityType.quantityType(forIdentifier: .bloodPressureSystolic)!
        let systolicQuantity = HKQuantity(unit: HKUnit.millimeterOfMercury(), doubleValue: Double(systolic))
        let systolicSample = HKQuantitySample(type: systolicType, quantity: systolicQuantity, start: startDate, end: endDate)
        let diastolicType = HKQuantityType.quantityType(forIdentifier: .bloodPressureDiastolic)!
        let diastolicQuantity = HKQuantity(unit: HKUnit.millimeterOfMercury(), doubleValue: Double(diastolic))
        let diastolicSample = HKQuantitySample(type: diastolicType, quantity: diastolicQuantity, start: startDate, end: endDate)
        // 3
        let bpCorrelationType = HKCorrelationType.correlationType(forIdentifier: .bloodPressure)!
        let bpCorrelation = Set(arrayLiteral: systolicSample, diastolicSample)
        let bloodPressureSample = HKCorrelation(type: bpCorrelationType , start: startDate, end: endDate, objects: bpCorrelation)
        // 4
        let beatsCountUnit = HKUnit.count()
        let heartRateQuantity = HKQuantity(unit: beatsCountUnit.unitDivided(by: HKUnit.minute()), doubleValue: Double(heartRate))
        let heartRateType = HKQuantityType.quantityType(forIdentifier: .heartRate)!
        let heartRateSample = HKQuantitySample(type: heartRateType, quantity: heartRateQuantity, start: startDate, end: endDate)
        // 5
        healthKitStore.save([bloodPressureSample, heartRateSample]) { (success: Bool, error: Error?) in
            completion(success, error)
        }
    }
There are different type of data samples that can be written to HealthKit. Blood pressure and heart rate data is considered a quantity sample. It’s made up of a sample type, quantity, and the sample data which includes the point in time the data was taken.
Let’s breakdown the method:
- Since all this data is captured at one point in time, lets capture the current date as the start and end date of the sample.
- Here we are constructing the systolic and diastolic sample data. Both the type and quantity are used to define the sample.
- This is where we correlate the diastolic and systolic measurements into one sample.
- The heart rate sample is its own measurement. The thing of note here is that the unit of measure (beats per minute) is a combination of count divided by time.
- Here we save the blood pressure and heart rate measurements, with the typical completion block. An example of a failure would be if the user has not granted write access for these measurements, the completion block will get an
errorAuthorizationDeniederror.
That’s a quick walk through of how to write blood pressure and heart rate data to Apple’s HealthKit.

