
In a perfect world, there would never be a need to connect to resources running in AWS. Your would diagnose problems using server logs, and your databases would always hold the correct data and perform optimally. In the real world, it’s sometimes necessary to get your hands dirty and look at what’s happening on the actual machine. This is especially so in development and test environments, where things going right is the exception, not the rule.
Given this practical necessity, how best to implement? As with everything, AWS gives you many ways to get up close and personal with your resources running around the globe. This post highlights a few, with pros and cons and helpful hints.
My target audience is a development team that needs access to AWS, but is on their own for how to gain that access. If you work in an organization that already has processes and procedures in place, then you should talk with your IT people.
Bastion Host
While this post is titled “Beyond the Bastion,” it started life as an explanation of how to set up and use a bastion host. As it’s always good to start a journey by understanding the thing that you’re moving “beyond,” here goes…
A bastion host, also known as a “jump box,” is one of the simpler ways to gain access to your VPC. It’s just a publicly-accessible EC2 instance, which listens for SSH connections and allows your users to create tunnels to other resources.
Pros:
- A bastion host is easy to set up, cheap to run, and doesn’t require (much) networking know-how.
- You can use existing security facilities to control access and usage.
Cons:
- Effectively using a bastion host requires your developers to have SSH (secure shell), and understand how tunnels work.
- You need to explicitly grant access to your resources from the bastion.
- Opening port 22 to the world will cause Trusted Advisor to complain; restricting it to your users’ home IP addresses may require constant maintenance.
Creating the Bastion Host
As I said above, a bastion host is simply a publicly accessible EC2 instance. You don’t need a lot of compute capability; a t4g.nano (which costs roughly $3/month) is more than sufficient to run SSH tunnels.
Create two security groups for this instance. The first, named bastion-access, grants access to the bastion: it must have a rule for each of your users, allowing port 22 from that user’s IP address(es).
Tip: use the “Description” field in the security group rule to identify the person associated with that rule. To minimize your workload, give your users the IAM permission to change the rules of that security group. And shame them ruthlessly if they create rules without attaching their name (you can find out they did it via CloudTrail) or if they don’t delete obsolete rules.
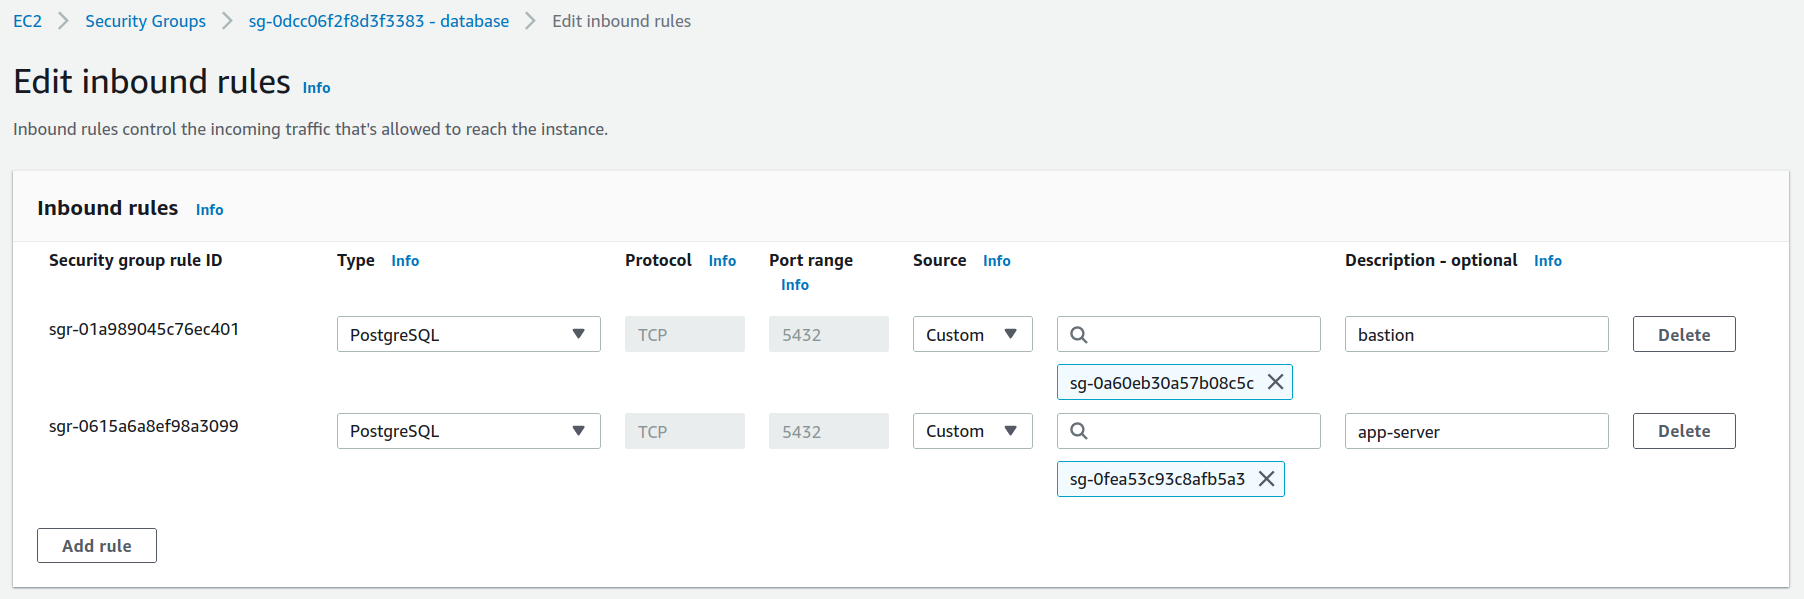
The second security group, named bastion, has no rules of its own. Instead, it is referenced by the security group of the resource(s) you want to connect to:
SSH Keypairs
When you create the bastion host, you must select a keypair for the primary user on the instance (ec2-user for Amazon Linux). It’s tempting to share that keypair with everyone who uses the bastion host, but that’s actually an inconvenience for experiened SSH users, and it’s a security risk (especially if you open the bastion host to the world). Instead, ask each user for their public key, and add it to the file $HOME/.ssh/authorized_keys (or give each user their own account, as I describe below).
Tip: whenever you edit authorized_keys, don’t log out of the edit session until you’ve successfully logged-in using a different window. It’s easy to accidentally damage that file or change its permissions, which will lock out access to the bastion. True, it’s also easy to re-create a single-purpose bastion host, but that’s wasted time.
Tip: store the authorized_keys file in source control, or on S3. It contains public keys, so there’s no concern about who sees it. And doing so simplifies recovery from errors (as well as allowing you to automate bastion host creation).
Using an SSH Tunnel
Assuming that you can connect from your workstation to the bastion, and the bastion has permission to open connections to a particular resource, this is how to open a tunnel using command-line SSH:
ssh -i ~/.ssh/privatekey.pem -fN -o ServerAliveInterval=30 -L 5432:database-1.yw1cjq9vqfwj.us-east-1.rds.amazonaws.com:5432 ec2-user@3.17.166.183
Breaking it down:
-
-i ~/.ssh/privatekey.pemidentifies the keypair used to access the bastion host. This presumes that you’ll have a shared key for the bastion. If you use your own SSH key, you can omit it. -
-fNinstructs SSH to run in the background. If you omit it, you’ll end up with a terminal session on the bastion, and accidentally exiting that session will break any established tunnels. -
-o ServerAliveInterval=30tells SSH to send a “keep alive” ping to the server every 30 seconds. This is important if you leave the connection open but inactive, and are using a typical home network router. Such routers maintain a limited table of open connections, and busy network traffic causes inactive connections to drop out of that table – the router forgets that you had the connection open. By regularly sending the keep-alive message, you ensure that your connection remains in the table. -
-L 5432:database-1.yw1cjq9vqfwj.us-east-1.rds.amazonaws.com:5432establishes a tunneled connection. The general form is-L LOCAL_PORT:REMOTE_HOST:REMOTE_PORT: SSH listens for TCP connections on the local port, and when it receives one it opens a connection to the remote host and port.
You can provide as many-Loptions as you want, with different remote hosts/ports. Beware, however, that you can only specify a single local port once. So if you’re connecting to two different Postgres databases, one can be mapped to the local port 5432 (the standard Postgres port), but the other needs to be something different (say, 6432). -
ec2-user@3.17.166.183is the username and IP address of the bastion host. You can also use the public DNS hostname of the host. Or better, a configuration file as I show below.
With this running, you connect to Postgres via localhost, not the actual address:
psql --host localhost --user postgres
When you’re done with the bastion, use ps and grep to find your SSH process. Beware that you may have multiple SSH processes; look at the command-line arguments to find the correct one.
Also beware that suspending your workstation for more than a few minutes will terminate the SSH connection. However, after resuming it won’t realize it’s dead until the “keep alive” timeout expires.
Using an SSH Config File
If you don’t want to type that long SSH command every time you need to set up a tunnel, then you can put most of the information in $HOME/.ssh/config:
Host bastion-postgres
   Hostname            3.17.166.183
   User                ubuntu
   ServerAliveInterval 60
   LocalForward        localhost:5432 database-1.yw1cjq9vqfwj.us-east-1.rds.amazonaws.com:5432
With that in place, your SSH command is reduced to:
ssh -fN bastion-postgres
A Multi-User Bastion
The bastion host, as I’ve described it, will case heart palpitations for security professionals: everybody connects as ec2-user, which, oh yeah, can sudo without a password. One way to lock things down is to give each user their own (non-sudoer) account.
Personally, I feel that this adds a lot of maintenance overhead to the bastion, and turns it into a “pet” (a machine that is lovingly hand-maintained). It does have a few benefits, including the ability to track individual user connections. That may or may not be important to you, or your security team.
Having individual users is, however, a prerequisite to enabling multi-factor authentication.
Multi-Factor Authentication (MFA)
Multi-factor authentication adds another layer of protection to the bastion. If you open port 22 to the world (perhaps because your developers travel, or use a mobile hotspot), and a developer loses control of their laptop, and has not password protected their SSH private key, then an MFA challenge prevents an attacker from connecting to the bastion. Provided that your additional factor is not something available on the laptop.
The multiple factors are things that you know (generally a password), things that you have (such as an authenticator app), and things that you are (such as your fingerprints). In most cases, adding another factor of authentication means a “time-based one-time pad” (TOTP), usually implemented with an authenticator app on your phone. This app uses a secret key, also known by the server, to generate a new six-digit code every 30 seconds.
To avoid making a long post longer, I won’t include instructions for setting up MFA tokens. Instead, I’ll point you to this somewhat out-of-date post from AWS, with the note that with Amazon Linux 2 you have to use the amazon-linux-extras tool to enable the epel repo and install the google-authenticator package.
Virtual Private Network (VPN)
A bastion host is the “Linux hacker” approach to VPC access. allowing you to tunnel individual connections from your PC to VPC resources. A VPN is the “network administrator” approach, essentially turning your PC into a node on the VPC network.
Pros:
- It Just Works™. When you connect to the VPN, your computer is effectively on the VPC network. It can connect to any resources resources that are enabled by the VPN authorization rules and security group(s).
- The VPN administrator can configure granular permissions, which allow you to access specific subnets within your VPC. If you assign specific subnets to each of your projects, this ensures that a person working on one project cannot accidentally harm another.
Cons:
- Your computer is effectively on the VPC network. Without granular configuration, your users may have access to systems that they shouldn’t.
- Higher per-hour charges than a bastion: if you use the AWS Client VPN you will pay an hourly charge for the VPN itself and each connected user. If you use a third-party VPN running on an EC2 instance, you will pay that instance cost, plus potential AWS Marketplace charges for the VPN-enabled AMI.
- Possible high data transfer charges if you route all client traffic through the VPN. Avoid by configuring your VPN as split-tunnel (see below).
There are many options for a VPN; discussing them all is beyond the scope of this post. Instead, I’ll focus on the AWS Client VPN, which is a relatively easy-to-manage version of OpenVPN.
Clients
AWS provides its own VPN clients; you can download them the Self-Service Portal, or follow links from the documentation. Alternatively, you can download the official client from OpenVPN, or use a client that is already provided for your operating system (assuming one exists).
As a Linux (Xubuntu) user, I wasn’t particularly happy with the AWS-supplied client: it must remain running to keep the connection open. Instead, I installed the network-manager-openvpn-gnome package, which can import the AWS client configuration file, and which runs as a system service. Beware, however, that the client configuration file does not identify your VPN user; you’ll need to configure that in Network Manager before connecting.
I also tried installing the AWS-provided client in a Windows environment. However, it only supports Windows 10; trying to install on a Windows 11 machine results in an error. The OpenVPN-provided client works fine with Windows 11, but you must edit the client configuration file: the remote entry is not an actual hostname. This is intended to avoid DNS caching (in concert with the --remote-random-hostname client option), and the workaround is to prepend a hostname. So, given the original configuration:
remote cvpn-endpoint-0727e8ff12aba9a45.prod.clientvpn.us-east-1.amazonaws.com 443
Convert to this (you can replace “vpn” by any valid hostname):
remote vpn.cvpn-endpoint-0727e8ff12aba9a45.prod.clientvpn.us-east-1.amazonaws.com 443
Authentication
If you decide to set up a Client VPN, the first choice you need to make is how you’ll authenticate your users. There are three options: Active Directory, federated (SAML) user directory, and/or “mutual authentication” via certificates.
I’m going to ignore SAML-based authentication, because (as far as I can tell), you must use the AWS client to work with it. This is a non-starter for me, but If you’re already using a SAML identity provider it might be OK for you. Or, you might prefer to use a commercially-supported version of OpenVPN, or some other VPN implementation.
Active Directory gives you the standard abstraction of users with passwords. If you already have Active Directory set up, or are considering setting it up to support IAM Identity Center, then it’s a “no-brainer” for VPN authentication. There are also a number of features of the AWS Client VPN, such as restricting access to network segments, that only work if you have Active Directory. The primary drawback to Active Directory is that you need an EC2 Windows instance (or better LDAP skills than I have) to administer your users.
Certificates are normally used as an additional factor of authentication for a VPN: in addition to the factor you know (username/password), the certificate is something that you have. However, AWS Client VPN lets you use certificates as the sole source of authentication. If you’re in a situation where Active Directory isn’t a viable option (perhaps because you already have a user directory, and can’t hook into it), this may be your best choice. However, there are some quirks to be aware of.
The first is that you’ll need to maintain your own certificate authority (CA) – or pay AWS $400 per month to use the managed Private CA. And while it’s easy to create certificates, controlling access and secrecy is critical. Anyone who gains access to your CA configuration can mint their own certificates and gain access to your VPN.
The second quirk of mutual authentication is that you don’t upload individual certs for each of your users. Instead, you provide a root certificate, and the VPN will accept anyone with a cert signed by the same CA. You have to explicitly disable individual user certificates, by uploading a certificate revocation list.
And lastly, using certificates by themselves means that anybody who can access your users’ laptops can connect to your VPN. If you choose this option, be sure to use strong passwords, encrypted disks, and auto-lock when inactive.
Split-tunnel Operation
By default, the AWS Client VPN routes all of your workstation’s network traffic through the VPC. This has several important consequences. First, if your destination network doesn’t have connectivity to the Internet (ie, no NAT Gateway), neither will your PC. Second, you will pay for data transfer to/from external sites at EC2 egress rates!
Third, and perhaps most important to a small team, routing all of your PC network traffic over a single VPN means that you can only interact with a single VPC. If you need to switch between development and test environments, for example, you need to drop one VPN connection and start another. With split-tunnel, as long as the VPCs don’t have overlapping CIDR blocks, you can run multiple client connections.
Your organization might have rules that prohibit split-tunnel VPNs. However, if that’s the case, then I suspect they also prohibit team-specific VPNs. As always, check with your IT team to understand the rules that apply.
Session Manager
Session Manager is one of the tools provided by AWS Systems Manager. While most of those tools are intended to automate your deployment, Session Manager lets you connect directly to EC2 nodes, replacing SSH.
Pros:
- Uses IAM credentials to control access; no need to maintain a separate set of authorized SSH keys.
- Can provide secure tunnels through EC2 instances to other in-VPC resources.
- Connections are tracked in CloudTrail; session activity can be logged to CloudWatch Logs or S3.
Cons:
- Must run an agent on your instance, with the ability to make an outbound connection to AWS (via public IP, NAT, or VPC Endpoint).
Session Manager uses the SSM agent to respond to requests. It comes pre-installed on AWS Linux and common AWS-supported AMIs; you can install it on other AMIs and on-prem servers. As mentioned above, it must be able to connect to AWS services, and requires at least the privileges contained in the AmazonSSMManagedInstanceCore managed policy (see the docs for a complete discussion of permissions).
The SSM User
When you establish a session, it runs as the user ssm-user, not the instance default user (ec2-user, ubuntu, whatever). This user is not a member of any system groups, but does have access to the AWS CLI and other system tools, including unrestricted sudo. This means it’s easy to become the default (or any other) user:
sudo -i -u ec2-user
Command-line Interface
You can connect to the instance from the AWS Console, but if you want to do port forwarding, you’ll need to use the command line. Which means installing the SSM plugin for the AWS CLI. Once you do that, you gain access to the ssm start-session command:
aws ssm start-session --target i-0ff2f37e853220b4c
The plain start-session command opens a connection to the specified EC2 instance, and launches a shell as ssm-user. Note that you use the instance’s ID, not its IP address.
You can also open a tunnel to a different machine, using the EC2 instance as a jump box:
aws ssm start-session \
    --target i-0ff2f37e853220b4c \
    --document-name AWS-StartPortForwardingSessionToRemoteHost \
    --parameters '{"host":["database-1.yw1cjq9vqfwj.us-east-1.rds.amazonaws.com"],"portNumber":["5432"], "localPortNumber":["5432"]}'
Again, we provide an instance identifier; this instance must be able to connect to the database server (ie, have compatible security groups). The --document-name parameter refers to an SSM Session Document; AWS-StartPortForwardingSessionToRemoteHost is a predefined document, maintained by AWS. Finally, you provide the local port, and destination host and port, as a JSON document.
When you run this, you’ll see something like the following on your terminal:
Starting session with SessionId: kgregory-0780d813511e74345
Port 5432 opened for sessionId kgregory-0780d813511e74345.
Waiting for connections...
Using session manager to port-forward is much like running an SSH port-forwarding session in the foreground: it takes over that terminal window. To exit (intentionally or accidentally), type Ctrl-C.
SSH via Session Manager
In the documentation, there are several examples of running ssh to directly connect to the instance. To make that work, you must follow this optional step when configuring Session Manager in your account. It creates an entry in your SSH config file that uses Session Manager as the transport for SSH, rather than a direct TCP connection.
Personally, I don’t see a lot of value in doing this: it requires that you have SSH credentials on the target instance, in addition to the IAM credentials that allow you to access the machine. But it does allow you to use SSH-based commands, such as rsync, which would not otherwise be available.
Enabling agent communication
As noted above, to use Session Manager, your EC2 instance must be able to make an outbound connection to AWS. You can accomplish this by giving the instance a public IP, or with a NAT Gateway (to give all of your private instances unrestricted access to the Internet), or with VPC Endpoints that restrict access to SSM.
If you don’t have or want a NAT Gateway, you’ll need to enable at least three VPC Endpoints to use Session Manager: ssm, ssmmessages, and ec2messages. Additionally, if you want to enable activity logging, you’ll need to create endpoints for logs and/or s3 (depending on which you use for logging).
Endpoints incur slightly less cost per-hour than a NAT Gateway ($0.03 per hour per availability zone versus $0.045), and you will save significantly on bandwidth ($0.01/GB versus $0.045). If you’re using the VPC endpoint to tunnel data from a database, this could be a significant savings.
ECS Exec
When you’re developing with Docker containers, it’s often useful to use docker exec to run an interactive shell inside the container. When running those containers in ECS using an EC2 container instance, you can SSH to the instance and the do the same thing. But if you run on Fargate, you were out of luck until March 2021, when AWS released ECS Exec.
Pros:
- Lets you connect to your running task, to diagnose problems that may not be solvable from logs alone.
Cons:
- This capability can only be enabled when a task starts, not while it’s running.
- Task must run in a public subnet with a public IP, or in a private subnet with either a NAT Gateway or the various VPC endpoints required for SSM Session Manager.
- A long list of documented “considerations.”
ECS Exec works by running an SSM agent inside the primary container of the ECS task. The running container must have the ability to contact the SSM service, and the task’s execution role must have the appropriate permissions (at least those granted by the AmazonSSMManagedInstanceCore managed policy).
As noted above, you must enable this capability when you launch the task. There’s no way to do this when launching from the (current) Console; you must use the command line or an API client (I personally favor my ecs-run script). You can also configure a Service to enable this capability, but again, not when you create that service in the Console.
Other means of launching containers, such as AWS Batch, don’t support this feature, even when they run on Fargate. If you use EKS (Elastic Kubernetes Service), I believe that you have similar functionality with kubectl exec, but that doesn’t rely on Session Manager.
Can we help you?
Ready to transform your business with customized cloud solutions? Chariot Solutions is your trusted partner. Our consultants specialize in managing cloud and data complexities, tailoring solutions to your unique needs. Explore our cloud and data engineering offerings or reach out today to discuss your project.