
The ability to experiment is one of the unsung benefits of cloud computing. It was, in fact what drew me to AWS in 2008: if I wanted to try out a new development tool, or create a demo app, I could spin up an EC2 instance for a few hours and do so without adding any cruft to my developer PC. At Chariot, we have multiple sandbox environments, some for specific projects and some for general play.
One of the key elements of a useful sandbox is that the people playing in it should have near-complete control of their environment — in other words, administrator rights. But with great power comes great responsibility, and humans are fallible. This was driven home to me several years ago: one of my colleagues had spun up four of Amazon’s then-largest instance for performance testing during his last week with the company. A month later, our head of IT called me to point out that the machines were still running, had cost the company $5,000, and how much longer do we need them?
So, clearly, you need to establish some controls, but they shouldn’t be onerous ones. This post details some of the things that we do at Chariot.
One note before starting: we use a standard AWS Organization, with parent and child accounts. Much of what we do could be handled by Control Tower, but we consider that too heavyweight for our needs (and we started down this path before it was generally available).
Before doing anything: have “The Talk” about security
Sandboxes work best if you grant your users wide-ranging privileges. However, this means that their user credentials are valuable commodities: a way to spin up machines for cryptocurrency mining, or worse. Not only can you end up with a large bill, you might find yourself liable if your account is used to serve illegal content.
So your first step is to make sure that your developers understand the risk, and follow some basic security procedures:
- Use strong passwords and multi-factor authentication.
- Never save access credentials in source code.
- Never send long-lived or high-permission credentials to a browser, phone, or other uncontrolled client.
- Don’t expose servers to the open Internet; limit security group ingress to connections from your corporate network.
These are my top picks; if you have others, feel free to leave them in the comments.
Create a sandbox account — perhaps many
For AWS, the account is the atomic unit of permissions management: permissions granted in one account don’t affect resources in another account. For this reason, many organizations use different accounts for different tiers of their deployment: dev, qa, prod, and so on. A sandbox is simply another tier, one with fewer access controls than even the “development” account. So it should be its own account.
Since users in the sandbox have wide-ranging (perhaps administrator) access, it’s possible that they’ll step on each others’ projects. To prevent this, give each developer or team their own sandbox; setting up an AWS account takes only minutes, although you will have to ask AWS to increase your limit for child accounts beyond the default of four. One recommendation: name the accounts “sandbox1”, “sandbox2”, and so on, rather than “keith-sandbox”; you want to encourage re-use and re-assignment, not a sense of ownership.
When creating sandbox accounts, as when creating your master account, use a group email address: if people leave the company, you don’t want to scramble because they used their now-locked employee email address for an AWS account. Also beware that each AWS account must have its own email address; I recommend using the “+” trick: everything after “+” in an email address is ignored; email sent to “aws+sandbox1@mycompany.com” will go to the mailbox “aws@mycompany.com” (but be aware that you’ll get lots of “new account” emails from AWS).
Lastly: create an organizational unit for your sandboxes. The primary mechanism for controlling sandbox access is the service control policy, and it’s far easier to apply SCPs to an OU than to each account. Also, always remember: don’t apply SCPs to your master organization account, lest you lock yourself out.
Prevent changes to the organization access role
When you create a new account in the organization, or when an existing account accepts your invitation to join the organization, AWS creates an admin role in that account, by default named OrganizationAccountAccessRole. This role grants the AdministratorAccess policy, and allows an administrator or other authorized user in the master account to manage the child account.
It’s not something that you want to delete or change, because the only other way to manage the account is to log in using its root credentials. However, if you grant administrator access to your sandbox users, there’s a chance that they may accidentally delete or change the role.
To keep this from happening, create this service control policy and attach it to the organizational unit that holds your sandboxes:
{
  "Version": "2012-10-17",
  "Statement": [
    {
      "Sid": "ProtectOrgAccess",
      "Effect": "Deny",
      "Action": [
        "iam:DeleteRole",
        "iam:DeleteRolePolicy",
        "iam:DetachRolePolicy",
        "iam:UpdateRole"
      ],
      "Resource": [
        "arn:aws:iam::*:role/OrganizationAccountAccessRole"
      ]
    }
  ]
}
Note that the resource identifier includes a star in the account-number field. You could explicitly identify each child account’s role by its exact ARN, but let Amazon do the work for you.
Limit the types of instances that can be created
Do your developers need to work on instances with 4 TB of RAM? If not, you probably don’t want them firing up an x1e.32xlarge, which will cost you $26.688 per hour to run. Indeed, for most sandboxy tasks an m5.large, with 2 virtual CPUs and 8GB of RAM is more than enough, at a cost of $0.10 per hour.
So, if you’re concerned about costs, this is another place to use an SCP: the following prevents launching anything other than a specific set of instance types.
{
  "Version": "2012-10-17",
  "Statement": [
    {
      "Sid": "RequireMicroInstanceType",
      "Effect": "Deny",
      "Action": "ec2:RunInstances",
      "Resource": "arn:aws:ec2:*:*:instance/*",
      "Condition": {
        "StringNotLike": {
          "ec2:InstanceType": [
            "t2.*",
            "t3.*",
            "m5.large",
            "m5d.large"
          ]
        }
      }
    }
  ]
}
For real-world use, you’ll also want to limit the allowable RDS instance types, as well as Elasticsearch and SageMaker endpoints (and probably a few others that escape me at the moment).
This is also one area where it’s nice to have multiple sandboxes: while you can apply this SCP to the “standard” sandbox, you may relax the restrictions for teams that do large-scale data analysis or machine learning.
Limit the regions where resources can be created
There may be some cases where your developers need to create resources in distant regions: perhaps they’re evaluating the latency of cross-region access. But otherwise, it makes sense to limit them to your “home” region(s): not only will they experience lower latency in their work, you won’t have to hunt all over the AWS cloud to find “forgotten” resources.
This also is handled by a service control policy:
{
  "Version": "2012-10-17",
  "Statement": [
    {
      "Sid": "RestrictRegion",
      "Effect": "Deny",
      "Action": "*",
      "Resource": [
        "*"
      ],
      "Condition": {
        "StringNotEqualsIfExists": {
          "aws:RequestedRegion": [
            "us-east-1",
            "us-east-2"
          ]
        }
      }
    }
  ]
}
One helpful hint for service control policies: you can have multiple statements in an SCP, as long as the total size of the policy doesn’t exceed 5k bytes (including all whitespace). So rather than create separate policies to restrict instance creation and restrict regions, use a single policy with multiple statements. And if you run into size restrictions, don’t pretty-print.
Pay attention to billing
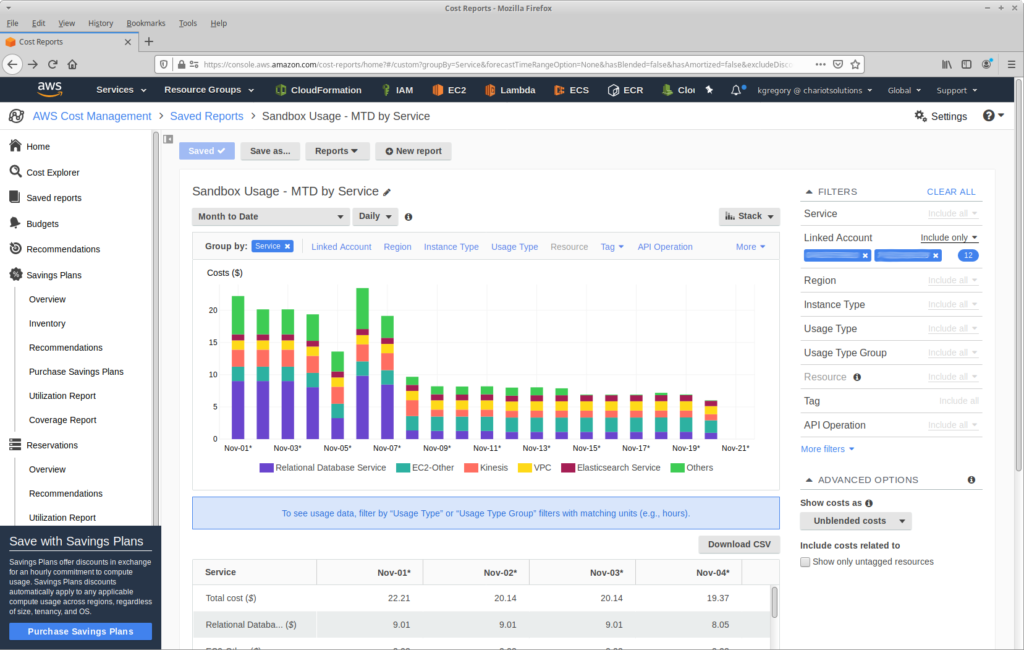
Amazon makes it easy to figure out how much you’re spending, in near-real-time. While you can get detailed billing reports, it’s best to start with Cost Explorer, a free tool that gives you a graphical display of current and historical costs, grouped and filtered along several dimensions. Two of the useful dimensions are Linked Account, which shows you whether your sandboxes are using excessive resources, and Region, which shows you whether resources are running in places that you don’t expect. One of my “canned” reports is below: the month-to-date charges for our sandbox accounts, grouped by service. If you look at this first thing in the morning, you can catch most charges before they become excessive.
To be more proactive, turn on Budgets, which will notify you when a particular usage type exceeds a predefined amount (either actual or forecasted). You can configure it to send you an email or an SNS notification.
Set up a naming/tagging conventions, with an auto-kill Lambda for resources that don’t follow them
This is controversial, so I’m leaving it for last, but I think it’s an important feature. Even with the best of intentions, developers create resources and forget about them. Without at least a naming convention, you’ll be faced with a list of instances and have no idea who to talk to.
So start with a naming convention: the name of every resource has to include the username of the person that created it. If you do this, ownership will be obvious when looking at resources in the AWS Console.
The problem with a naming convention is that it’s targeted at a person looking at the AWS console. Better is a tagging convention, which can be examined by a Lambda. I recommend adding two tags for every resources: CreatedBy, which contains the user’s name, and DeleteAfter, which holds the date when the user thinks s/he’ll be done with the resource. You can configure the AWS Console to show (and sort by) these tags, and you can write a Lambda function like this one, which deletes expired instances and those that are missing the CreatedBy tag. Someone will probably get unhappy the first time their hand-configured instance disappears; tell them to Google “chaos engineering.”
Wrapping up: this post is about enabling, not securing
As I was re-reading this post, I became concerned that it might be interpreted as an intro to securing your AWS account. It’s not.
Securing your account is about restricting access, allowing only those operations that are necessary to operate your business. This post is about granting wide-ranging privileges by default, with restrictions acting as “guardrails” (or, as they say in Pennsylvania, “guide rails”) to prevent unintended consequences.
To learn about securing your AWS account, I recommend starting with the AWS Security Best Practices document, written by AWS. I also read the AWS Security Blog, as a way to keep up with security-related changes in the AWS ecosystem.