Data lakes are great for holding large volumes of data, such as clickstream logs. But such data has limited usefulness unless you can combine it with data from your transactional, line-of-business databases. And this is where things get tricky. Simple approaches, such as replicating entire tables, don’t scale. Streaming approaches that include updates and deletes require logic to determine the latest value (or existence!) of any given row. All of which has to be translated into static data files in a data lake.
In this post I look at one approach to solve this problem: AWS Data Migration Service to capture changes from the source database and write them to a Kinesis Data Stream, with Amazon Data Firehose to load those records into Iceberg tables on S3.
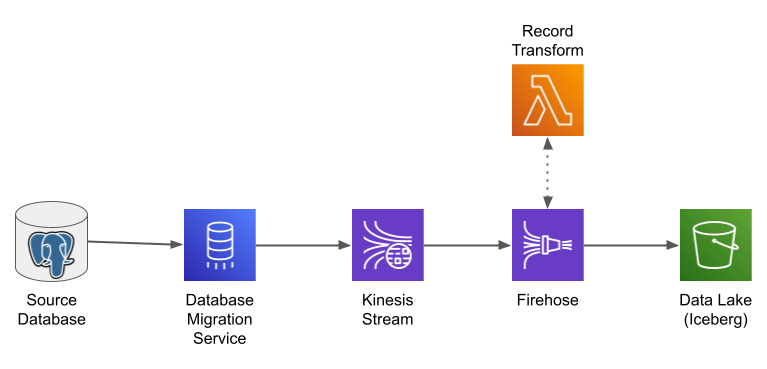
System Architecture
This pipeline is an extension of the one in my previous post. As in that post, I use Amazon Data Firehose (formerly Kinesis Firehose) to format streaming data and write it into Iceberg tables. In this post I expand the architecture to the left, using the AWS Database Migration Service (DMS) to subscribe to changes in a source database, and write those changes to a Kinesis stream. I also look at how to configure Firehose to write to multiple destination tables.
Sample Data
Finding appropriate sample data is always a challenge when writing these posts: it has to realistically represent what you might find in the real world, and by easy for readers to reproduce (if only to satisfy section 1.8 of the AWS service terms). In the past, I have often turned to CloudTrail, as it nicely demonstrates problems with organizing data and dealing with small files (plus, I have five years worth of data to work with). I’ve also used a program to generate simulated “clickstream” events (originally written fo the Chariot Data Engineer interview). For this example, which includes updates and deletes as well as inserts, I decided to look at third-party database benchmarks.
I ended up with the venerable TPC-C benchmark, as implemented in the BenchBase project. TPC-C models an order processing system: customers buy things, which are stocked in warehouses. I chose it because (1) it includes updates and deletes as well as inserts, and (2) it has a relatively small number of tables. Full disclosure: my goal was to generate data, not benchmark a database, so I pretty much ran the benchmark as-is (I did increase a couple of parameters to generate more activity).
One issue with using a benchmark rather than a real-world database is that a real-world database typically has years of data along with its ongoing transactions. A benchmark, by comparison, generates all of its data at the start of the run, and it doesn’t take that long to run. This is important because for the real-world database, DMS performs an initial load, followed by ongoing change-data-capture. Rather than try to start the DMS task somewhere in the middle of a run, I ran the benchmark twice: once before starting the task, and once after. The first run was handled as an initial load, the second as change-data-capture; I could then compare the performance of each phase.
Database Migration Service
As its name implies, the AWS Database Migration Service (DMS) is a service for migrating data from a source database to a destination database. It identifies the tables on the source, reads the contents of those tables, and writes them to like-named tables on the destination. To do this, DMS uses a “replication instance”: essentially an EC2 instance that runs the replication software (DMS also provides a serverless option, not used here).
DMS has a lot of flexibility. It lets you migrate data from one database engine to another: for example, from MySQL to Postgres. It also allows migration from one version to another: for example, Postgres 12 to Postgres 16. And it supports some non-database targets, in particular Amazon Kinesis.
When configured with a Kinesis target, DMS writes individual JSON records for each database change. These contain a “data” sub-object, which holds the fields in the source table record, and a “metadata” sub-object, which identifies the source table and the operation being reported. In this case, an insert to the order_line table:
{
  "data": {
    "ol_w_id": 1,
    "ol_d_id": 1,
    "ol_o_id": 1,
    "ol_number": 1,
    "ol_i_id": 53109,
    "ol_delivery_d": "2025-02-20T14:43:25.073000Z",
    "ol_amount": 0,
    "ol_supply_w_id": 1,
    "ol_quantity": 5,
    "ol_dist_info": "hlbpzuihkpoorimbljchfvz"
  },
  "metadata": {
    "timestamp": "2025-02-20T19:54:37.924174Z",
    "record-type": "data",
    "operation": "insert",
    "partition-key-type": "primary-key",
    "schema-name": "public",
    "table-name": "order_line",
    "transaction-id": 28561
  }
}
Configuring Postgres for replication
I find the AWS docs for this topic choppy, so here are the steps that you need to allow DMS to replicate changes from a Postgres source database:
- Enable logical replication. For RDS, this means setting the
rds.logical_replicationparameter to 1. For a self-managed Postgres instance, set thewal_levelparameter to “logical”. - Set the parameters
max_replication_slotsandmax_wal_sendersparameters to a value greater than 1. For RDS, these will already be set to a higher value, and can be left alone. - Enable the extension by adding
pglogicalto theshared_preload_librariesparameter. This parameter is a comma-separated list of extensions, and probably already contain several that you want to keep. The docs are misleading in that they seem to suggest replacing any existing value, which you definitely don’t want to do.. - Reboot the database to apply these parameters.
- Login (using
psqlor your favorite SQL front-end) as the database administrator and executecreate extension pglogical;. - If you don’t want to use the database admin user for replication, then create a new user and grant
SELECTpermissions on the schemas/tables to be replicated. Also create a Secrets Manager secret to hold that user’s connection information, as documented here. - Grant
rds_replicationto the replication user (you must do this even if using the admin user).
Configuring DMS to read from Postgres, write to Kinesis
DMS has three components:
- A replication instance, which runs the migration code. You can also configure a serverless migration, but for this example I decided to stick with a traditional migration instance.
- Source and target endpoints. These require configuration such as the database connection secret and Kinesis stream name.
- A replication task, which runs on the replication instance. This task has additional configuration, such as number of threads for both initial load and change-data-capture.
My recommendation is to create these in the order I list here, so that you can use the replication instance to test the endpoints. Once those two components are in place, the replication task is easy (although it might require tuning).
There are many replication instance types; the naming is consistent with like-sized EC2 instance types. Replication – at least for a single source and destination – should not need a lot of CPU, but in my experience it does require significant memory. Start with a dms.t3.medium and jump to one of the “R” (memory-optimized) types if you increase the number of concurrent threads in your replication task.
Replication instances run inside of a VPC. You can run them in a private subnet, which makes sense when migrating between two in-VPC database servers, but which means that you need a NAT or VPC endpoints to access external services such as Kinesis. For this example, I recommend instead deploying into a public subnet, with a public IP (it will still communicate with the database via its in-VPC endpoint).
Like an EC2 instance, the replication instance is associated with a security group. I use this group as a “marker”: it has no ingress rules of its own, but is referenced in an ingress rule for the security group attached to the database. It has an all-traffic egress rule to allow it to connect to the source and target.
When configuring endpoints, you must provide an IAM role that allows whatever actions are required by the endpoint. For example, if you store the database connection config in a Secrets Manager secret, you must grant permission to retrieve that secret value. I think of this role as dedicated to the replication task, rather than the individual endpoints, and use one role for both endpoints used by the task.
Lastly, there’s the replication task itself. It’s easy to create a replication task: simply tell it the endpoints and replication instance, and let it pick defaults for everything else. However, that’s unlikely to give you good results performance-wise. There are a lot of parameters that control task operation, many of them dedicated to parallel execution. Increasing the number of parallel workers will require a larger instance type, as each worker uses a multi-megabyte buffer for its work-in process.
Rather than do this all in the Console, I have created a CloudFormation template that creates the data migration components.
Firehose
My previous post used Firehose to populate a single table, from a stream that contained only inserts. For this example, I have seven tables, and a mixture of inserts, updates, and deletes (as well as some non-DML statements). This means changes to the transformation Lambda, and also to the destination table configuration.
I’ve created a CloudFormation template for the Firehose (including transformation Lambda) here, and for the Glue tables definitions here.
Transformation Lambda
In my previous post, the transformation Lambda lowercased all of the fieldnames, so that they would match the columns in the Glue table definition. There’s no need to do that here, because DMS passes lowercase field names. But we still need to transform the records:
- We only want to write the “data” sub-object into the destination table.
- The DMS initial load produces records with the operation “
load”; these should be passed to Iceberg as “insert”. - Non-DML records should be dropped entirely.
- As should records for any tables that we don’t want to populate.
Most of these rules are applied in the transform() function:
def transform(rec:bytes) -> bytes:
    data = rec.get('data')
    if not data:
        return None
    metadata = rec.get('metadata')
    if not metadata:
        return None
    operation = OPERATION_LOOKUP.get(metadata.get('operation'))
    if not operation:
        return None
    table_name = metadata.get('table-name')
    if not table_name:
        return None
    return (operation, table_name, json.dumps(data))
This function is called by the process() function, which is responsible for handling a single Firehose transformation record. Note that it uses the “extended” transformation output structure, which FIrehose added to support Iceberg tables. In addition to status and the output record, it contains metadata identifying the destination table and operation (insert/update/delete).
def process(rec:dict) -> dict:
    record_id = rec['recordId']
    data = None
    try:
        raw = base64.b64decode(rec['data'])
        parsed = json.load(io.BytesIO(raw))
        transform_result = transform(parsed)
        if transform_result:
            (operation, table_name, transformed) = transform_result
            encoded = base64.b64encode(bytes(transformed, "utf-8"))
            return {
                'recordId': record_id,
                'result': 'Ok',
                'data': str(encoded, "utf-8"),
                'metadata': {
                    'otfMetadata': {
                        'operation': operation,
                        'destinationDatabaseName': glue_database_name,
                        'destinationTableName': table_name
                    }
                  }
            }
        else:
            return {
                'recordId': record_id,
                'result': 'Dropped'
            }
    except Exception as ex:
        logger.warn(f"exception processing record; data = {data}", exc_info=True)
        return {
            'recordId': record_id,
            'result': 'ProcessingFailed'
        }
Destination table configuration
In my previous post, I included the destination table configuration primarily because CloudFormation required it. In this example, which includes updates and deletes as well as inserts, it’s necessary. For each table, I need to specify the fields that comprise the table’s primary key. As an example, the customer table has a three-column primary key; in CloudFormation, its configuration looks like this:
- DestinationDatabaseName:    !Ref GlueDatabaseName
  DestinationTableName:       "customer"
  UniqueKeys:                 [ "c_w_id", "c_d_id", "c_id" ]
One problem: the history table does not have a primary key: it’s a record of updates to other tables. You can simply omit such tables from the configuration: Firehose will treat all records as inserts.
Potential Problems
When I ran this pipeline in a test environment, it worked perfectly: all of the rows from the source ended up in Iceberg. However, I have a few concerns …
Performance
My sample database had approximately 1.1 million rows. The initial load, writing to a 4-shard Kinesis stream, took approximately 15 minutes, for an average of slightly over 1,200 rows/second. The change-data-capture phase, of approximately the same number of rows, took 27 minutes, with CloudWatch indicating around 700 rows/second. Individual table stats for the initial load, as reported by the DMS task, were around 600 rows/second.
These numbers are far lower than the 4,000 rows/second promised by a 4-shard Kinesis stream, which makes me worry that DMS won’t be able to keep up with an active database.
DMS allows you to tune the number of threads used to read the source table, and my test was with four threads per table, and eight concurrent tables. This did have some benefit versus defaults: for example, the order_line table, with approximately 600,000 rows, took 21 minutes for the initial load with the default configuration, and 14 once I upped the number of threads. But I would have expected more.
This will be a problem if you have large tables, such as a billion-row transaction table. In fact, Kinesis Data Streams aren’t a great choice for such a large table in any case: even if you could max out the data rate, it would take more than 11 shard-days to load such a table (or, in other words, to load a billion row table in under a day you need a stream with 12 shards – assuming that you can feed it at max throughput).
DMS does allow configuring CDC-only tasks, starting at a specified Postgres LSN (log sequence number). So for a large database that has relatively infrequent inserts or updates, you could dump the tables manually and then use DMS only for capturing changes. I haven’t done this, and think that it’s sufficiently complex that I’d consider custom code for the change-data-capture portion as well.
Out-of-order updates
DMS allows you to configure the number of threads for target writes, and the number of queues used to feed those threads. This can improve performance, but risks applying changes out-of order. For example, an order might have several status changes – placed, address verified, credit verified, sent to warehouse – that happen in a short time period. If different threads handle these updates, then the data lake might say that the status is “address verified” while the actual database says “sent to warehouse” simply because the incorrect status appeared in the stream after the correct status.
The actual risk will depend on your specific application, how rapidly it updates the same row, and whether the order of updates will affect your analytics. For example, if you care only about the number of orders that are shipped or not, it won’t matter that the intermediate statuses are applied out-of-order (assuming there’s a time gap between sending the order to the warehouse and actually shipping it).
In my test, running a benchmark that made frequent updates, I did not see issues with out-of-order updates: the final state of my data lake matched the final state of my source database. However, I wouldn’t rely on that in a real-world environment. At the least, I would perform frequent cross-check queries to ensure that the databases match.
Lack of referential integrity
Related to out-of-order updates, rows might be inserted into one table before the rows that they refer to are inserted into another table. As long as the source maintains its own referential integrity constraints, then the data lake will be eventually consistent. But you should be aware that any given join might not select all of the rows that you expect.
Schema changes
If you change the schema on the source, that change isn’t replicated to the data lake. Instead, you have to update the Glue table definitions to include any added columns (and, if the transformation Lambda changes field names, update it as well).
If you add a column with a default value, be aware that there’s no way to tell Glue about that default. Any existing rows will have null for that column’s value. If the default value is important to you, I believe that the best solution is to create a view that uses the coalesce function to replace nulls.
Dangling replication sets
When you first start a replication task, it creates two pglogical replication sets, along with a replication slot. If you then delete that task, it does not clean up these resources. This is not an issue for a production deployment, since you probably won’t delete the task. But it may become an issue in development, where you might experiment with different task configurations using infrastructure-as-code.
To identify the replication slots and replica sets, use the following queries:
select * from pg_replication_slots;

select * from pglogical.replication_set;
I recommend running these two queries before creating any replication tasks, so that you can see what resources exist outside of DMS (most likely, there won’t be any). Then, after deleting a DMS task, run the two queries again and use the following queries to delete the no longer used slots/sets (these are functions, rather than procedures, so must be invoked using SELECT):
select pg_drop_replication_slot('SLOT_NAME');

select pglogical.drop_replication_set('REPLICATION_SET_NAME');
Conclusion
DMS provides one relatively simple solution to replicate line-of-business systems into your data lake. It avoids custom code, meaning that you can get something deployed quickly. And in many cases, it will be sufficient.
But, as you’ve seen with my comments above, there are still challenges. In particular, because DMS is a “black box” that provides minimal information when things go wrong. The DMS team produced a four-part blog about how to debug your jobs. I, personally, would be much more comfortable if AWS were to open-source DMS, allowing its users the ability to understand how the data moves through the pipeline.