
SiriKit was created for developers in iOS 10. However, there were, and still are, a limited number of intent domains with which you can integrate an app. An intent domain is simply a category of app that can take advantage of Siri. With the release of iOS 11, a few new domains are being made available.
Possibly the most intriguing intent domain for most developers is “Lists and Notes”. In the past, Siri has been available for messaging apps, VoIP calling apps and some others. While, having Siri available to these apps as a user is a great thing, most apps are not able to fit inside of those domains. Although, many more apps will be able to fit into the lists and notes domain.
Because of the lists and notes being suitable for many more apps, this tutorial is going to look into how to use SiriKit so that an app can take advantage of Siri. We will work on a simple note app. Even if your app is not a list or note taking app, most of what is discussed here is generic to SiriKit and not specific to the domain. So, the information here can easily be applied to other domains. To get started, download the starter project from GitHub.
Requesting Authorization For Siri
Siri, like many other iOS features, requires the user to grant permission before it will work. To that effect, we must first set up the app to request permission. Note, though, that this permission is only requested from the iOS app. If you have a watchOS app, it will automatically be granted or denied permission based on the iOS app’s permission.
First, we must declare that we are going to use Siri in the app’s Info.plist file. In Info.plist, add a new entry with the key NSSiriUsageDescription. The value for the key should be a string that describes what information is going to be shared with Siri. Enter “Notes will be shared with Siri.”
Next, we need to prompt the user for permission. Your app might have a setting to turn this on so that you can prompt the user only when the feature is enabled. For this app, we will request as soon as the app finished launching. In AppDelegate, add import Intents to the list of import statements. Then, in application(_: didFinishLaunchingWithOptions:) add the following code.
INPreferences.requestSiriAuthorization { (authStatus: INSiriAuthorizationStatus) in
}
If you build and run now, you will see a crash. So, hold off for now.
Enabling Siri
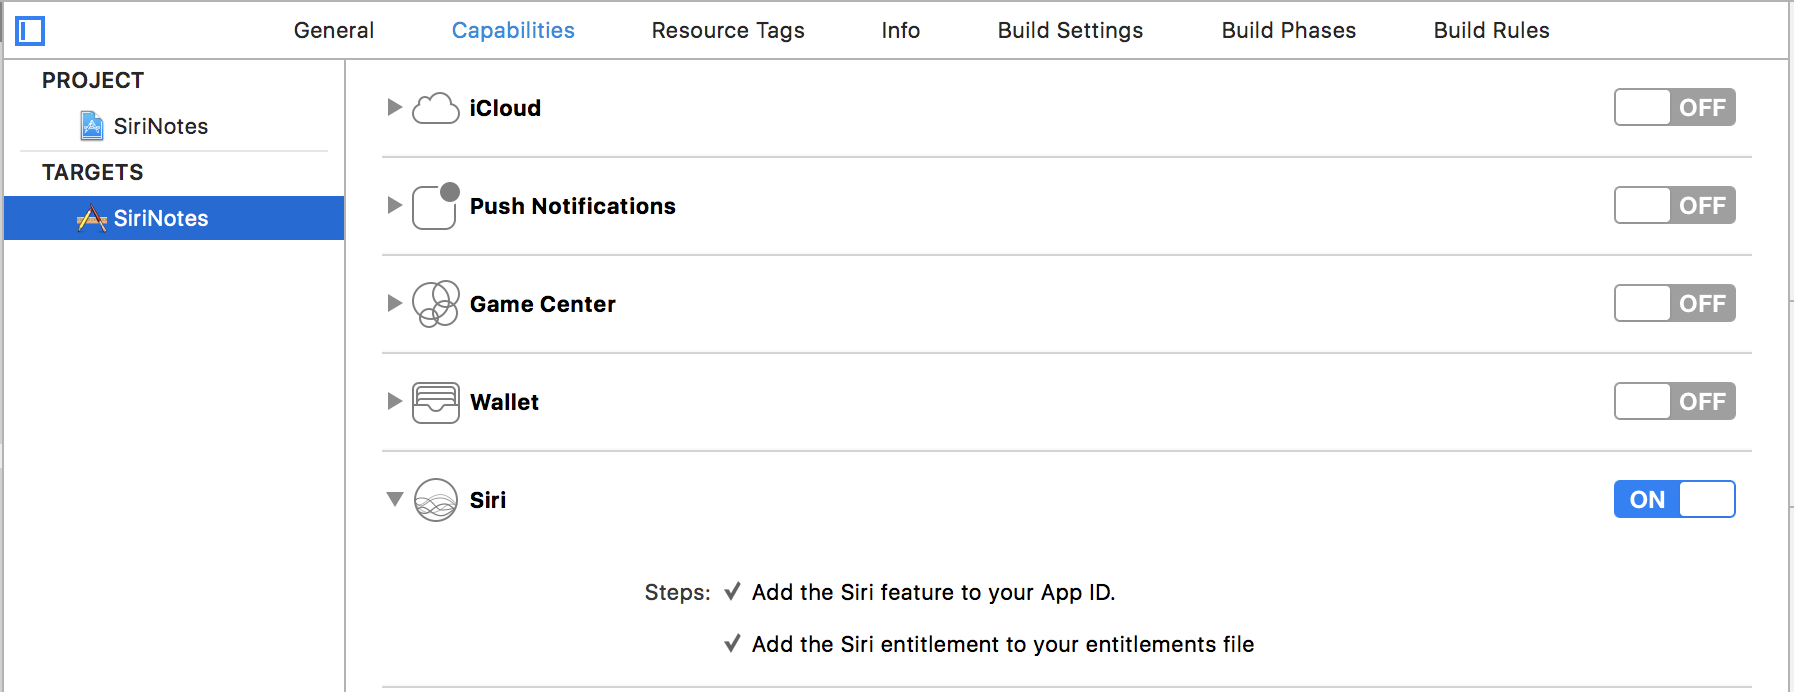
The first step to enabling Siri is to turn on the Siri capability. This will add an entitlement to your project. Open the project details and select the “Capabilities” tab. There, you can turn on Siri.
Creating A Siri Extension
Next, we need to create an app extension. This is where all interactions with Siri take place. Create a new target and select “Intents Extension” as the type.

Give it an appropriate name, such as “SiriNotes_SiriExtension”. By keeping the “Include UI Extension” checkbox selected, we will have an opportunity to customize the Siri interface if we so choose. If you look at the list of targets, you will now see three. They correspond to the iOS app, the intents extension, and the UI extension that is used for customization.
Specifying Intents For Siri
The extension’s Info.plist file lets SiriKit know which intents are supported. Next, we will be working in this file. Do not confuse this file with the Info.plist file that we were previously working on. This Info.plist file will be found under the folder that was created in Xcode for your new extension. The file should look something like this:

Take note of two keys: “IntentsSupported” and “IntentsRestrictedWhileLocked”. These are both arrays of strings. Each string should match a class name. In the “IntentsSupported” array, we need to list the intents that we are going to support. In the “IntentsRestrictedWhileLocked” array, we list the intents that we want the user to unlock the device before using. We would want that if there is a security concern with the data our app holds. For example, apps that support financial transactions would require the device to be unlocked before committing a transaction.
We need to remove the default intents that are listed and add the ones that we actually want to support. After removing the three supported intents under “IntentsSupported”, add the new supported intent: “INCreateNoteIntent”.
There are two important things to mention at this point. First, there are more intents that we could support with our notes app, “INSearchForNotebookItemsIntent” and “INAppendToNoteIntent”. We are choosing not to support these. Second, the order of the intents is, sometimes, important. If, when speaking to Siri, the user is not clear about exactly which action is desired, Siri will use the first intent in the list that might work.
Setting Up The Intent Handler For Siri
In the extension that was created, there is an IntentHandler class. This class is used by SiriKit to provide an object that can handle an intent. This object can be any type and could even be a different type of object based on the type of intent that needs to be handled. For example, I could have one class that only handles the “INSearchForNotebookItemsIntent” and a separate class that only handles “INCreateNoteIntent. If this is my setup, then I can inspect the intent to decide which class I should instantiate and return. However, since we are only supporting one intent, we will use the IntentHandler class to do all of the work instead of creating a new class.
IntentHandler currently has a lot of code for handling messaging intents, which we do not need. Remove all the code from this class except the handler(for:) method. Your class should look like this:
class IntentHandler: INExtension {
    override func handler(for intent: INIntent) -> Any {
        return self
    }
}
This will tell Siri that this instance of IntentHandler is going to be the handling object for any intents that are received. Next, we need to make sure our class conforms to INCreateNoteIntentHandling since that corresponds to the intent type that we handle.
Resolving Parameters From Siri
The first thing we need to do when handling an intent is to make sure the data given to the app is valid. To do this, we work with SiriKit by implementing the methods that start with “resolve”. For note creation there are three:
resolveTitle(forCreateNote:with:)resolveContent(forCreateNote:with:)resolveGroupName(forCreateNote:with:)
For each of these we need to inspect the intent and see if the data is valid. Once complete, we call the completion closure with the results. There are six options as the results.
- Success – The intent has the information we need.
- Not required – Our app does not need this data.
- Needs disambiguation – There are multiple results that could be accurate but we do not know which one the user wants. So, more information is needed from the user.
- Needs confirmation – We think that we know what the user wants but we need to confirm.
- Value required – There is no value for this parameter but we need a value.
- Unsupported – The value supplied represents something that our app is not able to handle.
Since our app is fairly simple, the only results we will need to use are Success and Not required. Lets start by implementing the three “resolve” methods. First, we will implement resolveTitle(forCreateNote:with:). Implement this method as follows.
public func resolveTitle(forCreateNote intent: INCreateNoteIntent, with completion: @escaping (INStringResolutionResult) -> Swift.Void) {
    let result: INStringResolutionResult
    if let title = intent.title, title.count > 0 {
        result = INStringResolutionResult.success(with: title)
    } else {
        result = INStringResolutionResult.needsValue()
    }
    completion(result)
}
Since this value is required, we are checking for the existence of the title. If it exists, we return success. Otherwise, we return needsValue. Take not that success also takes a string. This is because if we wanted to alter the title we could. For example, we could make sure that the title always starts with a capital letter.
Next, we will implement resolveContent(forCreateNote:with:). For this property, we will either return success or notRequired. Add the following method to IntentHandler.
public func resolveContent(forCreateNote intent: INCreateNoteIntent, with completion: @escaping (INNoteContentResolutionResult) -> Swift.Void) {
    let result: INNoteContentResolutionResult
    if let content = intent.content {
        result = INNoteContentResolutionResult.success(with: content)
    } else {
        result = INNoteContentResolutionResult.notRequired()
    }
    completion(result)
}
Again, we check to see if the content exists. If it does, we return success. Unlike the title, however, this is not required. So, if the content is not valid, we will return notRequired so that Siri will continue anyway.
Continuing, we must implement resolveGroupName(forCreateNote:with:). We are not grouping our notes into categories, so the group name does not make sense for us. We need a way of telling Siri that we do not need a value for this but we can still proceed. For this, we will always return unsupported.
public func resolveGroupName(forCreateNote intent: INCreateNoteIntent, with completion: @escaping (INSpeakableStringResolutionResult) -> Swift.Void) {
    completion(INSpeakableStringResolutionResult.unsupported())
}
Confirming Details For Siri
After all of the parameters have been resolved. SiriKit will ask us to confirm that we are ready to handle the intent. This is our point to make sure any dependencies we have are prepared. For example, if we need access to the user’s location, we can make sure that is active and we have been granted permission. For this app, there is nothing more that we need so we are simply going to tell SiriKit that the intent is confirmed.
public func confirm(createNote intent: INCreateNoteIntent, completion: @escaping (INCreateNoteIntentResponse) -> Swift.Void) {
    completion(INCreateNoteIntentResponse(code: INCreateNoteIntentResponseCode.ready, userActivity: nil))
}
Handling The Intent From Siri
Finally, we get one more method called in our extension to let us know that all of the data is ready. That method is handle(createNote:completion:). In this method we will create a new note and call the completion handler with the result of our actions. We will go through this implementation one step at a time. First, take a look at the code below.
public func handle(createNote intent: INCreateNoteIntent, completion: @escaping (INCreateNoteIntentResponse) -> Swift.Void) {
    // Step 1
    let context = DatabaseHelper.shared.persistentContainer.viewContext
    // Step 2
    let newNote = Note(context: context)
    newNote.title = intent.title
    newNote.details = intent.content?.description
    // Save the context.
    do {
        // Step 3
        try context.save()
        // Step 4
        let response = INCreateNoteIntentResponse(code: INCreateNoteIntentResponseCode.success, userActivity: nil)
        // Step 5
        response.createdNote = INNote(title: intent.title!, contents: [], groupName: nil, createdDateComponents: nil, modifiedDateComponents: nil, identifier: nil)
        // Step 6
        completion(response)
    } catch {
        // Step 7
        completion(INCreateNoteIntentResponse(code: INCreateNoteIntentResponseCode.failure, userActivity: nil))
    }
}
Now, we can go through exactly what is happening here.
- We get the context so that we can save to CoreData. Note that we must make changes to our
DatabaseHelperso that our data is in an “App Group”. Otherwise, the extension will not see the same data as the app. This step is not covered here as it is not anything new. - Create a new
Noteand populate the properties based on the intent we are given. - Save the new
Note. - Create an
INCreateNoteIntentResponseto pass to the completion block. The completion block must be called. Since we have been successful in creating the new note, we will passsuccessin as the response code. We usenilfor the user activity since our app is not configured to handle user activities. - Create an
INNoteto represent theNotethat we created. The only part of this that we are interested in relaying back to the user is the title. So, the title is added from the intent, the contents are an empty array and everything else is nil. We could fill in more of these parameters to give the user more data but it is not necessary. - Call the completion block with the
INCreateNoteIntentResponsethat was created in step 4. - If there is an error along the way, we will respond by calling the completion block and telling Siri that we failed.
We have now implemented SiriKit to allow us to create a new note! Build and run the app, close it and trigger Siri to create a new app by saying something like “Create a new note called dogs in SiriNotes”. Then, close the Siri screen and launch the app. You should see your new note!. If you do not see your note at this point, kill the app and re-open.
Testing Siri Integration
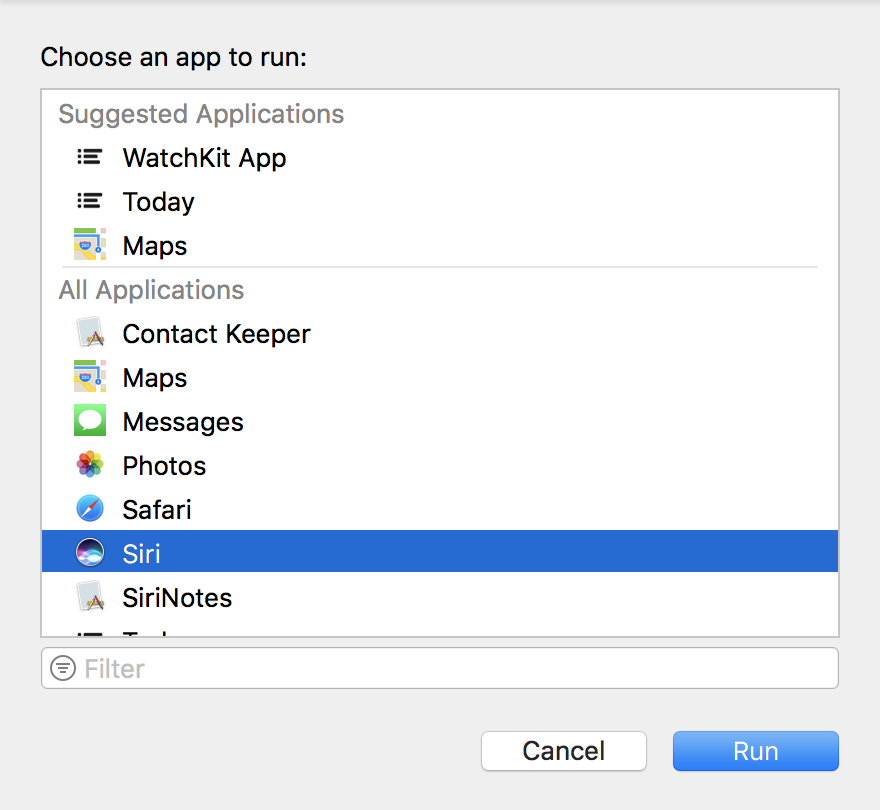
In order to test, which can be done on a device or simulator, select the scheme for your intents extension and select run. You will be shown a prompt to select which app you would like to run. Select “Siri”.
If you do this, and issue a command to Siri, but your app is not recognized, it does not immediately mean that there is a problem. There can be up to a few minutes of delay between launching this and Siri recognizing your app. The same is true if you make changes to the extension’s Info.plist file. For example, you may add or remove an intent. In any of these situations, wait for a few minutes and try again. Apple does not give us any direction on the maximum amount of time that this could take.
Issues And Improvements
There is currently one bug and one very big improvement that could be made. First, I will address the bug. As I alluded to previously, there is a chance that you will not see the new note in the app immediately. This happens if the new note is created via Siri with the app running in the background. This is because the NSFetchedResultsController is not told about changes made to CoreData while the app is in the background. There are multiple ways to fix this issue but I will leave that up to you.
Second, if an NSUserActivity is given to the INCreateNoteIntentResponse that is sent to the completion handler in the method handle(createNote:completion:) then this process will be more powerful. This would enable the user to continue with the note immediately after creating it via Siri. To do this, you would also have to handle continuing from an NSUserActivity in the AppDelegate class.
Wrap Up
You have now seen how to fully handle intents in the notes domain with SiriKit. As mentioned previously, the implementation for other domains would be very similar. Since many of these methods are very specific to notes, it is clear that methods will change. However, the concepts remain the same. You will need to resolve each parameter, confirm that the intent can be handled and handle the intent.
The completed project can be found on GitHub.