
Writing AWS Lambda functions using the Serverless Framework makes it easy to manage dependencies that your functions depend on as far as third-party packages or keeping track of the AWS resources that your service utilizes. The Serverless Framework automates a lot of the resource allocation and packaging of the functions with a CLI tool named “serverless”. When I develop serverless functions they can be difficult to debug without actually deploying the functions and that’s why I’ve incorporated the Serverless Offline plugin and also the LocalStack project into my workflow.
Serverless Offline is great for spinning up a local environment that simulates API Gateway and my function handlers without touching any online AWS resources. The great thing about Lambas is that they can be incorporated with many of AWS’s services so when I’m debugging my functions offline I want to be able to mock their connection to other AWS resources.
The last project I want to talk about is LocalStack. LocalStack like the Serverless Framework is also an open-source project that helps you create a local environment using Docker that provides the same functionality and API as the real infrastructure.
The Serverless Framework provides a Github repository that has a lot great templates to help you get started. I decided I wanted to test out a small simple Python REST API with DynamoDB so the example project provided looks like the typical CRUD backend for creating a todo application. It has an integration with one resource which is a DynamoDB table so we will be modifying this example to add our Serverless Offline plugin and utilizing LocalStack to emulate the DynamoDB calls offline and local to our machine.
Setup:
Prerequisites:
- Node
- Python 3
- Docker and Docker Compose
- AWS CLI
Spinning up an example is easy to do. Open up a terminal and navigate to your project directory and run the following commands:
serverless install \
-u https://github.com/serverless/examples/tree/v3/aws-python-rest-api-with-pynamodb \
-n todos

npm install serverless-offline --save-dev
The first command installs the example template project and the second command installs the plugin in our dev dependencies. As with Serverless plugins they need to be defined in the plugin section of the yml file.
serverless.yml:
plugins:
- serverless-python-requirements
- serverless-offline
To configure the Python portion for this project we need two plugins. The template project provided the first one for us, serverless-python-requirements, which is a plugin that makes it easy to package Python functions. The second plugin we need is serverless-offline. Just add a new entry underneath “plugins” to hook up with plugin with Serverless. Since we also have some Python dependencies defined in the requirements.txt file lets create a simple virtual environment as well. Before we create the virtual environment, note that the Lambda runtime specified in the serverless.yml is Python 3.8 so our Python on our machine must match this call out, otherwise you may run into errors such as “python3.8: command not found”. It’s easy to have several versions of Python installed with pyenv.
In case you need to switch your Python version first install pyenv according to your system requirements and run:
pyenv install 3.8.13
pyenv shell 3.8.13
Now create the virtual environment to keep track our dependencies for Python:
python3 -m venv env
source env/bin/activate
pip install -r requirements.txt
Project Overview
You can call the project anything you like but for this demonstration I’m calling this project todos. Open up the project in your code editor of choice, for me that will be VS Code.
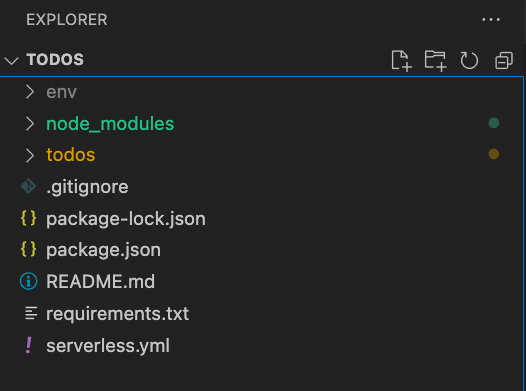
Now looking at the project structure it may look familiar if you worked on a JavaScript project before. It has your dependencies in the node_modules directory and the packaging information stored in package.json. Even though Serverless is a JavaScript project you can write your functions in other languages that AWS supports, such as Python For example, my functions in the todos directory are written in Python.
There is one more important file to take a look at and it’s the serverless.yml config that Serverless uses to manage the deployment to AWS. There’s a lot of customization that can be used here, such as choosing different providers other than AWS, and setting up how to deploy our functions with different services. For more complicated applications you have the option to call Cloudformation templates from here as well. We do depend on a DynamoDB table, so we have some custom Cloudformation in the resources section of the serverless.yml. More information about the different options you can use can be found on the here.
There’s some more setup I wanted to add to this project. Right now we only have Serverless configured, but I like to use Docker/Docker Compose to take care of the LocalStack setup. The docker-compose.yml file is copied from the LocalStack repository, the only changes I added were to expose the default port of 4566 to my host machine and I also added some AWS related environment variables. The one environment variable that is important to specify is “SERVICES”. LocalStack has support for many AWS services but you have to enable them at startup. For us we need to enable “dynamodb”.
docker-compose.yml
---
version: '3.8'

services:
  localstack:
    ports:
      - "4566:4566"
  image: localstack/localstack
  environment:
    - SERVICES=dynamodb
    - AWS_ACCESS_KEY_ID=123
    - AWS_SECRET_ACCESS_KEY=ABC
    - AWS_DEFAULT_REGION=us-east-1
The service can then be started up with Docker Compose:
docker-compose up -d
I’m using the -d detached flag so that we can run some commands to test LocalStack. To test the local environment there’s a flag that the AWS CLI provides --endpoint-url if we take a look at the container that spun up by Docker Compose we see that the container port 4566 is attached to our host of the same port
docker-compose ps

We should be able to interact with this container using the AWS CLI. Since we only have DynamoDB enabled lets see what happens when we use the “list-tables” command. Other DynamoDB commands can be found here.
aws --endpoint-url http://localhost:4566 dynamodb list-tables
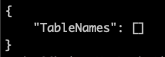
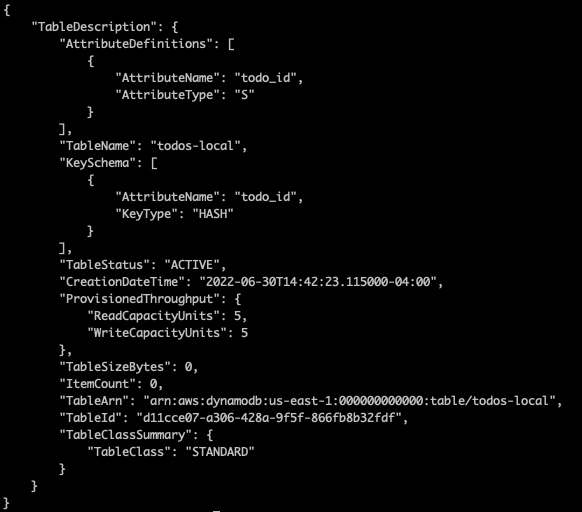
This was the response I was expecting. We don’t have any tables yet, but we now know our container environment is working, so lets create a table now. After looking at the resource definition in the serverless.yml file we have a very simple DynamoDB table with one primary key and attribute “todo_id” which is of type String “S”. I will run an aws cli command to create this same table in our container environment:
aws --endpoint-url http://localhost:4566 dynamodb create-table \
  --table-name todos-dev \
  --attribute-definitions \
    AttributeName=todo_id,AttributeType=S \
  --key-schema \
    AttributeName=todo_id,KeyType=HASH \
  --provisioned-throughput \
    ReadCapacityUnits=5,WriteCapacityUnits=5 \
  --table-class STANDARD
If the create-table command worked, we should see the output below that shows the table has been created and it’s status is “ACTIVE”.
Hooking up the mock DynamoDB table with our code
Our local table has been created. Now let’s make a minor modification to how the functions access these resource in our function code. If we open up the todos directory we will see the typical CRUD operations for a REST API but the file we want to edit is the “todo_model.py”. This file is using a third-party Python PyPI package named PynamoDB as we saw in the requirements.txt file. This is just an ORM that makes it easy to interact with DynamoDB.
NOTE: PynamoDB has a small blurb on their website on modifying just the host connection, but I found that after digging around the source code that both the host and region need to be modified for our use case. Let’s do that and specify the name of our table in the Meta class:
table_name = os.environ['DYNAMODB_TABLE']

if "IS_OFFLINE" in os.environ:
    region = 'localhost'
    host = 'http://localhost:4566'

else:
    region = 'us-east-1'
    host = 'https://dynamodb.us-east-1.amazonaws.com'
Since we are using the Serverless Offline plugin, an “IS_OFFLINE” variable is injected at runtime when we start our local server. This seemed to be a good way to dynamically setup up the host connection. If the environment variable is present then the application will default to using our LocalStack table, but when the application is deployed it will use the production endpoint. Lets test out that connection now.
serverless offline

We now have some local endpoints. Here we can use whatever tool we like to test these endpoints, such as Postman or the command line tool Curl. Lets test out the list function by running a curl command on the /todos endpoint.
curl http://localhost:3000/todos

{"items": []}%
Our API looks like it’s working; we just don’t have any data in DynamoDB yet. Lets change that by adding a couple of entries:
curl -X POST http://localhost:3000/todos --data '{ "text": "Learn Serverless" }' -H "Content-Type: application/json"

{"checked": false, "createdAt": "2022-06-30T15:38:04.859240+0000", "text": "Learn Serverless", "todo_id": "290f9af8-f8ac-11ec-ad0b-96ac03bab523", "updatedAt": "2022-06-30T15:38:04.859493+0000"}%

curl -X POST http://localhost:3000/todos --data '{ "text": "Finish blog post" }' -H "Content-Type: application/json"

{"checked": false, "createdAt": "2022-06-30T15:38:04.859240+0000", "text": "Finish blog post", "todo_id": "36a00158-f8ac-11ec-ad0b-96ac03bab523", "updatedAt": "2022-06-30T15:38:27.616268+0000"}%
Now that we have some entries in our our table let’s try curling the /todos endpoint again:
curl http://localhost:3000/todos

{"items": [{"checked": false, "createdAt": "2022-06-30T15:38:04.859240+0000", "text": "Learn Serverless", "todo_id": "290f9af8-f8ac-11ec-ad0b-96ac03bab523", "updatedAt": "2022-06-30T15:38:04.859493+0000"}, {"checked": false, "createdAt": "2022-06-30T15:38:04.859240+0000", "text": "Finish blog post", "todo_id": "36a00158-f8ac-11ec-ad0b-96ac03bab523", "updatedAt": "2022-06-30T15:38:27.616268+0000"}]}%
Our Create and List functions look to be working correctly. I’ll leave the testing of the other functions up to you. Assuming our functions work as expected, the last thing we need to do is to deploy this on real AWS infrastructure. Serverless takes care of this for us with one command:
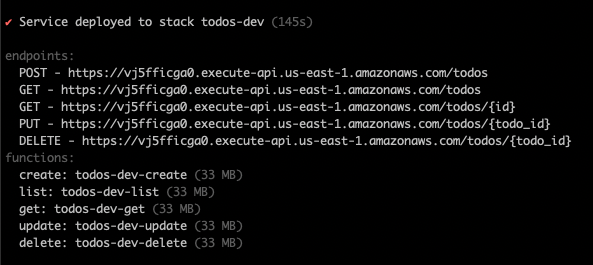
serverless deploy
When we run this command, the terminal will show the various steps as it creates the Cloudformation stack, and eventually it will show the deployed functions. You can also see at any point what you have deployed by running:
serverless info --stage dev
Now if we run the same commands using the new endpoint we should see the same results:
curl -X POST https://vj5fficga0.execute-api.us-east-1.amazonaws.com/todos --data '{ "text": "Learn Serverless" }' -H "Content-Type: application/json"

{"checked": false, "createdAt": "2022-07-01T14:56:42.558529+0000", "text": "Learn Serverless", "todo_id": "04d8aa7e-f94e-11ec-99fe-fadd30fe4085", "updatedAt": "2022-07-01T14:56:42.571787+0000"}%
curl https://vj5fficga0.execute-api.us-east-1.amazonaws.com/todos

{"items": [{"checked": false, "createdAt": "2022-07-01T14:56:42.558529+0000", "text": "Learn Serverless", "todo_id": "04d8aa7e-f94e-11ec-99fe-fadd30fe4085", "updatedAt": "2022-07-01T14:56:42.571787+0000"}]}%
Next Steps:
The Serverless Framework handles the packaging and deployment for us. We are able to test and debug our functions locally with mocked services provided by Serverless Offline and LocalStack. The functions are right now exposed to the world so the next thing I would do is to lock these down so that only I would have access to them. Serverless also has some examples that can help you get started.
The final code for this blog can be found here.