
The debate as to whether or not the iPad can replace a computer is on going. We do not need to get into the discussion of who this might work for or what kind of work can be done with an iPad. The fact is that for some people this is already happening. Even if people are not using the iPad as a computer replacement, many people are at least using it as a light weight computer. It is a computer that has a pointing device (finger, Apple Pencil or stylus), a spacious screen and a keyboard, which allows us to use shortcuts.
Introduction
The keyboard is an enormously important piece of hardware. Leaving aside the iPad for a minute, when people have an application that they use heavily, they tend to squeak every bit of of efficiency from it. Keeping both hands on the keyboard and not moving one of the hands to a mouse or the screen is one great way to keep things efficient. Personally, I have chosen to use software that I know lacks certain features that are available from other apps simply because I already know exactly what to do with the app I am comfortable with and I know every shortcut key I need.
Returning to the iPad, the same idea applies. People want to use whatever apps are available as efficiently as possible. Especially if the app is used for business. As these devices become more powerful and people are doing more with them, we, as developers, need to make sure we are doing everything possible to give the user the best experience possible with the apps we create. As I looked through the apps on my iPad Pro, I was shocked by how few of them supported keyboard shortcuts, or at least discoverable keyboard shortcuts.
Implementing Keyboard Shortcuts
If you prefer video, I did a quick screencast on what it takes to set up keyboard shortcuts which can be found here. For a more in-depth and realistic look, though, we are going to re-visit a list app that I made while writing Enabling Siri Integration With SiriKit. Using this app as a starting point, we will implement keyboard shortcuts to create and delete notes. To get started you can download the code here.
Keyboard Shortcuts with a UISplitViewController
In a simple app, as you may have seen if you watched the screencast that accompanies this post, supporting keyboard shortcuts is very simple. However, in most apps there is something about the app’s architecture that causes complications. For this app, those complications come from the split view controller. We are not able to simply support keyboard shortcuts directly in the MasterViewController and DetailViewController because on an iPad, where these shortcuts are most likely to be used, these views can both be on screen at the same time. In this situation, the system doesn’t know which UIViewController‘s keyboard shortcuts to make available. Additionally, we may want shortcuts from both the master and the detail to be available at the same time. This is going to require us to subclass the UISplitViewController and add some logic there.
First, create a new class called SiriSplitViewController and make it a subclass of UISplitViewController. In this class, we must override the keyCommands property. keyCommands is an array of UIKeyCommand objects and that array tells the system what keyboard shortcuts are available. The keyCommands property is available to all UIResponder subclasses. It is a read-only property, though, so it must be overridden.
override var keyCommands: [UIKeyCommand]? {
}
A UIKeyCommand is created like this:
UIKeyCommand(input: "n",
           modifierFlags: .command,
                  action: #selector(insertNewObject(_:)),
    discoverabilityTitle: "New Note")
Notice that, unlike UIButtons, there is no target in a UIKeyCommand. That means that the Selector is called on the object that creates the UIKeyCommand. Since we do not really want SiriSplitViewController to be deciding which shortcuts are available or to be handling the keyboard shortcuts, we must create a way to communicate with the classes inside of our SiriSplitViewController instance that should be doing this work. We will do this by creating a protocol. Above SiriSplitViewController, create a protocol like this:
protocol KeyCommandProvider {
    var shortcutKeys: [UIKeyCommand] { get }
}
Now, when SiriSplitViewController is asked by the system for supported shortcutKeys, this request can be, in effect, passed on to the proper classes. Before going any further, we are going to create a couple of helper methods that are going to be used a few times in SiriSplitViewController. The first helper method is going to find a class that conforms to KeyCommandProvider, if one exists.
private func keyCommandProvider(forViewController viewController: UIViewController?) -> KeyCommandProvider? {
  var provider: KeyCommandProvider?
  if let top = viewController {
    if let nav = top as? UINavigationController {
      var controller: UIViewController? = nav.topViewController
      while (controller != nil &&
             controller!.isKind(of: UINavigationController.classForCoder())) {
        controller = (controller as? UINavigationController)?.topViewController
      }
      if let controller = controller as? KeyCommandProvider {
        provider = controller
      } else if let navProvider = nav as? KeyCommandProvider {
        provider = navProvider
      } else if let topProvider = top as? KeyCommandProvider {
        provider = topProvider
      }
    }
  }
  return provider
}
The next helper method is going to find which UIKeyCommands should be supported given a UIViewController as a starting point.
private func keyCommandsFor(viewController baseController: UIViewController?) -> [UIKeyCommand]? {
  var keyCommands: [UIKeyCommand]?
  if let provider = keyCommandProvider(forViewController: baseController) {
    keyCommands = provider.shortcutKeys
  }
  return keyCommands
}
With these two helper methods in place, we can return to the keyCommands property. A UISplitViewController, of which SiriSplitViewController is a subclass, has up to two UIViewControllers that are accessible via the viewControllers property. We are going to use that property to get the commands that are supported on the master and detail side of the split view controller. Add the following code inside of keyCommands implementation:
let topCommands = keyCommandsFor(viewController: viewControllers.last)
let bottomCommands = keyCommandsFor(viewController: viewControllers.first)
Next, we need to merge these two arrays together to get one master list of UIKeyCommands that are supported. If only one of the arrays is non-nil, though, the master list will be comprised of that array only. Under the two lines of code that were just added, add the following:
var allCommands = [UIKeyCommand]()
if let top = topCommands, let bottom = bottomCommands {
    allCommands = bottom
    allCommands.append(contentsOf: top)
} else if let top = topCommands {
    allCommands = top
} else if let bottom = bottomCommands {
    allCommands = bottom
}
As I mentioned earlier, when the UIKeyCommand is created there is no target property. So, if we return this list, the system will figure out that there must be a mistake and the list will be ignored. So, we need to create our own UIKeyCommand objects that mirror the keyboard shortcuts that the KeyCommandProvider wants to support. We will iterate through each of the UIKeyCommands that are supposed to be supported and create a related UIKeyCommand with the same input, modifierFlags and discoverabilityTitle but a new Selector.
if allCommands.count > 0 {
    var returnCommands = [UIKeyCommand]()
    for command in allCommands {
        returnCommands.append(
            UIKeyCommand(input: command.input ?? "",
                 modifierFlags: command.modifierFlags,
                        action: #selector(handleKeyCommand(_:)),
          discoverabilityTitle: command.discoverabilityTitle ?? "")
        )
    }
    return returnCommands
} else {
    return nil
}
As you can see, each of these new UIKeyCommands will call handleKeyCommand(_:) so that needs to be implemented. We will need to check both the master and the detail side of the SiriSplitViewController to find a KeyCommandProvider, then we will need to allow that KeyCommandProvider to handle the UIKeyCommand. It is possible, though, that the KeyCommandProvider that we find first, does not know how to handle the UIKeyCommand. So, we will also need a way for the KeyCommandProvider to report if it successfully handled the command. To start this flow, we will add a function to the KeyCommandProvider. Using this new function, we can pass the UIKeyCommand that is being used and the function will return a Bool indicating if it was handled or not. In the KeyCommandProvider add the following under the shortcutKeys property:
func handleShortcut(keyCommand: UIKeyCommand) -> Bool
Next, since we potentially need to run the same exact code on both the master side and the detail side of the SiriSplitViewController, we are going to make another helper method. This helper method will take the UIKeyCommand and a UIViewController. Using the UIViewController it will find an available KeyCommandProvider. If it is able to find a KeyCommandProvider, it will call handleShortcut(keyCommand:) and return the result.
@discardableResult
private func handleKeyCommand(_ command: UIKeyCommand,
      withBaseController viewController: UIViewController?) -> Bool {
  var handled = false
  if let provider = keyCommandProvider(forViewController: viewController) {
    handled = provider.handleShortcut(keyCommand: command)
  }
  return handled
}
With the helper method in place, we can now implement handleKeyCommand(_:), the function that we created a Selector for when we created the UIKeyCommands. In this function, we will first call handleKeyCommand(_:withBaseController:) on the last UIViewController that is in SiriSplitViewController‘s viewControllers array. If that call returns false, meaning the the UIKeyCommand was not handled, then we will call the same helper method on the first UIViewController in SiriSplitViewController‘s viewControllers array.
@objc func handleKeyCommand(_ command: UIKeyCommand) {
    let handled = handleKeyCommand(command,
                        withBaseController: viewControllers.last)
    if !handled {
        handleKeyCommand(command,
              withBaseController: viewControllers.first)
    }
}
Updating the Storyboard
Now that we have the new SiriSplitViewController fully implemented, we need to make use of it in our app. Open main.storyboard and locate “Split View Controller Scene”. Select the UISplitViewController inside of this screen. Open the identity inspector on the right and change the “class” to SiriSplitViewController.
Keyboard Shortcuts with a KeyCommandProvider
Since our app is simple, we only need to implement KeyCommandProvider in two places. First, we will modify MasterViewController. At the bottom of this class, create an extension that declares an implementation of KeyCommandProvider.
extension MasterViewController: KeyCommandProvider {
}
Next, we need to implement the shortcutKeys property so that we can provide the keyboard shortcuts that we are going to support. In this class, we will only support one keyboard shortcut, command+n. Additionally, we want to have the discoverabilityTitle set to “New Note”. The discoverabilityTitle is used so that the system can “advertise” your keyboard shortcuts. We will talk about this more later. For now, add the following inside of the new extension:
var shortcutKeys: [UIKeyCommand] {
    return [
        UIKeyCommand(input: "n",
             modifierFlags: .command,
                    action: #selector(handleShortcut(keyCommand:)),
      discoverabilityTitle: "New Note")
    ]
}
Remember that because of our implementation in SiriSplitViewController, the action specified in the constructor does not matter at all. However, since all of our UIKeyCommands will be passed through the handleShortcut(keyCommand:) function, we will use that here.
Continuing, we need to handle the handleShortcut(keyCommand:) function call. We need to check that the input is “n” and the modifierFlags is .command. If both of these are true, then the user pressed command+n, which is what we want to handle. In this case, we will call insertNewObject(_:), which is the same method that gets called when the user taps the “+” button on the top right of the screen. Also, in this case we need to return true so that SiriSplitViewController does not try to pass this keyboard shortcut to another KeyCommandProvider as well. If the user did not press command+n, we will return false.
@objc func handleShortcut(keyCommand: UIKeyCommand) -> Bool {
    if keyCommand.input == "n" &&
       keyCommand.modifierFlags == .command {
        insertNewObject(keyCommand)
        return true
    } else {
        return false
    }
}
Now, we need to take the same exact steps in the DetailViewController class. Open DetailViewController.swift and at the bottom of the file, create an extension that implements KeyCommandProvider.
extension DetailViewController: KeyCommandProvider {
}
Then, implement shortcutKeys. In this class we will supply two ways to delete a note. The first, is by pressing command+d and the second is by pressing the delete key. Note that unicode characters can be used and “\u{8}” is the unicode character for the delete key.
var shortcutKeys: [UIKeyCommand] {
    return [
        UIKeyCommand(input: "d",
             modifierFlags: .command,
                    action: #selector(handleShortcut(keyCommand:)),
      discoverabilityTitle: "Delete Note"),
        UIKeyCommand(input: "\u{8}",
             modifierFlags: [],
                    action: #selector(handleShortcut(keyCommand:)),
      discoverabilityTitle: "Delete Note")
    ]
}
Finally, if either of these shortcut keys are used, we need to handle them and return true. Otherwise, we will return false without doing anything.
@objc func handleShortcut(keyCommand: UIKeyCommand) -> Bool {
    if (keyCommand.input == "d" &&
        keyCommand.modifierFlags == .command) ||
       (keyCommand.input == "\u{8}" &&
        keyCommand.modifierFlags == []) {
        if let note = detailItem {
            managedObjectContext?.delete(note)
            do {
                try managedObjectContext?.save()
            } catch {
                let nserror = error as NSError
                fatalError("Unresolved error \(nserror), \(nserror.userInfo)")
            }
            detailItem = nil
            configureView()
        }
        return true
    } else {
        return false
    }
}
One Last Step
We are now done with all of the code we need for handling shortcuts. However, if you build and run now you will notice that the delete shortcuts do not actually do anything. This is because in the previous version of the app, we did not worry about saving updates to a note. So, when the segue was performed after selecting a note in `MasterViewController`, the managed object context was not passed in. Therefore, the managed object context is currently nil when we try to delete the note and nothing is happening.
You can fix this by opening MasterViewController and adding the following line under line 54:
controller.managedObjectContext = fetchedResultsController.managedObjectContext
Now, you can build and run. All of the supported keyboard shortcuts will work like a charm.
Discovering Keyboard Shortcuts
I mentioned that I was surprised by the lack of apps supporting discoverable keyboard shortcuts. But, I did not mention how to find keyboard shortcuts that are discoverable. To do this, simply hold command key down while any app is open. If you do this with our app you will now see:
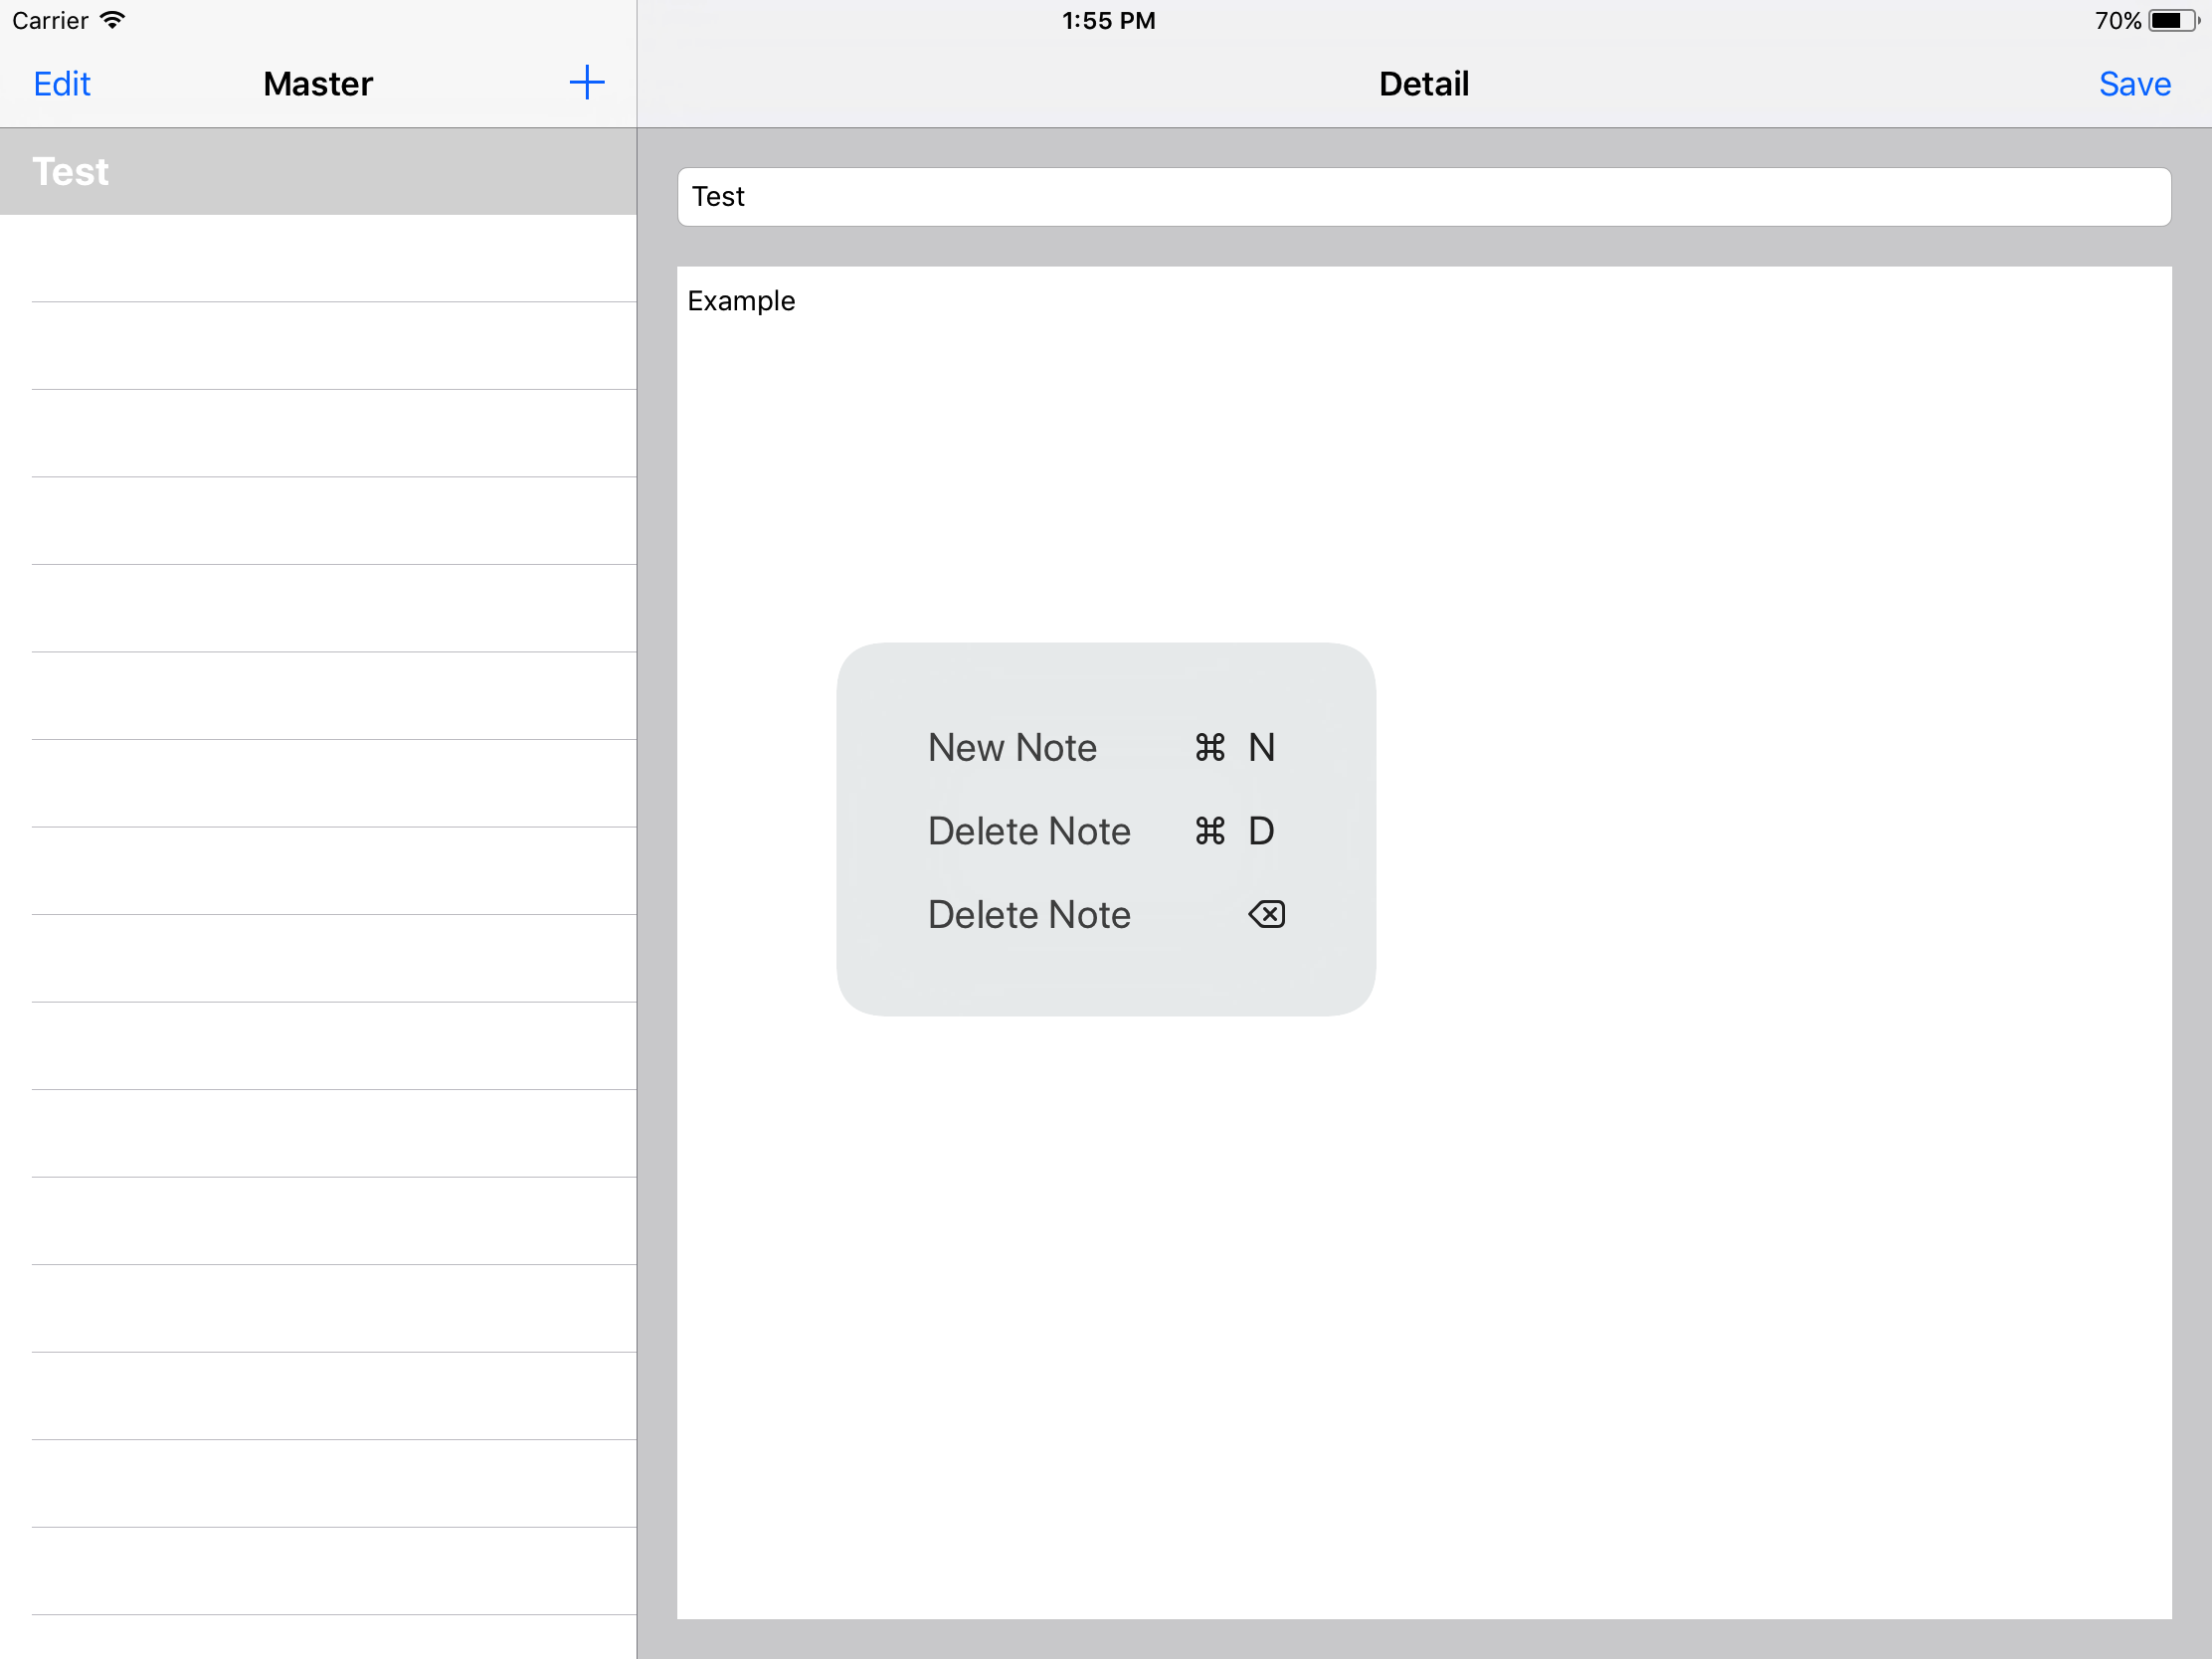
This interface is given to us for free on the iPad. It does not show on the iPhone at all, although the shortcuts are still supported if the user attaches a keyboard to an iPhone. The fact that this display is given to us by iOS is great. It means that anyone who is familiar with the keyboard can quickly find out what keyboard shortcuts your app supports.
Making Discoverable Keyboard Shortcuts
The way that we created all of our UIKeyCommand objects makes them discoverable by default. If you do not want your UIKeyCommand object to be discoverable, for some reason, simply remove the discoverabilityTitle from the end of the constructor. Then, when the user holds down the command key, that keyboard shortcut will not get displayed.
I should note that as of iOS 11 beta 2, UIKeyCommands that do not have a discoverabilityTitle are still getting displayed. This is a bug, however, and will most likely be resolved before the release of iOS 11. You can run on iOS 10 or earlier to verify the behavior you want.
Designated Keyboard Shortcuts
There are some standard keyboard shortcuts that most people are familiar with. There are also some that are standard that not as many people know but are available system wide. Some exaples are:
- command+tab – This will let you switch apps without touching the screen
- command+c – Copy
- command+p – Paste
None of these can be overridden. If you try to use one of these keyboard shortcuts, the event will never be passed through to your app.
Conclusion
Now you know how to support keyboard shortcuts in your apps. You can find the completed implementation for this project on GitHub. This is an easy feature to implement and your users will love it. If you have any questions feel free to let me know in the comments below.