
At WWDC Apple announced that iOS 11 will now support Drag and Drop. This works not only within an app, but also from one app to another. Dragging between apps is only supported on iPads. Drag and Drop between apps works if the iPad is in split view mode, with both the source and destination apps open side by side, or even if the destination app is completely closed.
As the iPad becomes more of a “Pro” device and increases in power, it is going to become a desktop replacement for more and more people. And, this feature will be an extremely useful. Hopefully, your app excels at it’s main goal. However, most users do not want content to be available to only one app. If your app is a photo editing app then you will want your users to be able to take that photo to another app to have it printed or share it with friends and family online.
Even if your business is a restaurant, you can make use of Drag and Drop. Think about the user who wants to keep receipts of everything purchased. Your app is awesome and allows orders to be placed online. But then the user needs to have that receipt emailed to them so that it can be uploaded to the note taking app that they love. Your user would be thrilled if they could open the note taking app right next to your app and when they Drag and Drop, your app generates a PDF file that can be dropped right into that notes app. This interaction is easier than the previous method and you have a happy customer.
Getting Started
In this tutorial we are going to learn how to implement Drag and Drop as the destination app. This means that we will accept data coming from other apps. However, we will not be able to drag data out of our app to another app just yet. Watch for part 2 of this tutorial to learn how to handle dragging. Now, let’s dive in to see how we can implement Drag and Drop as the destination app.
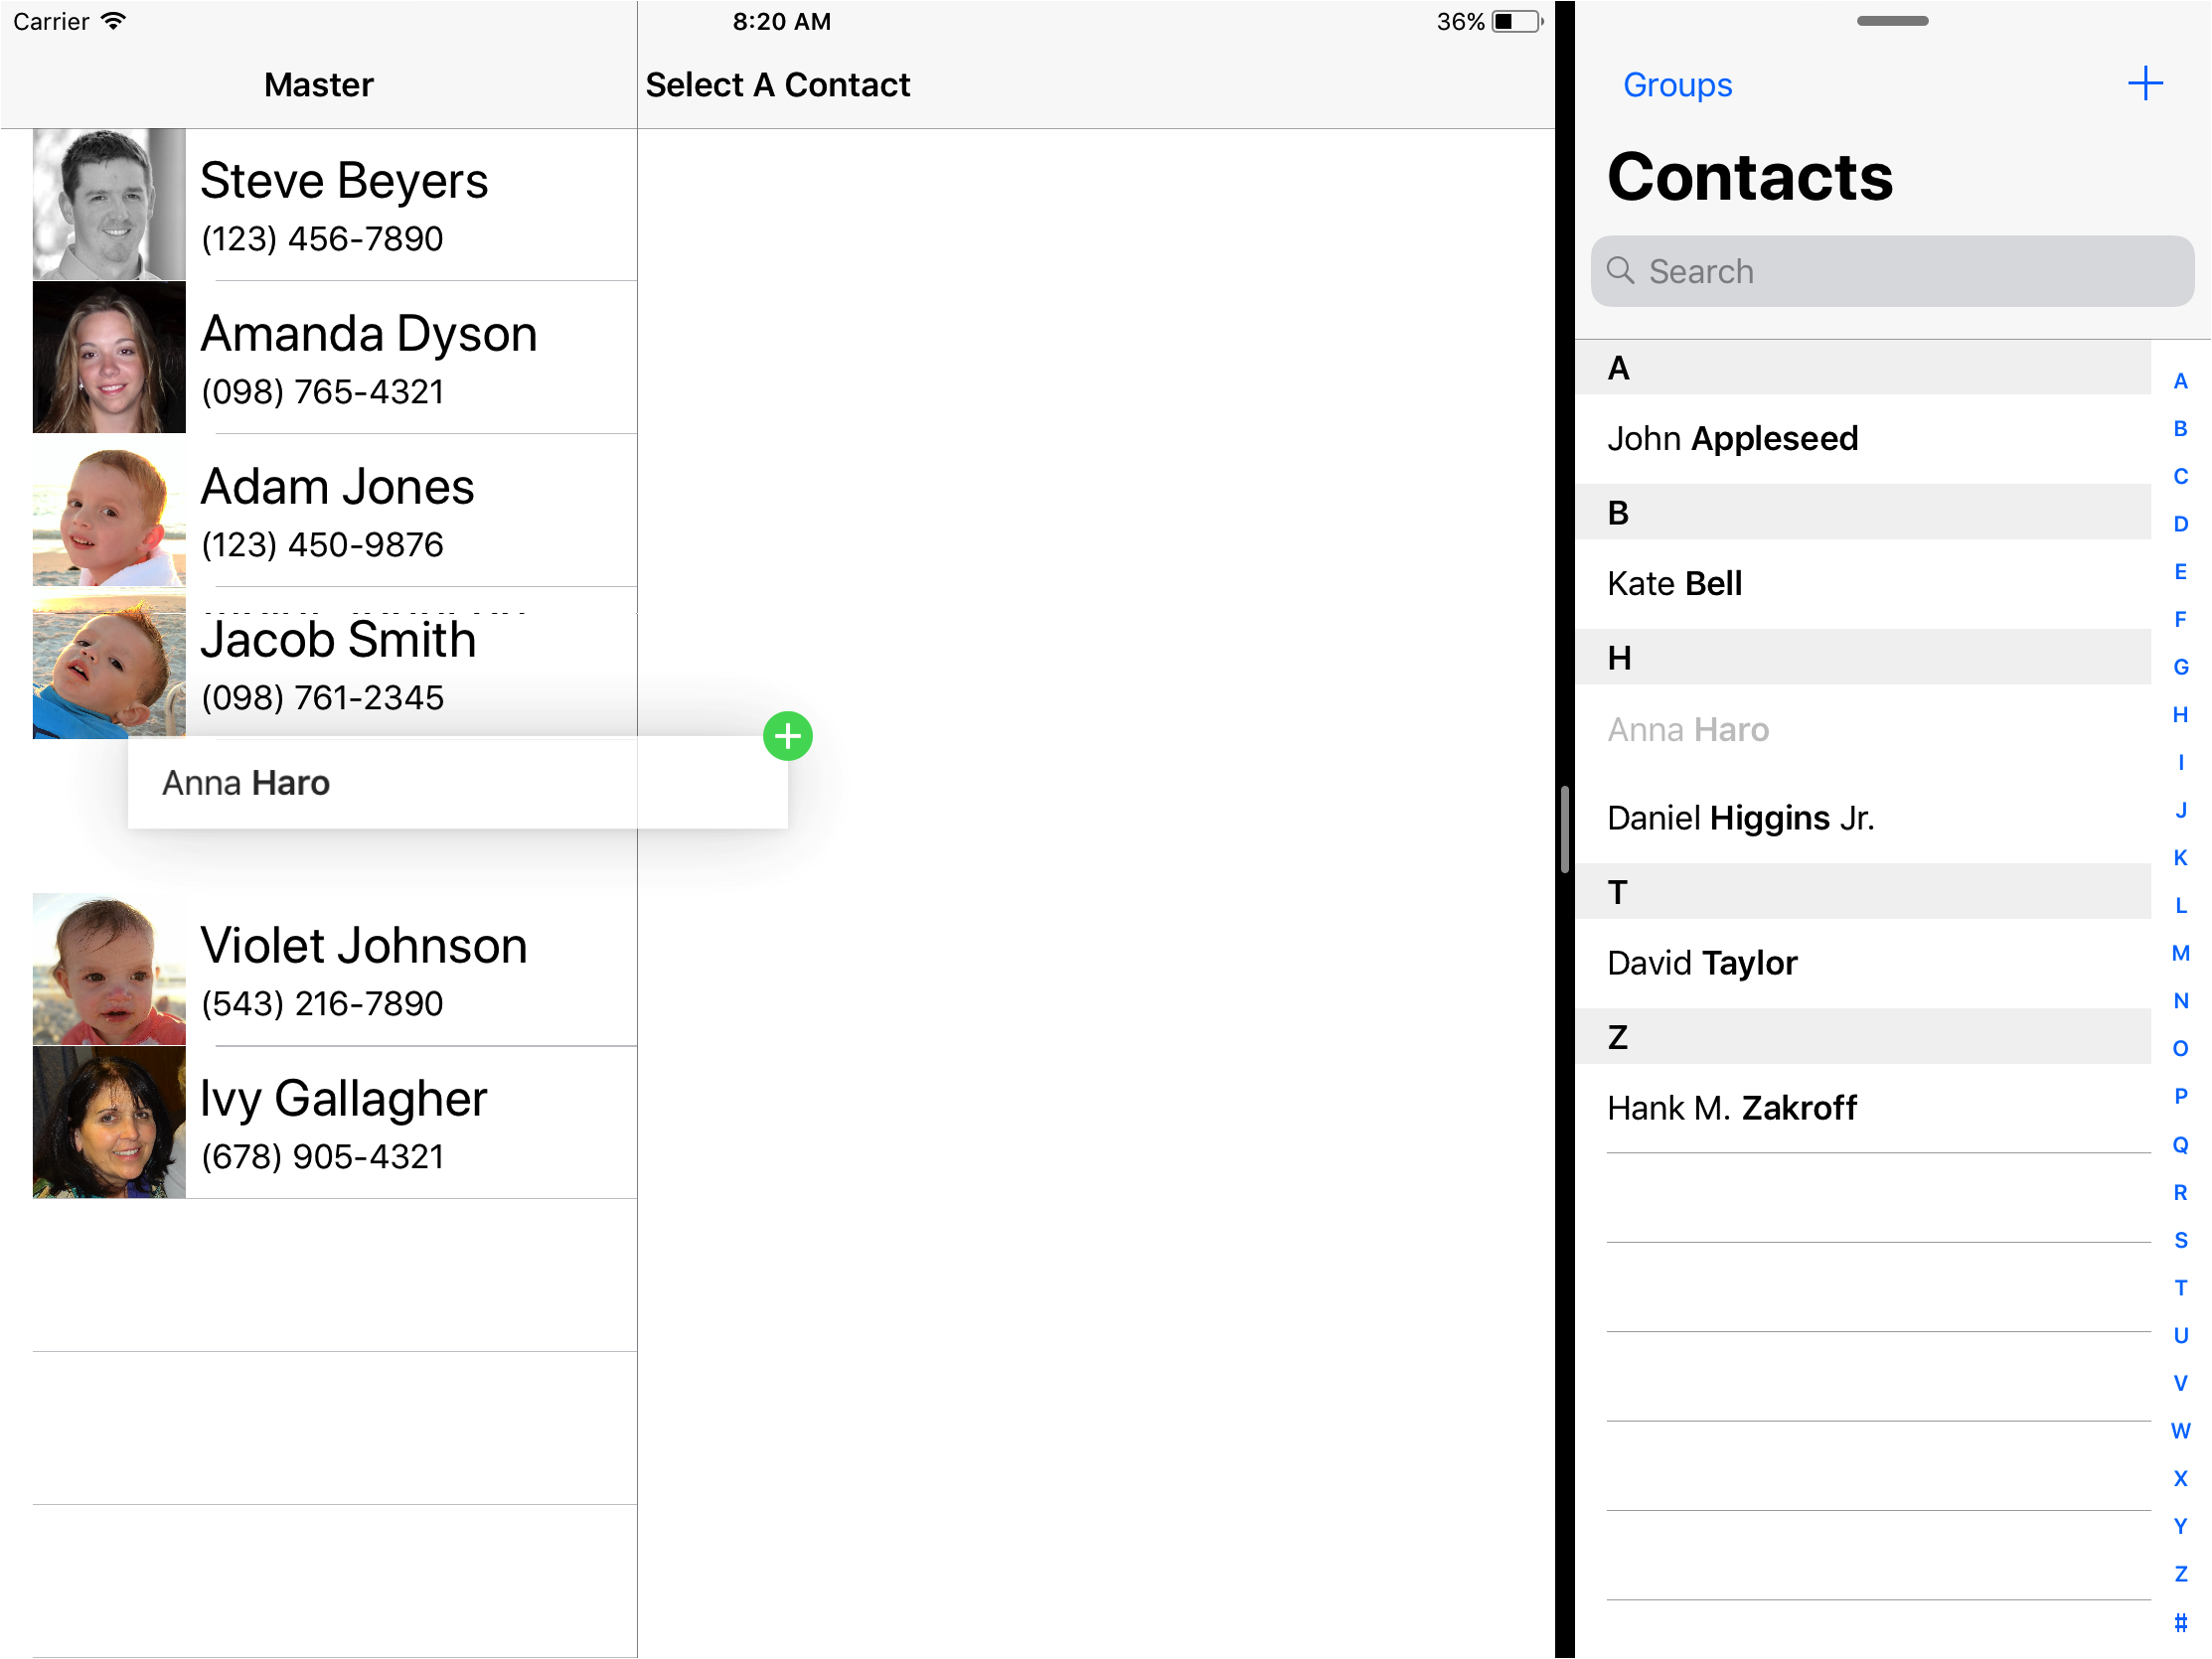
For this demo, we will start with a basic contact list app that can interact with the contacts app in iOS. A starter project can be found here.
Drag and Drop – Destination App
As usual, Apple has tried to help developers where possible. UITextView, UITableView and UICollectionView all have built in support for Drag and Drop. So, we will learn how to implement Drag and Drop both to a UITableView and to a UIImageView, which does not have built in support.
Drag and Drop – UITableView
To enable the drop action from a Drag and Drop activity in a UITableView, we need to set the UITableView‘s dropDelegate property. In MasterViewController‘s viewDidLoad() add the following line of code at the bottom.
tableView.dropDelegate = self
Initially, you will see an error on this line of code because MasterViewController does not conform to the UITableViewDropDelegate protocol. So, let’s fix that next. At the bottom of MasterViewController.swift, create an extension of MasterViewController.
extension MasterViewController: UITableViewDropDelegate {
}
There are three methods that must be implemented. Next, we will go through each one. The first method will give us, as the consumer, the option to ignore a Drag and Drop action if it is representative of data that we can’t use. For example, if we want to allow text only, we can check the UIDropSession to see if it contains text. Additionally, we could ignore data based on the state of our app or any other parameters we choose. For our app, we will accept any contact from the device’s contact list, but we will only allow one item to be dropped.
func tableView(_ tableView: UITableView, canHandle session: UIDropSession) -> Bool {
        return session.hasItemsConforming(toTypeIdentifiers: [kUTTypeVCard as String]) && session.items.count == 1
}
This will show errors because kUTTypeVCard. To fix this, we need to import MobileCoreServices. Later, we will also need to import the contacts framework so we will import both of these frameworks now. At the top of the file add the following import statements.
import Contacts
import MobileCoreServices
Next, we want to tell the system if and how we want to accept data. We have four options, which are called UIDropOperations.
- We can choose to move the data. In order perform a move, the
UIDropSessionmust have it’sallowsMoveOperationset totrue. Otherwise, the move will fail and this will be treated as canceling the Drag and Drop activity. This option is only valid if you are supporting Drag and Drop within an application. - We can choose to copy the data. This is most likely the option that we want to choose if data is coming from another app. This option can also be used with Drag and Drop within the same application.
- We can choose to cancel the activity. This option will be used when we do not want to accept the data. This might happen if we returned
truein the previous step, but, because of the context of the app, we are not able to accept the data right now. - We can decide to forbid the data from being handled. This option would be used when, under normal circumstances, we want to accept the data. However, because of some special situation, we are not able to.
We also need to tell the system how the drop will take place if we are accepting the drop content. This is done through a UIDropIntent. Again, there are four options.
- The drop intent can be
unspecified. This would indicate that the location in which the data will be placed is not known. It is recommended to make some kind of visual change, manually, to make it clear to the user that the drop is being accepted until the data can be positioned correctly. - We can specify that the data will be inserted at the index path
(insertAtDestinationIndexPath) over which the user is hovering. If this is returned, the table view will adjust data to leave a space to make this obvious to the user. - We can specify that the data will be inserted into the index path (
insertIntoDestinationIndexPath) over which the user is hovering. This would be used if the row is a container for multiple pieces of data and the dropped data should be inserted intot he same container. In this case, theUITableViewCellwill be highlighted so that the user gets visual indication of what is happening. - The drop intent can be
automatic. This would mean that the system will determine if this should be inserted at an index path or inserted into an index path. The decision will be made based on the precise location of the drop activity. Also, this option should only be used if theUITableViewsupports bothinsertAtDestinationIndexPathandinsertIntoDestinationIndexPath.
In order to tell the system which combination of these options is applicable, we must implement the next delegate method. In this delegate method we will return a new UITableViewDropProposal which includes both a UIDropOperation and a UIDropIntent. For our purposes, we will always use the .copy operation and the .insertAtDestinationIndexPath intent.
func tableView(_ tableView: UITableView, dropSessionDidUpdate session: UIDropSession, withDestinationIndexPath destinationIndexPath: IndexPath?) -> UITableViewDropProposal {
        return UITableViewDropProposal(dropOperation: .copy, intent: .insertAtDestinationIndexPath)
}
Finally, when the user lifts their finger, thereby committing to the drop activity, we must handle the drop and update our data according to the data given to us. When working in the method that handles the drop activity, we want to return as quickly as possible. To aid us in this goal, the methods that help us get the data are asynchronous.
Next, we will complete the drop activity. During that process, we will copy the data and update our UI as needed.
func tableView(_ tableView: UITableView, performDropWith coordinator: UITableViewDropCoordinator) {
    let destinationIndexPath: IndexPath
    // Step 1
    if let indexPath = coordinator.destinationIndexPath {
        destinationIndexPath = indexPath
    } else {
        // Get last index path of table view.
        let section = tableView.numberOfSections - 1
        let row = tableView.numberOfRows(inSection: section)
        destinationIndexPath = IndexPath(row: row, section: section)
    }
    // Step 2
    for item: UIDragItem in coordinator.session.items {
        // Step 3
        item.itemProvider.loadDataRepresentation(forTypeIdentifier: kUTTypeVCard as String, completionHandler: { (data, error) in
            // Step 4
            if let data = data {
                do {
                    // Step 5
                    let newContacts = try CNContactVCardSerialization.contacts(with: data)
                    var indexPaths = [IndexPath]()
                    // Step 6
                    for (index, contact) in newContacts.enumerated() {
                        let indexPath = IndexPath(row: destinationIndexPath.row + index, section: destinationIndexPath.section)
                        indexPaths.append(indexPath)
                        // Step 7
                        let newContact = Contact(contact: contact)
                        // Step 8
                        self.contacts.insert(newContact, at: indexPath.row)
                    }
                    // Step 9
                    DispatchQueue.main.async {[weak self]() in
                        self?.tableView.insertRows(at: indexPaths, with: .automatic)
                    }
                } catch {
                    // an error occurred
                }
            }
        })
    }
}
Breaking this down step by step we can see exactly what is happening here.
- We need to determine the index path at which the user is dropping the content. If the index path can’t be determined, we will set the index path to be the last row of the table
- Loop through each of the
UIDragItems given to us. - For each item in the loop, we are going to load the
CNContactthat it represents asynchronously. To accomplish that, we are going to callloadDataRepresentation(forTypeIdentifier:completionHandler:)and pass inkUTTypeVCardas the type of data we want to handle. - Once our completion handler is called, we verify that a non-nil data object was returned.
- Making use of
CNContactVCardSerializationwe parse the data intoCNContactobjects. - We could have multiple
CNContacts at this point. We will loop through each one. - We create our custom
Contactobject using a convenience initializer which accepts theCNContactobject. - Using the index path that we determined earlier, we insert the new
Contatctinto our array ofContacts. - We need to update the
UITableViewso we callinsertRows(at:with:)ontableViewso that it displays the new data. Be sure that this is done on the main thread.
We are now set up to accept Drag and Drop from the contacts app or any other app that creates CNContact object and allows the user to drag them around. For further exploration, you can try removing the requirement that only one contact can be dropped into our list at a time.
Drag and Drop – UIImageView
In this section, we want to allow the user to update a contact’s picture by dragging in an image from another app. For example, the Photos app. Although, any app that allows the user to drag and drop and image will work. For this, we will mostly be working in DetailViewController.
The first thing that needs to be done when working with a view that does not have Drag and Drop built in, like the UITableView does, is to create a drop interaction. This is done using the UIDropInteraction class and adding an instance of it to the view that should support the drop interaction. Also, the view that is going to accept the Drag and Drop action must have user interaction enabled. Add the following code in viewDidLoad().
let dropInteraction = UIDropInteraction(delegate: self)
imageView.addInteraction(dropInteraction)
imageView.isUserInteractionEnabled = true
Obviously, DetailViewController does not implement UIDropInteractionDelegate so there is an error. We will fix this by adding an extension to DetailViewController with the required protocol declaration.
extension DetailViewController: UIDropInteractionDelegate {
}
This implementation is going to require us to implement three methods from the delegate protocol. These three methods are going to look very familiar after going through the implementation of UITableView. However, we will still step through these methods one at a time.
The first method is an opportunity for the app to decide if it wants to handle the Drag and Drop activity. This activity can be canceled based on the state of your app, the content type that is available or any other logic that you wish. For our app, we will make sure the data is a UIImage and there is only one.
func dropInteraction(_ interaction: UIDropInteraction, canHandle session: UIDropSession) -> Bool {
    return session.canLoadObjects(ofClass: UIImage.self) && session.items.count == 1
}
Note that we are using canLoadObjects(ofClass:) to determine if the object is a UIImage as apposed to hasItemsConforming(toTypeIdentifiers:), which was used in the UITableView implementation. Either of these methods can be used when we are checking for an UIImage. However, when we were working with CNContact objects, we could not use canLoadObjects(ofClass:) because CNContact does not conform to NSItemProviderReading.Type. So, some types of data give us some flexibility while others limit our options. You should be comfortable handling data both ways.
Next, we need to provide the system with a UIDropProposal. We will use this, as we did before, to verify that the drop can happen. First, we will check to see if the user is holding the Drag and Drop item over our UIImageView view. Then, we will determine if the location is over the UIImageView, in which case we will use .copy as the UIDropOperation. Otherwise, we will use .cancel.
func dropInteraction(_ interaction: UIDropInteraction, sessionDidUpdate session: UIDropSession) -> UIDropProposal {
    let dropLocation = session.location(in: view)
    let operation: UIDropOperation
    if imageView.frame.contains(dropLocation) {
        operation = .copy
    } else {
        operation = .cancel
    }
    return UIDropProposal(operation: operation)
}
The last step is to accept the data and update the data model and UI based on the data that comes in. We start this process by calling an asynchronous method that will load the UIImages for us. Remember, we want to exit out of this method as quickly as possible so that the UI looks responsive. Second, when we get our asynchronous callback, we will save off the UIImage in the model and display it on the screen.
func dropInteraction(_ interaction: UIDropInteraction, performDrop session: UIDropSession) {
    session.loadObjects(ofClass: UIImage.self) { imageItems in
        let images = imageItems as! [UIImage]
        self.imageView.image = images.first
    }
}
At this point we can build and run the app. After navigating to the contact details screen in this app, open an app like Photos and use any method of Drag and Drop to move an image from that app to our contact app. When you drag an image over the UIImageView on the details screen you will see a green circle with a plus icon indicating that the image can be copied there.
It is important to note that the image change is only local to the details screen and if you look at the list of contacts, the original image will still be displayed. Since updating the image everywhere in the app is not related to drag and drop, it will be a task for you to implement on your own if you choose to do so.

You can find the complete source code for implementing Drag and Drop as a destination app on GitHub. You can also continue on to part two of this tutorial.