If you are working on a JavaScript heavy application (think jQuery Mobile, etc.), you probably will want to look at some JavaScript libraries to help add structure, consistency and convenience to your applications. One of the JavaScript libraries I’ve used lately is Backbone.js. To quote Backbone themselves, it provides “models with key-value binding and custom events, collections with a rich API of enumerable functions, views with declarative event handling, and connects it all to your existing application over a RESTful JSON interface.”. This is really a great summary of what Backbone can provide to your application.
As an example of how to apply Backbone, I’ll create a small jQuery Mobile app and use a Backbone model, collection and view to render the user interface. Through the use of Backbone’s event model, the user interface will update as the model changes or new models are created.
I decided to use jQuery Mobile as the UI framework mainly because I am a mobile guy and it will provide the HTML with some reasonable style with no additional effort on my part. I know, lazy…but it works for this blog post 🙂 Continuing on the lazy path, I will refer to jQuery Mobile as JQM from this point forward.
The following assumes you are at least a little familiar with jQuery and JQM. If not, take a look at the JQM website (http://jquerymobile.com/). They have some great documentation and even a template for creating a basic app. All of the code in this post will be available in my github repository (https://github.com/stevenpsmith/Exercise/tree/BackboneIntro).
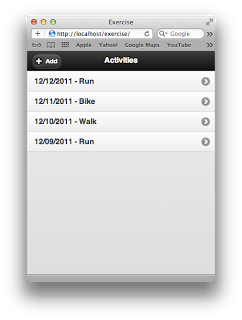
The application we are going to make will allow a user to log exercise they have done on any given day. Please remember this is a very basic app for the sole purpose of demonstrating Backbone.js. The piece that will be developed for this post will involve pulling exercise data from a server and presenting it in a list view, a very common paradigm for mobile apps. In the end, our app will look like this:
The JSON we will be dealing with will look like this:
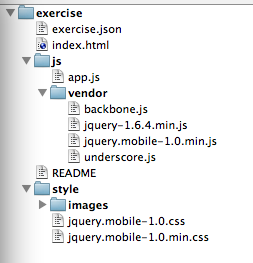
I like to organize my application structure a little differently than the JQM introduction shows, mainly for organizational reasons. My application structure looks like this:
All of our work will be done in index.html and app.js. In real applications I usually break down my JS files even further, but it really isn’t necessary here. The list page of the application is defined within index.html. It should look like a typical JQM page definition with the only the content portion defined. We will use the Backbone View to create the list view:
If we view this in the browser, we get an empty page with an add button in the header. Since we want to populate our list view with data, we should define a Backbone model and collection in order to manipulate and store the data via JavaScript. A basic model and its collection are easily defined:
The great thing about the collection is it provides a RESTful access back to your server for data retrieval and persistence. To keep this simple, our data will be served from a static JSON file with the structure referenced earlier. Since we have no real server side in this example, we can’t really save our changes anywhere but in the client’s memory. But the collection will fetch the data from the server and can be used to help render our user interface. The following code will create an instance of the collection in memory, retrieve the data from the server, and parse it into a collection of models.
The exercise.initData() function can be called during initialization of the application (or wherever else might be appropriate) to load the data. Now it is time to render the view. Backbone views depend upon Underscore.js. Underscore is a utility library that includes a lot of great features, one of which is view templates. Backbone can be used with many view template frameworks (e.g. Mustache, Handlbars, etc.), but here we will stick with Underscore templates as they meet our needs. For our exercise activity items, we need a very basic template like this:
Giving the template a unique id will let us access it using typical jQuery selectors. The data driven parts of the template are surrounded by
As you can see in line 2, we are using the id, date, and type attributes of whatever model is supplied to the template to fill in the HTML accordingly. While the “identifier” attribute is not a real HTML attribute and not required by any of the frameworks, it would be used to determine what activity the user selected in the list so the appropriate data could be retrieved and displayed on a subsequent page.
The next step is to define the Backbone View that will render the list view. Backbone views can be defined and set up numerous ways, and the documentation does a great job explaining the options, etc. I like to define my views so that they are as self contained as possible. So, rather than allowing Backbone to create the HTML within a DIV (the default behavior), I define the appropriate properties to create a JQM list view as shown in lines 2-4 below:
From the Backbone site: “The default implementation of render is a no-op. Override this function with your code that renders the view template from model data, and updates this.el with the new HTML. A good convention is to return this at the end of render to enable chained calls”. The $(this.el) refers to the containing element, in this case the ul element. There are standard attributes that are accessible from within the Backbone View including collection and model. Lines 17-20 iterate over the collection of activities, fills in the template placeholders with the data from the model, and appends the resulting HTML to the containing element.
If you need to pass arbitrary data to your view, it can be accessed via the options object as shown on line 11 of the code snippet. As mentioned earlier, I like my Backbone Views to be as self contained as possible, so I provide the containing HTML element for this view (as a jQuery object) when constructing the View instance. Line 20 sets the HTML of the containing element to the Backbone View and line 21 tells JQM to style things appropriately.
The next step is to instantiate and render the view with the appropriate collection and HTML container. Since this is the “home” page in our application, this is done after JQM initializes the page.
Now we have a list view that renders a JQM list based on data in a Backbone collection. To take advantage of the real power of Backbone models/collections, we can add listeners for changes to the collection that will update the view based on those changes. The beauty of this is the additional code to accomplish this is minimal. By adding
this.collection.bind('add', this.add, this);
to the initialize method of our Backbone View and providing an add() method. Here we are just grabbing the list view and appending the new model to the view (and refreshing it so JQM does its magic). By adding a click handler to the “Add” button, we can test that adding a model to the collection updates the view.
There are other methods on which to bind, but this provides a quick example on how Backbone can be used to assist with view rendering and data handling in JavaScript based client applications. The entire code base is available here. It can be deployed on any web server. For OS X, I use the built in web server, but feel free to use the server of your choice.
Related Posts:


