Note – I’ve updated this article and created a new github project using angular-cli to test it. Run all tests with ng test after following instructions at https://github.com/krimple/angular2-unittest-samples-rc
Testing Components
In my last post, I discussed how to write tests in Angular 2 based on the new angular-testing API. We learned how to stand up a test and use the test injector, and how to mock the network requests to the Http service using the MockBackend.
In this post, we'll learn how to test components, the lynchpin of any Angular 2 application.
Testing a Component
We'll build a user interface component (BlogRoll) that displays and edits blog articles. For the sake of simplicity, we'll make a single component that displays both the listing and an editing form for modifying a single blog article.
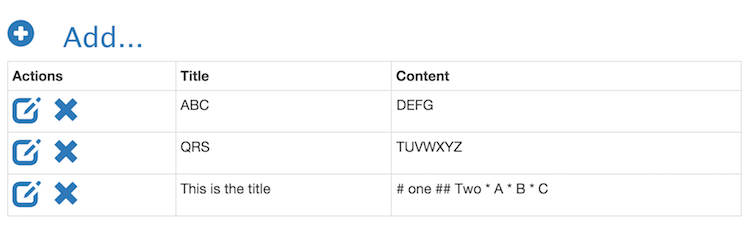
Figure 1: The List View
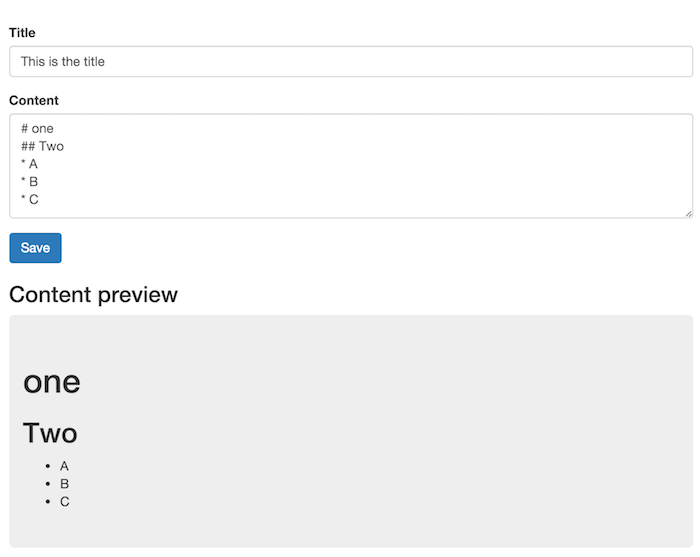
Figure 2 – The Form
This could have been built with the Angular Router and two components, but since the Angular Component Router still does not provide a published test stub or mock framework, it is a non-trivial exercise to test components written to use it. Pressed for time, I went with this single-component approach. (footnote: see the Angular 2 navigation spec for a potential way to test routes by using some pre-built mock components).
The Three Ways to Test an Angular Component
Like Angular 1 before it, Angular 2 components are testable both inside and outside of the framework. There are at least three ways to test a component:
- Pure unit tests – testing the component outside of the container, mocking other collaborators completely
- Component tests – standing up the component inside of Angular 2, and injecting collaborators via dependency injection, mocking external resources where appropriate
- End-to-end tests – standing up the entire web server and accessing the web client via Protractor or Selenium in order to test the system from the front-end to the back-end
We'll leave the end-to-end protractor tests for another time, and focus on unit and component tests in this post. Before we start, we should discuss the component we're about to test, the BlogRoll component.
The Component Under Test – BlogRoll
Our component under test is BlogRoll, which is contained in src/blog-roll/blog-roll.ts in our sample application. Here is a skeleton of the provided methods (See this link for the source on GitHub):
@Component({
  selector: 'blog-roll',
  template: `...`,
  bindings: [BlogService, MarkdownService],
  directives: [CORE_DIRECTIVES]
})
export class BlogRoll implements OnInit {
  blogs: Array<BlogEntry>;
  blog: BlogEntry;
  editing: boolean = false;
  constructor(private blogService: BlogService,
              private markdownService: MarkdownService) { }
  ngOnInit() {
    this.loadBlogEntries();
  }
  refresh() {
    this.loadBlogEntries();
  }
  // calls blogService.getBlogs
  loadBlogEntries() { ... }
  // calls markdownService.toHtml
  render(blog: BlogEntry) { ... }
  // shows edit template content
  editBlogEntry(blog: BlogEntry) { ... }
  // calls blogService.saveBlog
  saveBlogEntry(blog: BlogEntry) { ... }
  // calls blogService.deleteBlogEntry
  deleteBlogEntry(blog: BlogEntry) { ... }
}
I've purposely hidden the implementation of the methods so we can focus on their intent. The same goes for the template: while it's important to understand it to test, we should start by eyeballing the component under test to see how to structure our Jasmine tests.
Unit Testing an Angular 2 Component
Let's start by creating a simple unit test shell file, blog-roll-unit.spec.ts, in the same directory as our component, src/app/blog-roll. We'll begin with this overall script, which should only rely on Jasmine, and not Angular, to configure the test and mock the collaborators:
import {provide} from '@angular/core';
import {BlogRoll} from './blog-roll';
import {BlogEntry} from '../domain/blog-entry';
import {BlogService} from '../services/blog-service';
import {MarkdownService} from '../services/markdown-service';
import {Observable} from 'rxjs/Rx';
Next, we'll introduce our mock / stub classes:
class MockMarkdownService extends MarkdownService {
  toHtml(text: string): string {
    return text;
  }
}
class MockBlogService extends BlogService {
  constructor() {
    super(null);
  }
  getBlogs() {
    console.log('sending fake answers!');
    return Observable.of([
      {
        id: 26,
        title: 'The title',
        contentRendered: '<p><b>Hi there</b></p>',
        contentMarkdown: '*Hi there*'
      }]);
  }
}
The Unit Test Setup
Now it is time to build our test suite, which will directly instantiate instances of our mock objects and the component under test.
Our normal MarkdownService uses an external JavaScript API, and we won't focus on it here because it is a trivial operation. However, since we covered our BlogService last time I want to use it to illustrate how to mock the data fetching behavior of an Observable in a pure unit test.
We begin with the describe and beforeEach methods. beforeEach runs before each test, and so we use this to initialize our objects:
describe('Blog Roll unit test', () => {
var blogRoll: BlogRoll,
    blogService: BlogService,
    markdownService: MarkdownService;
beforeEach(() => {
  blogService = new MockBlogService();
  markdownService = new MockMarkdownService();
  blogRoll = new BlogRoll(blogService, markdownService);
});
This code should be somewhat obvious – we need to create our fake Blog Service and Markdown Service instances, and then inject them into our BlogRoll component by hand. In this way we're acting like the dependency injector, but we're wiring up pure JavaScript objects.
If this feels like JUnit testing in Java or like Ruby's RSpec to some degree, it is because now we're really able to create classes derived from our components to mock, and wire them up as fake collaborators to our component in much the same way.
The First Test – the Initial View
Now we're ready to test the blog listing state (the state when we first load the component onto a page). To do so, we'll manually call the ngOnInit method (which is called after the component is initialize and the data is bound). This method in BlogRoll calls the getBlogs method in the BlogService class, so we need our fake to return fake data for us, which it does in the form of an Observable. Remember the relevant section of our mock class:
return Observable.of([{
      id: 26,
      title: 'The title',
      contentRendered: '<p><b>Hi there</b></p>',
      contentMarkdown: '*Hi there*'
}]);
The mock object's getBlogs() method fragment above returns a synchronous Observable using Observable.of – which simulates our response from the real Http.get service method. The synchronous nature of the subscription response makes this easy to test:
it('shows list of blog items by default - unit', () => {
  blogRoll.ngOnInit();
  expect(blogRoll.blogs.length).toBe(1);
  expect(blogRoll.blog).toBeUndefined();
  expect(blogRoll.editing).toBe(false);
});
Again, the key here is the synchronous Observable.of method. Otherwise we'd have to work with an observable or promise from the method in question.
Let's try another test method.
Triggering a New Blog Entry State
Now we'll force a new blog entry state – in the component's UI (which we haven't discussed yet) we will click an icon that tells the user interface to create a new blog entry. This click should call the newBlogEntry() method of the component, which should flip a editing flag and create a new BlogEntry value named blog. This new value will be used by the user interface to bind fields to a data entry form.
But we don't need to stand up a user interface to unit test our BlogRoll component. Instead we can call the method we'll eventually bind to the click event, once we have an actual template – newBlogEntry(). Note that we still start by calling ngOnInit() in order to populate the list of blog entries from our fake service:
it('should show blog editor div when newBlogEntry is triggered...',  () => {
 blogRoll.ngOnInit();
 // we are not editing yet
 expect(blogRoll.editing).toBe(false);
 // trigger an edit event
 blogRoll.newBlogEntry();
 expect(blogRoll.editing).toBe(true);
 expect(blogRoll.blog).toBeDefined();
});
The newBlogEntry() method sets up the new blog state variable, toggles the editing property so we ultimately will display the editor section, and we're off and running.
The rest of the methods in the test class are a variation on a theme. Check out the GitHub Repository version of the blog-test-unit.spec.ts file for the rest of the component source.
Now let's move on to testing the component inside of Angular – using the TestComponentBuilder framework component.
An In-Container Angular Component Test
Our component test takes up where our last example left off — placing the component inside of an Angular 2 module, complete with a template and dependency injection.
Let's separate these component integration tests from the pure unit tests, by creating src/blog-roll/blog-roll.spec.ts to hold them.
We'll start our test with the imports from the unit test, plus some new imports from Angular 2's Jasmine-based test suite (angular2/testing), and as per our last blog entry, we'll be using the injectAsync function to resolve our tests with a Promise. We also inject TestComponentBuilder, which helps us build up our component for testing.
Here are the new imports:
import {
  describe,
  expect,
  fail,
  it,
  injectAsync,
  TestComponentBuilder
} from '@angular/core/testing';
You'll notice some of the common Jasmine API methods being imported here not from Jasmine itself, but from angular2/testing. This is because we want to add features such as dependency injection and asynchronous resolution to the test framework, and the Angular team has taken the time to wrap the normal Jasmine methods so they can work with Angular's D/I system.
We also need to import the provide dependency injector configuration method to help us wire the injectors with mock versions of our real dependencies:
import {provide} from '@angular/core';
And of course we still have our original imports:
import {BlogRoll} from './blog-roll';
import {BlogEntry} from '../domain/blog-entry';
import {BlogService} from '../services/blog-service';
import {MarkdownService} from '../services/markdown-service';
Defining the Component Test Spec
Now we'll set up the test specification. Note how we keep the same mock objects (they are just simple dummy objects after all), but we have to do some gymnastics to inject our fakes. Here are the fakes again…
class MockMarkdownService extends MarkdownService {
  // same as before
}
class MockBlogService extends BlogService {
  // same as before
}
describe('Blog Roll Component...', () => {
  var mockBlogService;
  beforeEach(() => {
    mockBlogService = new MockBlogService();
  });
You might be tempted to wire up a beforeEachProviders method to inject the real service and mock the Http backend. Don't! I consider this to be the wrong approach – it goes against the concept of unit testing – testing one component at a time, and truly mocking any external collaborators. As difficult as it may be to work through this, the correct way to fake a service is to replace it with a simple test double. Plus we are more tolerant of fetching the data stream from http to something else in the future, as long as we're delivering the data via Observables.
Our First Component Test – Enter the TestComponentBuilder
For our component tests, we use a new test scaffolding object, the TestComponentBuilder – this factory is injected into a test, and provides an API to build up your component from several settings. In our case, we'll tell the Builder that we want it to inject the proper fake collaborators, create the object asynchronously, and then we'll write a promise to handle the test itself. Sound confusing? Yes, it is in words, so let's look at it:
it('shows list of blog items by default',
    injectAsync([TestComponentBuilder], (tcb) => {
    return tcb
      .overrideProviders(BlogRoll,
         [ provide(BlogService, {useValue: mockBlogService}) ])
      .createAsync(BlogRoll)
      .then((fixture) => {
The steps involved are:
- Set the providers to include a fake
BlogServiceinstance, using the predefinedmockBlogServicevariable we created in ourbeforeEach, - Create the BlogRoll instance, injecting it with the objects required by the component's constructor,
- Provide a promise callback,
then, which, on success, is passed the fully wired component, which we like to callfixture
Now that we've done this, let's write the rest of the test. It goes the same way as before – we want to see that the component state is at rest with a collection of BlogEntry instances in blogs, and that we are not currently editing. But now we can actually look at the content in our template, as well as in our component's internal state:
expect(fixture.componentInstance.editing).toBe(false);
expect(nativeElement
        .querySelector('#blog-editor-panel') === null)
        .toBe(true);
expect(nativeElement
        .querySelector('#blog-roll-panel') === null)
        .toBe(false);
We are testing both internal state and template behavior here.
The internal state is tested as before, except now we have to access our BlogRoll component via the fixture's componentInstance property:
expect(fixture.componentInstance.editing).toBe(false);
The template behavior aspect of our test focuses on a fragment of the Component's template containing both the editor div and a div containing the display list, as a table of entries.
In one mode, we are editing a new blog entry. In another mode, we are showing the list of blog entries. So in the test, we look up each div which is displayed by the state of the editing variable and see if it is defined. When it isn't, the value is null. Here is the template fragment:
<div id="blog-editor-panel" ... *ngIf="editing">
   <form>...</form>
</div>
<div id="blog-roll-panel" ... *ngIf="!editing">
   <p>
     <a (click)="newBlogEntry()">
       <i class="glyphicon glyphicon-plus-sign">
       Add...
       </i>
     </a>
   </p>
      <table ...></table>
</div>
Triggering Events
Let's look at another scenario. We'll trigger the click event for the glyphicon-plus-sign icon to add a new Blog Entry and trigger our editing mode:
it('should show blog editor div when New is clicked...',
  injectAsync([TestComponentBuilder], (tcb) => {
    return tcb
      .overrideProviders(BlogRoll,
        [ provide(BlogService, {useValue: mockBlogService}) ])
      .createAsync(BlogRoll)
      .then((fixture) => {
        let nativeElement = fixture.nativeElement;
        fixture.detectChanges();
        // trigger the 'new' button and swap visible panels
        fixture.nativeElement
          .querySelector('i.glyphicon-plus-sign').click();
        // process the click event
        fixture.detectChanges();
        expect(fixture.componentInstance.editing).toBe(true);
        expect(nativeElement
                .querySelector('#blog-editor-panel') === null)
                .toBe(false);
        expect(nativeElement
                .querySelector('#blog-roll-panel') === null)
                .toBe(true);
    });
}));
Now we have the ability to both check the internal state of a component and trigger additional events.
Deeper Observations
We can go even further in our test DOM query. Given this (abbreviated) template syntax for our table rows:
<tr *ngFor="#blog of blogs">
<td>
<a href="#" (click)="editBlogEntry(blog)">
<i class="glyphicon glyphicon-edit"></i>
</a>
<a href="#" (click)="deleteBlogEntry(blog)">
<i class="glyphicon glyphicon-remove"></i>
</a>
</td>
<td>
<span class="title">{{ blog.title }}</span>
</td>
<td>
<div [innerHtml]="blog.contentMarkdown"></div>
</td>
</tr>
We can detect whether we have two table rows (one for the headers and one for our single array element of data from the fake blogService):
let trs = nativeElement.querySelectorAll('tr');
expect(trs.length).toBe(2);
and we can check their content using some DOM element properties:
let tdTitleContent = trs[1].children[1].innerHTML;
let tdRenderedContent = trs[1].children[2].innerHTML;
expect(tdTitleContent).toContain('The title');
expect(tdRenderedContent).toContain('Hi there');
And so we can completely introspect the DOM elements. Here's the full test method:
it('shows list of blog items by default',
 injectAsync([TestComponentBuilder], (tcb) => {
  return tcb
    .overrideProviders(BlogRoll,
     [ provide(BlogService, {useValue: mockBlogService}) ])
    .createAsync(BlogRoll)
    .then((fixture) => {
      let nativeElement = fixture.nativeElement;
      fixture.detectChanges();
      // we start with the blog roll panel visible
      expect(fixture.componentInstance.editing).toBe(false);
      expect(nativeElement.querySelector(
        '#blog-editor-panel') === null).toBe(true);
      expect(nativeElement.querySelector(
        '#blog-roll-panel') === null).toBe(false);
      let trs = nativeElement.querySelectorAll('tr');
      expect(trs.length).toBe(2);
      let tdTitleContent = trs[1].children[1].innerHTML;
      let tdRenderedContent = trs[1].children[2].innerHTML;
      expect(tdTitleContent).toContain('The title');
      expect(tdRenderedContent).toContain('Hi there');
    });
}));
Sidebar – what is detectChanges()?
Like Angular 1 before it, Angular 2 must resolve differences between the model and view. At runtime, this is automatic. But in our tests, we are given a method to take our next turn down the view resolution superhighway. It's the method called detectChanges() on our fixture. This is what calls our ngOnInit() method for us during startup, and processes our click event and updates the view when the component makes state changes.
Angular 2 is much faster than Angular 1 in terms of updating the user interface and binding data to the model, primarily because data flows in a single direction (downward in the DOM nodes) and events flow upward in response. This is very similar to how React processes changes. In addition, the Angular 2 team has implemented the Shadow DOM and has also even divorced the rendering from the rest of the system, so that developers can take advantage of loading data via Web Workers. This is all very powerful and it will take some time to fully realize the possibilities.
Test Component Builder Process Recap
The general pattern to stand up a test is as follows:
- Inject up a component fixture with
TestComponentBuilder - Set properties on the object with the
fixture.componentInstanceproperty - Move the change detection forward with
fixture.detectChanges() - Ask the
fixturefor anativeElementproperty and check the data on the DOM
The fixture is your component under test, with several additional properties and methods:
detectChanges()– force a walk of the data graph and update the view with relevant content, and vice versa. This is a top-down one-time process, similar in result to the Angular 1$scope.$digest()function but much fastercomponentInstance– the actual component under test – you can call methods of the component herenativeElement– the DOM element of the template your component owns
The TestComponentBuilder is a relatively new addition to Angular 2, and as such some of the errors you may get could be vague. I spent a ton of time trying to use the beforeEachProviders method to configure the mock instances of my BlogService, only to find out that the TestComponentBuilder basically ignored the first-level injection instructions – it always happily gave me the real BlogService but without an Http service or its HTTP_PROVIDERS services. The way I test now is to use the overrideProviders method of the builder, which seems to set up the proper fakes for me even directly into the component under test. See this closed issue in GitHub which saved me from insanity once I found it!
Simplify the Template
One additional technique may prove useful to you during your testing – the ability to replace the template with one that is suited for your testing purposes.
Consider that many developers don't really finalize the UI until, well, production. The UI widgets could change – links turn into buttons, one component turns into three, the features move from component to component, and so on. We can side-step view issues by setting our own fake template value. It's easy to do – just add an overrideTemplate(newValue) method before calling the .then method when setting up the fixture. For example:
it('provides a title', injectAsync([TestComponentBuilder], (tcb) => {
  var html = `
  <p *ngFor="#blog of blogs">{{ blog.title }}</p>
  `;
  return tcb
    .overrideProviders(BlogRoll,
       [provide(BlogService, {useValue: mockBlogService})])
    .createAsync(BlogRoll)
    .overrideTemplate(html)
    .then(fixture) {
       // now we can reason about the data inside of simple paragraphs!
    });
}));
Each test can focus on the fragment of view code that represents how the component will finally be implemented. The danger, of course, is that the view changes radically and your test fragment of HTML doesn't keep up.
Accessing the Sample Code
For reference, I've created a GitHub project that includes the [BlogRoll] component, the [unit test] and the [integration test]. I also have the tests of the [BlogService] itself from the last post in the same repository.
Review
We've talked about how to create tests against components using both familiar pure unit tests, and via the TestComponentBuilder class, and how it creates a test fixture object that wraps the view and component data. We discussed how to check HTML values via the DOM element property, elementReference and how to interrogate properties and call methods of the component instance via the componentInstance property. We also discussed how to override the HTML template of the test fixture to simplify it for our testing purposes.
I hope you found this content useful. Remember, Angular 2 is rapidly changing and adding missing pieces as it speeds toward release later this year. All of us in the community are researching and sharing what we've learned.
There is a fantastic community of people (such as @gdi2990, @zoechi who helped me think through the test component builder injector, Rob Wormald, and many others) over at gitter.im/angular/angular. If you are struggling with something and need to level up with some really smart people, don't be shy – the community is welcoming and very helpful.
You can find the code for this post on GitHub as https://github.com/krimple/angular2-unittest-samples-rc. Happy sleuthing and maybe we'll see you at ng-conf Salt Lake this year!