
In our first installment, we discussed how the Serverless Framework provided an easy way to deploy a Lambda (function) on AWS. But we skipped some pretty big topics:
- How Serverless manages our services
- How AWS Lambdas receive parameters, path variables, and query strings
- How to secure Lambdas from unauthorized use
- How to get something done within the Lambda
In this post, we’ll begin a deeper dive, starting with how to send information to Lambdas. We’ll start by passing parameters and path-based variables to our functions, and then begin to lock down our functions from unauthorized access.
Serverless manages boilerplate and build chores
Think of Serverless as a big boilerplate and build manager for cloud service projects. You pick a template (like the TypeScript Lambda template we’re using in this series), provide the details that AWS needs in serverless.yml, and write your functions. Serverless does the heavy lifting.
For example, at deployment time, the serverless deploy CLI command packs our services into a zip and uploads it. Because we’re using the TypeScript AWS Lambda template, and the configuration includes the serverless-webpack Serverless plugin, Serverless:
- executes a Webpack build to compile our TypeScript into JavaScript
- assembles a CloudFormation template and the compiled JavaScript code into the deployment’s zipfile
- uploads the zipfile to an S3 bucket
- and calls CloudFormation to deploy the AWS stack
Various features are added to Serverless projects by installing and configuring plugins, all of which are listed on the Serverless website.
Lambdas and the Internet
Lambdas can be exposed as web services on the Internet via the Amazon API Gateway. To do this, we added the last three lines below in our previous blog post:
functions:
  shout:
    handler: handler.shout
    events:
      # Installs the HTTP Proxy route to our method
      # in API Gateway. A GET of /shout will result
      # in a call to handler.shout
      - http:
          method: get
          path: shout
In practical terms, this has exposed our Lambda as a web service executed via an HTTP GET at a generated API Gateway instance URL, in the path /shout.
But how did it do that?
Serverless-generated CloudFormation Templates
When you issue a serverless deploy CLI command, the Serverless framework transforms the instructions in serverless.yml to a series of CloudFormation instructions in AWS. This happens at deploy-time. The templtes are generated in .serverless, a hidden temporary directory of your project. For the 30 lines contained in serverless.yaml, we’ll end up with a cloud-formation-template-create-stack.json file with 67 lines of code, and a cloud-formation-template-update-stack.json file with 340 lines of code. This two-step process is necessary: some resources, such as a deployment bucket, need to be created only once, and updated by uploading new ZIP files to the bucket at deployment time. Here are the contents of the .serverless directory:
.serverless
├── cloudformation-template-create-stack.json
├── cloudformation-template-update-stack.json
├── serverless-state.json
└── shout-it.zip
Note: the serverless-state.json file is used internally by Serverless to keep track of resources created during the deployment process. It can get stale (for example if multiple developers deploy the project at various times), so it will be updated on each deployment.
The templates, when deployed, define the following resources:
- A CloudFormation Stack, named based on the project name plus the stack name (such as
shout-it-dev) - An AWS S3 Bucket to hold the Stack configuration, along with an S3 Bucket policy to deny any user-based access to the files (since CloudFormation is managing them)
- A CloudWatch Logs log group for the Lambda at
/aws/lambda/shout-it-dev-shout - An IAM Role, shared by default for all Lambdas in this project, that allows the Lambda to create the log group and write log events to the stream
- A deployment script to publish the Lambda function using the standard
AWS::Lambda::Functiontemplate, along with the location of a pre-configured zipfile (also in the.serverlessdirectory) to upload to the S3 bucket when publishing the Lambda - A Lambda version policy which requests to retain prior versions of the Lambda when deploying new ones
- An AWS API Gateway service to expose our service to the Internet
- An URI for the
/shoutpath in the API Gateway - Proper configuration to point the route to the Lambda
All of that, just with the following serverless.yml file:
service:
  name: shout-it

custom:
  webpack:
    webpackConfig: ./webpack.config.js
    includeModules: true

plugins:
  - serverless-webpack

provider:
  name: aws
  runtime: nodejs12.x
  apiGateway:
    # Enable gzip compression for responses > 1 KB
    minimumCompressionSize: 1024
  environment:
    AWS_NODEJS_CONNECTION_REUSE_ENABLED: 1

functions:
  shout:
    handler: handler.shout
    events:
      - http:
          method: get
          path: shout
As shown above in the provider section, we can even pass environment variables to our Serverless functions and tune the API Gateway configuration to support gzip compression. There are many other settings available.
The Lambda Event object
Back to our API Gateway-exposed Lambda: so far we haven’t defined any information to feed to the Lambda to map incoming parameters or path variables. But actually, the Lambda does support incoming data in the form of a Lambda event.
Serverless defined our Lambda’s API Gateway mapping using its aws-proxy strategy. This strategy directly maps to the API Gateway’s proxy feature. Upon invocation, the Lambda is fed the entire request in the form of an event parameter. This means the Lambda is fed HTTP headers, cookies, and the body payload. It also means the Lambda is required to return the entire response, including the headers, status and body payload to return.
Using the console.log function, we can review what AWS passes to our event (the log output goes to CloudWatch logs).
For example, when you call the API without parameters (url collapsed to fit the code sample):
$ curl -X https://.../dev/shout
you get the following headers:
"resource": "/shout",
"path": "/shout",
"httpMethod": "GET",
"headers": {
    "Accept": "text/html,...",
    "Accept-Encoding": "gzip, deflate, br",
    ... many other HTTP headers
},
"multiValueHeaders": {
    "Accept": [
        "text/html..."
    ],
    ... many other multi-value HTTP headers ...
},
"queryStringParameters": null,
"multiValueQueryStringParameters": null,
"pathParameters": null,
"requestContext": {
... lots of info here ...
},
"body": null,
...
}
Thanks to the API Gateway proxy mapping, we get:
- HTTP headers
- the request body (which is currently
nullsince we aren’t passing anything in) - query string and path parameters
…and we aren’t using any of those things.
Processing Query Strings
If we send in a query string…
curl -X https://.../dev/shout?a=1&b=2&b=3
we get it detailed in the queryStringParameters and multiValueQueryStringParameters keys within the response payload:
"queryStringParameters": {
  "a": "1",
  "b": "2,3"
},
"multiValueQueryStringParameters": {
  "a": [
    "1"
  ],
  "b": [
    "2",
    "3"
  ]
},
...
Processing Path Variables
To use RESTful path variables in your URLs, you need to map them in the serverless.yml call. For example, if we exposed a path variable for a message key to pick from a list using this mapping:
functions:
  shout:
    handler: handler.shout
    events:
      - http:
          method: get
          path: shout/{key}
With this (admittedly silly) implementation of the Lambda:
export const shout: APIGatewayProxyHandler =
  async (event, context) => {
    let message: string;

    switch (event.pathParameters.key) {
        case 'shk':
            message = 'AAAAHH SHARK!';
            break;
        case 'py':
            message = 'AAAAHH PYTHON!';
            break;
        default:
            message = 'AAAAHH LAZY!';
    }

    return {
        statusCode: 200,
        body: JSON.stringify({
            message: `AAAAHHH ${message}`
        })
    };
};
… and this invocation:
CURL -X GET \
    https://.../dev/shout/py
we’d get the following response:
{"message":"AAAAHHH AAAAHH PYTHON!"}
You can use a similar process to fetch the query string if you place variables there.
Managing responses
The API Gateway Proxy strategy requires you to handle the response in the Lambda.
Any body content type can be handled, returned as the body, property, as long as the data is in the right format, and the content-type header in the headers property signifies the appropriate type. The response type defaults to application/json if headers are not returned.
You are also responsible for returning the appropriate statusCode.
At this point, your Lambda can be invoked by anyone who figures out the URL; a malicious person could submit millions of requests, running up your bill and blocking your real users.
We need to secure the Lambda, and Amazon provides both the security roles and permissions system with IAM. For now, we’ll use an IAM user to execute our Lambda. In our next post, we’ll see how to set up a true user management store with Amazon Cognito.
Securing Lambdas with IAM
To authorize access to resources, we need to use Amazon’s Identity and Access Management (IAM) system. IAM’s key objects are:
Users– These are users who sign in to the AWS Console, or access AWS via the Amazon AWS Command-Line Interface. Console users can be secured with two-factor authentication, whereas CLI users are enabled via assigning a secret and access key pair.Groups– Users can be assembled into Groups for management purposes.Roles– Logical names to attach a series of rights via polices (see below)Permissions– A right to execute a specific action or gain access to a specific resource or resourcesPolicies– Policies attach permissions to Roles
Serverless here, too, has helped us out a bit. It has generated the appropriate IAM role for our functions, giving them permissions to log to CloudWatch Logging. The IAM Role created is named after the project, its deployed region, and its stage. The name given is shout-it-dev-us-east-1-lambdaRole. Here is the prebuilt policy defined by Serverless:
{
    "Version": "2012-10-17",
    "Statement": [
        {
            "Action": [
                "logs:CreateLogStream",
                "logs:CreateLogGroup"
            ],
            "Resource": [
                "arn:aws:logs:us-east-1:xxxxxxxxxxx:log-group:/aws/lambda/shout-it-dev*:*"
            ],
            "Effect": "Allow"
        },
        {
            "Action": [
                "logs:PutLogEvents"
            ],
            "Resource": [
                "arn:aws:logs:us-east-1:xxxxxxxxxxx:log-group:/aws/lambda/shout-it-dev*:*:*"
            ],
            "Effect": "Allow"
        }
    ]
}
So, in effect, our Lambda is already able to act on other AWS services. If the Lambda executes a console.log command, Node’s output stream (process.stdout) and error stream (process.stderr) are hooked to the CloudWatch logger, and these permissions give us the ability to log our output to it.
We can add additional policies to this role to allow our ShoutIt lambda to access S3 buckets, send messages via a queue, or access databases. Actually you can choose hundreds of actions, but for each service you need to access, you need to add a policy and attach permissions to allow the Lambda to access the resource.
We’ll do this in future posts, when we write data to DynamoDB and perform other tasks.
Requiring authentication
Next, we need to secure our API and allow external web applications to call it. We do that with the cors and authorizer properties of serverless.yml.
functions:
  shout:
    handler: handler.shout
    events:
      - http:
          method: get
          path: shout/{key}
          cors: true
          authorizer: aws_iam
Adding cors: true enables Cross-Origin Resource Sharing (CORS) headers, which allow applications served from one host (such as a React app served from an S3 bucket) access to resources stored on another host (such as our Serverless app running on AWS Lambda). We’ll need this once we wire up a React application in the next blog post. cors:true is actually a shortcut for a series of settings, all documented here.
Adding authorizer: aws_iam requires callers to the endpoint (shout/{key}) to send along the appropriate AWS secret and access keys via a special, encrypted request signing process known as aws4. See the documentation for more details on aws_iam. If you want the details on aws4 visit see this information in the reference guide. We won’t need to know the details, because we’ll choose libraries that handle this for us (such as AWS Amplify).
Note: providing AWS keys is only a temporary requirement. In our next post we’ll create an Amazon Cognito security system and tie its users into our application, eliminating our requirement to pass those keys along. But until then, let’s just test our API via our AWS secret and private keys using the Postman testing tool.
How to Test our API with Postman
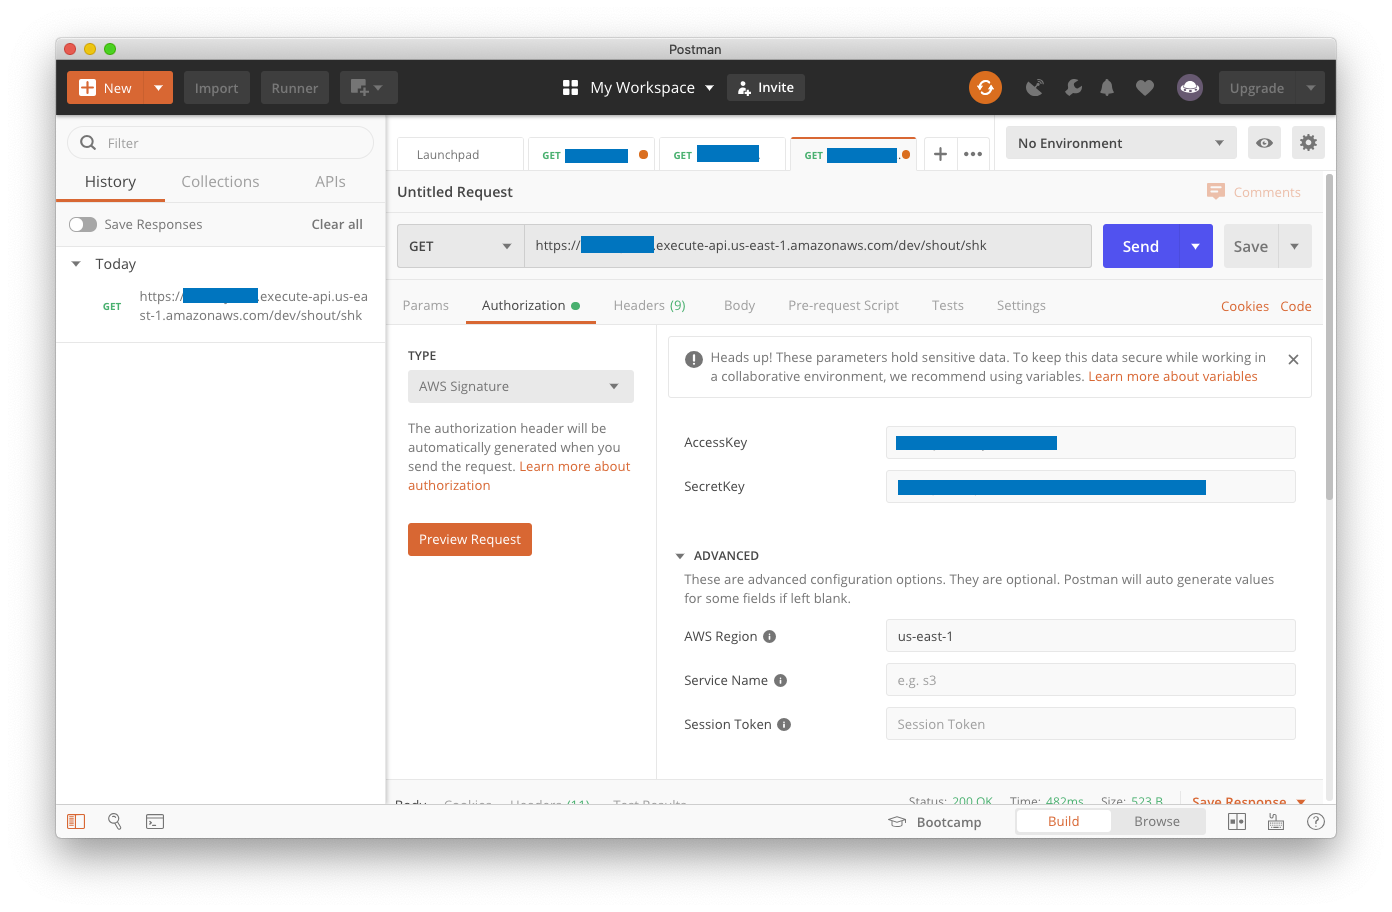
Postman is an HTTP REST testing tool. It supports several authorization methods, including AWS. Install Postman, and then use it to execute your API call. If you are following along and testing your own API, make sure the credentials you give have rights to execute Lambdas.
Here are the settings on Postman’s authorization tab. We’ve blocked out any identifying account information, but you’ll need to supply your Access Key, Secret Key, URL, and AWS Region (click on the image for a full-size rendering of our sample interaction):
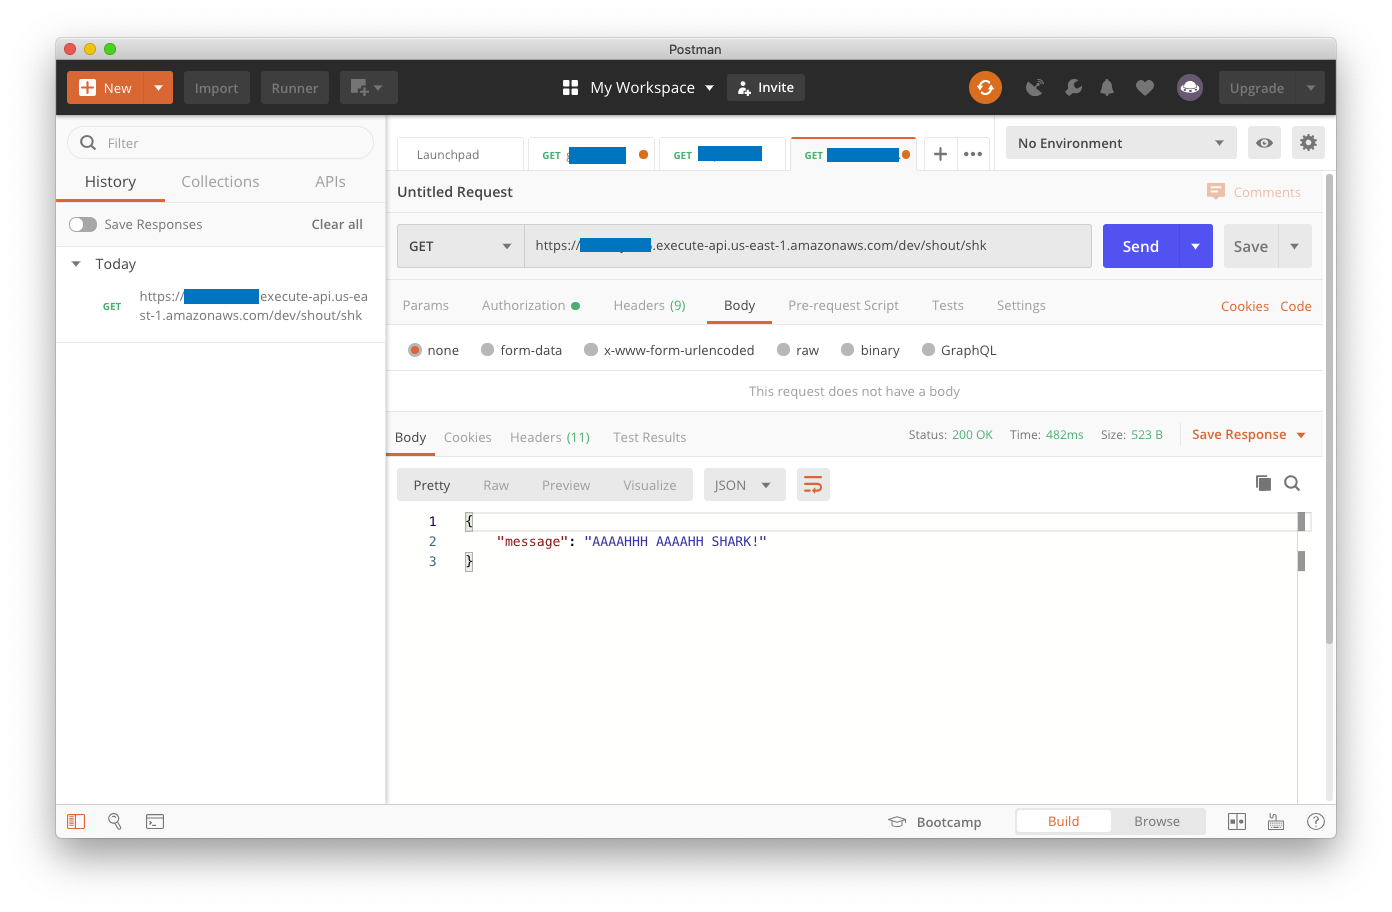
This should lead to success, as long as you provided our path parameter at the end for the message type you want, and provided secret and access keys from Amazon that have execute permission against your Lambdas (again, click on the image to see a full-size rendering).
Serverless versus AWS Serverless Application Model
Please note: Amazon has a similar framework,AWS SAM, with some CloudFormation features to generate some of the same objects. For example, there is a CloudFormation type for Lambda (AWS::Lambda::Function) as well as a SAM template (AWS::Serverless::Function). The AWS Serverless Lambda type transforms the CloudFormation instructions to more detailed instructions before deploying. This is a very AWS-centric way of managing complexity.
We’ll devote another article to comparing the approaches of each framework. For now, keep in mind that Serverless treats AWS as a cloud implementation provider, and can handle cloud frameworks from Google, Microsoft and other companies as well.
What’s next? Building a client and configuring AWS Cognito for web security
Having to pass your AWS Secret and Private keys from a client is a klunky way to work with AWS as an end user. IAM limits the total number of physical users anyway, and most applications require security based on usernames and passwords. Directly integrating with AWS via user-supplied keys is not the right approach for, say, a React-based web application to sign in.
In the next part of our series, we’ll discuss setting up a real user authentication system using Amazon’s Cognito, and we’ll install a Serverless plugin to access to our Lambdas via a simple React web application.