In this article we’ll take a look at a cloud-based application platform, Serverless,
and what it takes to get a simple function hosted on Amazon Web Services (aws), including configuring security with Amazon Cognito, and a front-end client with Angular.
There are a lot of little things going on here, so I’ve drawn out a very helpful diagram.

No, really, it’s not that bad
Let’s talk about what we’re actually trying to accomplish here. Our goals are:
-
Create an AWS Lambda Function
-
Expose an HTTP endpoint to execute said function via the AWS API Gateway
-
Create a Cognito user pool to store users and their credentials
-
Install the appropriate Security Policy in Amazon IAM to protect the Lambda so that only logged-in users can access it
-
Deploy a front-end application in a Single-Page Application platform to become the client to this application
-
Provide CORS headers to the browser to allow the Single-Page Application to request and gain access to the Lambda as an HTTP resource
-
Configure the client to log into/out of the application and provide security credentials via AWS Amplify, as mobile and web client platform
That may seem like a lot of steps, especially if you’re coming from a monolith-based application where you deploy the entire codebase at once, but it’s really not as complex as it seems. In this series of blog posts, I’ll break down these tasks and show you how the pieces fit together.
Starting somewhere – how about the beginning?
Ok, so let’s start at the beginning. You want to execute a Lambda (a function) in AWS. Using the Serverless framework (see serverless.com for details), you can set up a scratch project in minutes. All you need to do
is install the framework, make sure you’ve set up an AWS profile, and create a new project, like this (commands are linux/unix/OS X-based):
npm install -g serverless
mkdir serverless-sandbox
cd serverless-sandbox
serverless create --template aws-nodejs-typescript --name shout-it
This project creates and manages one (or more) Lambda functions. The project structure is as follows:
.
├── handler.ts
├── package.json
├── serverless.yml
├── tsconfig.json
├── vscode
│   └── launch.json
└── webpack.config.js

1 directory, 6 files
Let’s go through the files in the project.
-
handler.ts – this is the file containing the function we’ll run in the cloud. It’s defined as a TypeScript function (typescript is the JavaScript language with extensions such as datatypes to make life easier for developers).
-
package.json – as this is a NodeJS project, the project’s dependencies and build instructions are configured via the Node Package Manager, using this file to define all of the dependencies and scripts.
-
serverless.yml – This is the file used by the Serverless Framework to configure the application’s infrastructure when deployed to a cloud platform. Since we used the aws-nodejs-typescript template, it expects the app to deploy on Amazon Web Services.
-
tsconfig.json – Typescript is a compiler. It takes very useful typed JavaScript syntax, and compiles it down to a format that any NodeJS interpreter can deal with. In our case, it delivers ready-to-run ECMAScript 2017 JavaScript based on files such as our handler above.
-
vscode and vscode/launch.json – handy configurations for running the project locally using Visual Studio Code.
-
webpack.config.js – WebPack is a build tool that bundles up dependencies and includes them in the final JavaScript files to be deployed on a server. It can be used in Lambdas, and so we integrate it with our compilation process in the Serverless Framework, which uses plugins to integrate new features. In our case, the plugin being used is the serverless-webpack plugin. It is used when packaging our function to AWS, and pulls in dependencies listed in the dependencies section of package.json.
What’s in a Lambda?
An AWS Lambda deployment looks (in VERY simplified terms) like this:
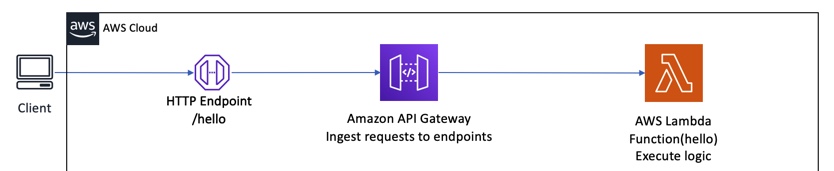
An AWS Lambda is a “serverless resource”�,” meaning it does not run on a dedicated EC2 instance. It runs in an isolated environment on AWS-managed hardware, and you pay only when the function is executing.
For the client to be able to call the Lambda, it needs to be exposed by a piece of AWS infrastructure known as the API Gateway. The gateway exposes endpoints (like our /hello example above) and uses them to allow your client to execute the Lambda function.
If you’re thinking “wait a minute, anybody could just execute this function!”, you’re right. We’ll secure it in a future blog post. But first let’s continue our review of the Serverless project at hand.
A Lambda is a very simple piece of code, located in handler.ts in our project. It will be translated to pure JavaScript and uploaded to S3, attached to AWS as a Lambda via a CloudFormation template. This is all managed by the Serverless framework via instructions in serverless.yml.
Here is the entire Lambda function:
import { APIGatewayProxyHandler } from 'aws-lambda';
import 'source-map-support/register';

export const hello: APIGatewayProxyHandler = async (event, context) => {
  return {
    statusCode: 200,
    body: JSON.stringify({
      message: 'Go Serverless Webpack (Typescript) v1.0! Your function
                executed successfully!',
      input: event,
    }, null, 2),
  };
}
-
Our lambda is a function that takes an event and context, and returns a response object. We use TypeScript to define the return type of our Lambda, namely as an APIGatewayProxyHandler, with a standard HTTP statusCode and a response body. We’re importing this type from the aws-lambda NPM module, and also using the source-map/register import to support generating JavaScript source maps for debugging later.
-
Our status code is a simple web 200/OK, and our payload is a JSON object with a message and input property.
Of course, Lambdas should integrate with other AWS services. More about that in another post.
The Lambda is configured for AWS via the serverless.yml file. Here is the relevant portion:
functions:
  hello:
    handler: handler.hello
    events:
      - http:
          method: get
          path: hello
-
A function is created, named hello
-
The code executed is the handler.ts file, in the hello method. This is compiled (actually the term in JavaScript circles is transpiled) into standard JavaScript for NodeJS and delivered when the Lambda is deployed.
-
The HTTP endpoint is /hello on the API Gateway, based on a ROOT URL generated at the time of the first deployment.
Where does this code get deployed, anyway?
That’s the interesting part. When you install Serverless, you configure it to point to your AWS profile using the AWS command-line tools. Your $HOME/.aws directory contains those files, and I’d refer you back to our AWS Practice Lead’s excellent post on configuring your AWS credentials for more details. The Serverless-specific part of the configuration will happen when you first execute the serverless command.
The code actually gets deployed as a CloudFormation Stack in AWS.
The stack name is actually translated from a Serverless property in serverless.yml called the “Stage”. Stages are analogous to deployment environments (like test, dev, production, customer1, etc) and so the stage helps make up the name of the resultant CloudFormation stack.
I switched the function name as well as the entry in serverless.yml to the name shout:
// in serverless.yml

functions:
  shout:
    handler: handler.shout
    events:
      - http:
          method: get
          path: shout
// handler.ts
import { APIGatewayProxyHandler } from 'aws-lambda';
import 'source-map-support/register';

export const shout: APIGatewayProxyHandler = async (event, _context) => {
  return {
    statusCode: 200,
    body: JSON.stringify({
      message: 'AAAAHHH!',
      input: event,
    }, null, 2),
  };
}
To deploy your Lambda, you’d follow this workflow, which creates an AWS CloudFormation stack named ‘shout-it-dev’ (a combination of the project nanme and the stage name).
# first time or whenever you add dependencies
$ npm install
# then...
$ serverless deploy
Let’s go over a snippet of the steps taken by Serverless:
-
Webpack compiles TypeScript into JavaScript. It produces both a handler.js file for the Lambda itself, and handler.js.map file for debugging.
$ serverless deploy
Serverless: Bundling with Webpack...

Time: 277ms
Built at: 02/03/2020 4:45:52 PM
         Asset      Size  Chunks                   Chunk Names
    handler.js  1.22 KiB       0  [emitted]        handler
handler.js.map  5.21 KiB       0  [emitted] [dev]  handler
Entrypoint handler = handler.js handler.js.map
[0] ./handler.ts 247 bytes {0} [built]
[1] external "source-map-support/register" 42 bytes {0} [built]
-
Next, Serverless is going to pull external dependencies (our source-map-support import created one), and bundle it, plus the Lambda, into a zipfile, and upload it to S3 so it can be attached to the Lambda.
Serverless: Package lock found - Using locked versions
Serverless: Packing external modules: source-map-support@^0.5.10
Serverless: Packaging service...
Serverless: Creating Stack...
Serverless: Checking Stack create progress...
........
Serverless: Stack create finished...
Serverless: Uploading CloudFormation file to S3...
Serverless: Uploading artifacts...
Serverless: Uploading service shout-it.zip file to S3 (289.04 KB)...
-
Serverless then installs or updates a generated CloudFormation Template to deploy the CloudFormation Stack:
Serverless: Validating template...
Serverless: Updating Stack...
Serverless: Checking Stack update progress...
..............................
Serverless: Stack update finished...
-
Finally, Serverless reports the result of the deployment, including any resources you may need to know, such as the endpoint URL for your function:
Service Information
service: shout-it
stage: dev
region: us-east-1
stack: shout-it-dev
resources: 11
api keys:
  None
endpoints:
  GET - https://rgq66soyuh.execute-api.us-east-1.amazonaws.com/dev/shout
functions:
  hello: shout-it-dev-shout
layers:
  None
Running our new function
To execute the (unprotected) function, just hit the endpoint URL. You’d need to substitute yours from the endpoints output above.
curl https://khdse63tui.execute-api.us-east-1.amazonaws.com/dev/shout
{
  "message": "AAAAHHH!",
  "input": {
    "resource": "/shout",
    "path": "/shout",
    "httpMethod": "GET",
    "headers": {
      "Accept": "*/*",
      ...
      "Host": "khdse63tui.execute-api.us-east-1.amazonaws.com",
      "User-Agent": "curl/7.64.1",
      "Via": "2.0 94bf92d1952d884a30739d1abb6a09eb.cloudfront.net (CloudFront)",
      ...
    },
    ...
    "requestContext": {
      "resourceId": "15c3hi",
      "resourcePath": "/shout",
      "httpMethod": "GET",
      "extendedRequestId": "HVydfFp0IAMF-iw=",
      "requestTime": "03/Feb/2020:21:58:33 +0000",
      "path": "/dev/shout",
      ...
      "identity": {
        "cognitoIdentityPoolId": null,
        "accountId": null,
        "cognitoIdentityId": null,
        "caller": null,
        ...
        "user": null
      },
      "domainName": "khdse63tui.execute-api.us-east-1.amazonaws.com",
      "apiId": "khdse63tui"
    },
    "body": null,
    "isBase64Encoded": false
  }
}
-
Our response includes the payload from our function (the aptly worded message), the input fed to the call, the request context, and any other relevant information.
-
Note, our security at the moment shows that we have a user of null. That’s bad, because anything that got our URL could flood us with requests and ring up a bill.
Next in our Serverless posts: Securing that service!
Coming up next, we’ll break down how to install Amazon’s Cognito security system, and how to wire it to our application and secure our Lambda with IAM.
