
Note – This article is an updated version of the rc1 version, and as such it now covers Angular 2.0.1 and above, the official release of 2.0. The main difference here is the way the framework is started, using the TestBed API.
Testing Components
In my last post, I discussed how to write tests in Angular 2 based on the new Angular 2.0 TestBed API. We learned how to stand up a service using the TestBed’s configureTestingModule API, injecting the service with the provider property, and how to mock the network requests to the Http service using the MockBackend.
In this post, we'll learn how to test components, the lynchpin of any Angular 2 application.
Testing a Component
We'll build a user interface component (BlogRoll) that displays and edits blog articles. For the sake of simplicity, we'll make a single component that displays both the listing and an editing form for modifying a single blog article.
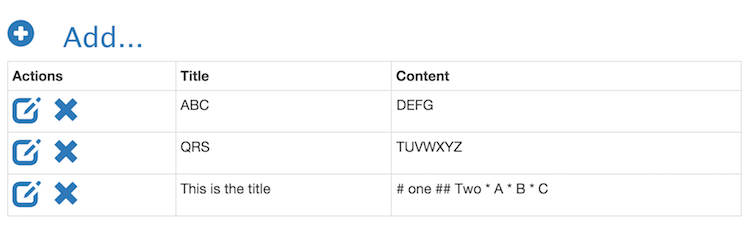
Figure 1: The List View
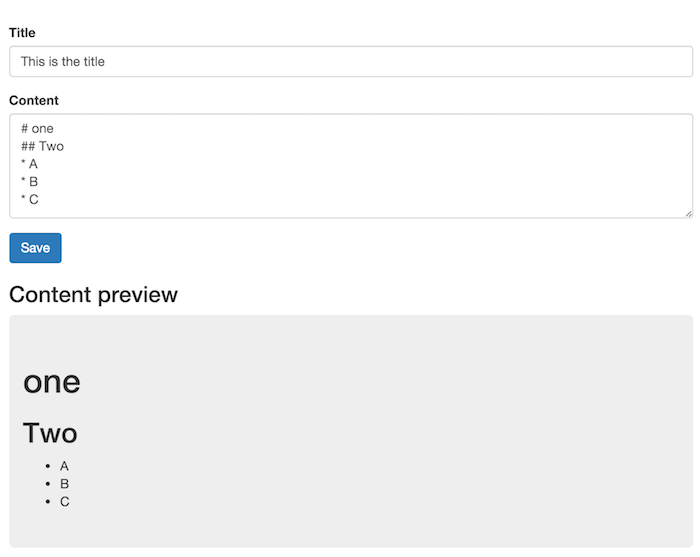
Figure 2 – The Form
This could have been built with the Angular Router and two components, however it is a non-trivial exercise to test components written to use it. So we will focus initially on an outer component that shows an entry form when editing a blog entry, and shows a list of existing blog entries when editing is no longer active.
The Three Ways to Test an Angular Component
Like Angular 1 before it, Angular 2 components are testable both inside and outside of the framework. There are at least three ways to test a component:
- Pure unit tests – testing the component outside of the container, mocking other collaborators completely
- Component tests – standing up the component inside of Angular 2, and injecting collaborators via dependency injection, mocking external resources where appropriate
- End-to-end tests – standing up the entire web server and accessing the web client via Protractor or Selenium in order to test the system from the front-end to the back-end
We'll leave the end-to-end protractor tests for another time, and focus on unit and component tests in this post. Before we start, we should discuss the component we're about to test, the BlogRoll component.
The Component Under Test – BlogRoll
Our component under test is BlogRoll, which is contained in src/blog-roll/blog-roll.component.ts in our sample application. Here is a skeleton of the provided methods (See this link for the source on GitHub).
First, we start with the component definition and member variables. We hold onto an array of BlogEntry TypeScript class instances, and blog, which is any blog entry currently being edited within a portion of our template. Later on, we’ll see how we use the OnInit interface to bootstrap our component data. Here’s the class declaration portion and annotation:
@Component({
  selector: 'blog-roll',
  templateUrl: 'blog-roll.component.html',
})
export class BlogRollComponent implements OnInit {
  blogs: Array<BlogEntry>;
  blog: BlogEntry;
  editing: boolean = false;
We are going to use two services we’ve defined in advance – the BlogService, which will store and fetch our blog entries using HTTP, and a MarkdownService, which uses the Marked library to convert Markdown to HTML. We provide them as private member variables using TypeScript constructor injection:
  constructor(private blogService: BlogService,
                private markdownService: MarkdownService) { }
Next, we define a method to intercept the OnInit lifecycle event, which is triggered when the component is initialized but before the view is configured. It calls a method called loadBlogEntries which fetches the blog entries from our BlogService:
  ngOnInit() {
      this.loadBlogEntries();
  }
  loadBlogEntries() {
      this.blogService.getBlogs().subscribe(
          (data: Array) => {
              this.blogs = data;
          },
          (error: Object) => {
              console.log('error!', error);
          }
      );
  }
  ...
} // end of component
Let’s start here, and look at how we configure a unit and then component test to load our blog entries and verify that the service is being called.
Testing the load of blog entries with a pure unit test
We can simply test this component (so far) using pure Jasmine, forgetting the view layer and treating the component as a simple TypeScript class. For example, we can start with a mock of the blog service, and one of the markdown service:
class StubBlogService extends BlogService {
constructor() {
super(null); // satisfy the real BlogService's constructor
// we aren't using the Http service in our
// stub
}
getBlogs() {
return Observable.of([
{
id: 26,
title: 'The title',
contentRendered: 'Hi there
',
contentMarkdown: '*Hi there*'
}]);
}
}
class StubMarkdownService extends MarkdownService {
toHtml(text: string): String {
return text; // override the real markdown service
}
}
Then we can build our testing around those stubs. We simply use the two fakes as parameters in our constructor when building the BlogRollComponent:
describe('Blog Roll unit test', () => {
  let blogRoll: BlogRollComponent,
      blogService: BlogService,
      markdownService: MarkdownService;
  beforeEach(() => {
    blogService = new MockBlogService();
    markdownService = new MockMarkdownService();
    blogRoll = new BlogRollComponent(blogService, markdownService);
  });
  it('shows list of blog items by default - unit', () => {
   blogRoll.ngOnInit();
   expect(blogRoll.blogs.length).toBe(1);
   expect(blogRoll.blog).toBeUndefined();
   expect(blogRoll.editing).toBe(false);
  });
  ...
});
So, not that hard… We’ve provided the full test class at our github repo so you can see how other calls are done.
Component Testing with the Angular TestBed
Our main focus for this article is how to test Angular components in-container. The Angular team has provided a test framework API called the TestBed, which we began covering in our prior article when we asked it to boot our services for testing. Now we’ll look at configuring a test bed for our components, and we’ll include wirings to provide fake HTTP results. Also, since our Markdown Service isn’t doing much other than calling a utility API, we’ll inject the real service for the purposes of this test.
Setting up the TestBed
Our test bed is configured in a beforeEach block. We’re also using the async test function to ensure all of our creation operations are complete before we run the test itself. Here is the test declaration:
describe('Blog Roll Component...', () => {
  let mockBackend: MockBackend;
Our backend will be configured by the beforeEach method, which uses our TestBed again. This time, we’re providing delcarations, which list the components we want to provide to our tests. Comments in the content below:
  beforeEach(async(() => {
    // configure the module, which we fetch
    // later with getTestBed():
    testBed.configureTestingModule({
      // begin with our angular components
      declarations: [
        blogRollComponent,
        blogEntryFormComponent
      ],
      // next, provide our services. we'll inject
      // the real markdown and blog services, and
      // a fake http backend similar to what we
      // showed in our earlier blog entry about
      // testing services:
      providers: [
        MarkdownService,
        BlogService,
        MockBackend,
        // this sets defaults for http requests,
        // including content types and accept headers
        BaseRequestOptions,
        // our http mock - this must be provided
        // exactly as shown
        {
          provide: Http,
          deps: [MockBackend, BaseRequestOptions],
          useFactory:
            (defaultOptions: BaseRequestOptions,
                    backend: XHRBackend) => {
                 return new Http(backend, defaultOptions);
               },
             deps: [MockBackend, BaseRequestOptions]
        }
      ], // end providers
      // now, list our imported modules - we'll be testing
      // a component (BlogEntryComponent) that provides a
      // form, so we need the FormsModule, and we are
      // using the HttpModule to provide our mock Http
      // service
      imports: [
        FormsModule,
        HttpModule
      ]
      });
Finally, we boot our test bed by compiling the templates of our components, making them ready to inject into our tests:
    TestBed.compileComponents();
  }));  // end beforeEach
An initial test – loading our blog entries
Now, we can test the startup of our components – which should provide an array of blog entries from the mock HTTP service. The test uses the getTestBed() method of Angular 2 to fetch the test bed, then uses the createComponent function to ask Angular to create a test fixture. The fixture contains an ElementRef called nativeElement that we can use to introspect the page content, and a componentInstance property that represents the Angular 2 TypeScript class for the running component itself. Comments inline:
it('contains list of blog items by default', () => {
// ask the test bed to configure the components, and in a promise
// provide the rest of our test. Any failure that causes the promise
// to fail (a failed test expectation) will fail the test.
getTestBed().compileComponents().then(() => {
// get a reference to the mock backend so we can respond with
// fake data when it is fetched with Http.get
let mockBackend = getTestBed().get(MockBackend);
// provide the fake response (connection is an observable that
// notifies the subscriber every time a request becomes pending
// and allows the subscriber to respond with a fake answer)
mockBackend.connection.subscribe(
(connection: MockConnection) => {
// our fake response:
connection.mockRespond(new Response(
new ResponseOptions({
body: [
{
id: 26,
title: 'Article Title...',
contentRendered: 'Hi there
',
contentMarkdown: '*Hi there*'
},
{
id: 97,
title: 'Article2 Title...',
contentRendered: 'Another blog entry
',
contentMarkdown: '*Another blog entry*'
}]
})
));
} // end of subscribe onNext method
);
// now, ask the test bed to create our BlogRollComponent
let fixture: ComponentFixture<BlogRollComponent> =
getTestBed().createComponent(BlogRollComponent);
// there is no web browser, we must feed the lifecycle methods to it
// so we access the "component" under test using componentInstance
// and call the lifecycle method
fixture.componentInstance.ngOnInit();
// cause the Angular framework to detect any changes to the component
fixture.detectChanges();
// now check the basic component state - we aren't editing a
// blog entry yet, so we are only showing the blog roll
expect(fixture.componentInstance.editing).toBe(false);
expect(fixture.nativeElement
.querySelector('#blog-editor-panel') === null).toBe(true);
expect(fixture.nativeElement
.querySelector('#blog-roll-panel') === null).toBe(false);
// and since we've loaded the data, check to see what the data is
// within the content - for that we use the fixture's
// code nativeElement to access the DOM nodes via a query selector.
let trs = fixture.nativeElement.querySelectorAll('tr.rows');
expect(trs.length).toBe(2);
let tdTitleContent = trs[0].cells[1].textContent;
let tdRenderedContent = trs[0].cells[2].textContent;
expect(tdTitleContent).toContain('Article Title...');
expect(tdRenderedContent).toContain('*Hi there*');
});
}));
If this feels like JUnit testing in Java or like Ruby's RSpec to some degree, it is because now we're really able to create classes derived from our components to mock, and wire them up as fake collaborators to our component in much the same way.
Let's try another test method.
Triggering a New Blog Entry State
Now we'll force a new blog entry state – in the component's UI (which we haven't discussed yet) we will click an icon that tells the user interface to create a new blog entry. This click should call the newBlogEntry() method of the component, which should flip a editing flag and create a new BlogEntry value named blog. This new value will be used by the user interface to bind fields to a data entry form.
Here is the template area we will focus on from the BlogEntry component:
<blog-entry-form *ngIf="editing"
                 [blog]="blog"
                 (submitted)="saveOrUpdate($event)"
                 (cancelled)="refresh()"></blog-entry-form>
<div class="row" *ngIf="!editing">
   ...
</div>
<
We are showing a child component, BlogEntryFormComponent, if our BlogRoll component flips the editing flag to true. But if it is set to false, we show the class that contains our blog roll itself. In this way, our component can flip/flop between editing and viewing modes and show either a list or a form.
Here is the test method.
  it('should show blog editor div when New is clicked...', () => {
    let testBed = getTestBed();
    // Externalize building test data calls
    mockBackendFunctions(testBed);
    let fixture: ComponentFixture<BlogRollComponent> =
                 getTestBed().createComponent(BlogRollComponent);
    // fire up the component
    fixture.componentInstance.ngOnInit();
    fixture.detectChanges();
    // trigger the 'new button' link and swap visible panels
    fixture.nativeElement.querySelector('a#new-blog-entry').click();
    // process the click event
    fixture.detectChanges();
    expect(fixture.componentInstance.editing).toBe(true);
    expect(fixture.nativeElement
                  .querySelector('blog-entry-form') === null).toBe(false);
    expect(fixture.nativeElement
                  .querySelector('#blog-roll-panel') === null).toBe(true);
  });
We’ve externalized the backend mocks to another method, so we can focus on viewing the code. Here is a mock backend method that handles several different potential AJAX calls:
function mockBackendFunctions(testBed: TestBed) {
mockBackend = testBed.get(MockBackend);
mockBackend.connections.subscribe(
(connection: MockConnection) => {
let isBlogListSearch =
connection.request.url &&
connection.request.method === RequestMethod.Get &&
connection.request.url.match(/\/server\/api\/blogs/) &&
connection.request.url.match(/\/server\/api\/blogs/)
.length === 1 ? true: false;
let isBlogSingle = connection.request.url &&
connection.request.method === RequestMethod.Get &&
connection.request.url.match(/\/server\/api\/blogs\/26/) &&
connection.request.url.match(/\/server\/api\/blogs\/26/)
.length === 1 ? true: false;
let isDeleteBlog = connection.request.url &&
connection.request.method === RequestMethod.Delete &&
connection.request.url.match(/\/server\/api\/blogs\/26/) &&
connection.request.url.match(/\/server\/api\/blogs\/26/)
.length === 1 ? true: false;
if(isBlogListSearch) {
connection.mockRespond(new Response(
new ResponseOptions({
body: [
{
id: 26,
title: 'Article Title...',
contentRendered: 'Hi there
',
contentMarkdown: '*Hi there*'
},
{
id: 97,
title: 'Article2 Title...',
contentRendered: 'Another blog entry
',
contentMarkdown: '*Another blog entry*'
}]
})
));
}
if (isBlogSingle) {
connection.mockRespond(new Response(
new ResponseOptions({
body: {
id: 26,
title: 'Article Title...',
contentRendered: 'Hi there
',
contentMarkdown: '*Hi there*'
}
})
));
}
if (isDeleteBlog) {
connection.mockRespond(new Response(
new ResponseOptions({
body: { },
status: 201
})
));
}
});
}
The rest of the methods in the test class are a variation on a theme. Check out the blog-roll.component.spec.ts for the full spec and blog-roll.component.ts for the full component source. It’s not completely perfect at the moment, but will improve over time, and the tests all pass.
What is detectChanges()?
Like Angular 1 before it, Angular 2 must resolve differences between the model and view. At runtime, this is automatic. But in our tests, we are given a method to take our next turn down the view resolution superhighway. It's the method called detectChanges() on our fixture. This is what calls our ngOnInit() method for us during startup, and processes our click event and updates the view when the component makes state changes.
Angular 2 is much faster than Angular 1 in terms of updating the user interface and binding data to the model, primarily because data flows in a single direction (downward in the DOM nodes) and events flow upward in response. This is very similar to how React processes changes. In addition, the Angular 2 team has implemented the Shadow DOM for CSS stability, and has also even divorced the rendering from the rest of the system, so that developers can take advantage of loading data via Web Workers and so Angular can only render when it absolutely has to. This is all very powerful.
Test Bed and ComponentFixture Recap
The general pattern to stand up a component test is as follows:
- Define a TestBed by calling the static method
configureTestingModule. - Start a test method and request the test bed by calling
getTestBed()from the Testing module - Ask the test bed to compile the component definitions with
compileComponents() - Inject the components by calling
testBed.createComponent(ComponentClassName) - Set properties and call methods on the component’s class with the
fixture.componentInstanceproperty - If needed, move the change detection forward with
fixture.detectChanges() - Ask the
fixturefor anativeElementproperty and check the data on the DOM using a query selector
Remember, the ComponentFixture returned from TestBed.createComponent is your component under test, with several additional properties and methods:
detectChanges()– force a walk of the data graph and update the view with relevant content, and vice versa. This is a top-down one-time process, similar in result to the Angular 1$scope.$digest()function but much fastercomponentInstance– the actual component under test – you can call methods of the component herenativeElement– the DOM element of the template your component owns
The TestBed was added around RC4 or RC5, and is the preferred method of testing components and services in the container.
Review
We've talked about how to create tests against components using both familiar pure unit tests, and via the TestComponentBuilder class, and how it creates a test fixture object that wraps the view and component data. We discussed how to check HTML values via the DOM element property, nativeElement and how to interrogate properties and call methods of the component instance via the componentInstance property.
You can find the code for this post on GitHub, which includes a more comprehensive set of tests for the BlogEntry component at https://github.com/krimple/angular2-unittest-samples-release.